How to Disable or Enable AutoPlay in Windows
Windows 10’s AutoPlay is a neat function if you know how to use it effectively – it enables you to choose default actions for different kinds of media that you insert or plug into your PC.
You can use AutoPlay to set default behaviors for content types like music, videos, and photos but you can also set behaviors for media types like DVDs, cameras, and phones. AutoPlay eliminates the need to reselect preferences – for example, if you use AutoPlay to select an app that will automatically deal with your photos, you won’t have to make the same choice the next time this scenario repeats.
However, security researchers have warned that setting AutoPlay behaviors that are too loose might leave your system exposed to vulnerabilities. Because of this, it’s important to know that you always have the option to disable the AutoPlay function and make the choices manually whenever the need arises.
Aditional Considerations
- AutoPlay notifications will only be displayed if AutoPlay is turned on and you connect a device, media or another type of content that has been previously established as default (by choosing Choose a default or Ask me every time).
- It’s possible to turn off AutoPlay for specific media by choosing to Take no action as the default.
- AutoPlay only knows how to show non-storage devices (phones, digital cameras, etc.). This means that AutoPlay won’t manage USB flash drives and other external drives.
- You can force the opening of an AutoPlay notification by pressing and holding the Shift key while you plug in or insert media into your PC.
If you’re looking for a way to disable or enable AutoPlay on Windows 10, the methods in this article will help. Below you have a collection of methods that other users in a similar situation have used to either disable or enable AutoPlay on Windows 10. Keep in mind that each method will help you accomplish the same thing, so feel free to follow whichever method seems more convenable to your particular situation.
Method 1: Turning AutoPlay On or Off via the Settings Menu
The easiest way to either enable or disable AutoPlay is via the Windows 10 Settings menu. Keep in mind that following the steps below will override any AutoPlay preferences that you might have set previously.
Note: If you want to enable this Autoplay, you should stick to this method since it will enable you to also choose AutoPlay defaults without actually plugging different types of content.
Here’s a quick guide on how to disable and enable AutoPlay via the Windows 10 Settings menu:
- Press Windows key + R to open up a Run box. Then, type “ms-settings:autoplay” and hit Enter to open the AutoPlay tab of the Devices section inside the Windows 10 Settings menu.

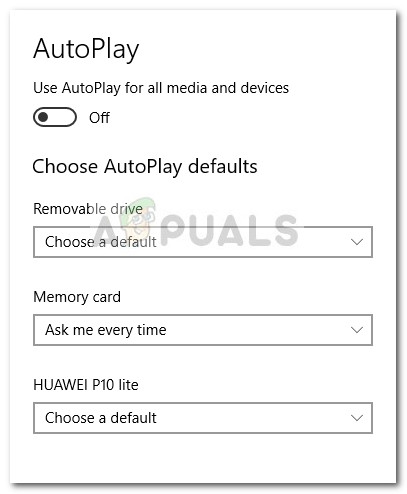
- In the AutoPlay section, enable or disable the toggle under Use AutoPlay for all media and devices to turn the feature On and Off.
- If you wish to enable AutoPlay, you can take advantage of this screen by changing the defaults of under Choose AutoPlay Defaults: Removable drive, Memory card other devices that you might have plugged in.”
- Once AutoPlay rules have been altered, they will take effect immediately, so there’s no need to reboot your computer.
Method 2: Disabling or Enabling AutoPlay via Control Panel
Another way to disable or enable AutoPlay is via a Control Panel menu. If you’re looking for a method that will enable Autoplay and allow you to do a fair ammount of customization to the default behavior, this method is without a doubt your best choice.
Here’s a quick guide on how to turn AutoPlay On or Off using Control Panel:
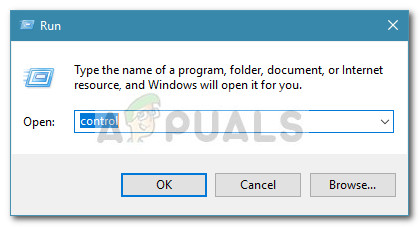
- Open a Run box by pressing Windows key + R. Then, type “control” and hit Enter to open Control Panel.
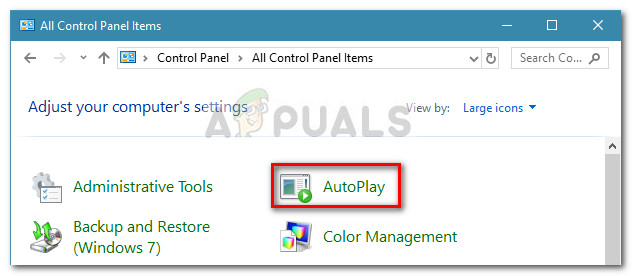
- Inside Control Panel, change the View by drop-down menu to Small Icons or Large icons, then click on AutoPlay.
- In order to disable AutoPlay, uncheck the box associated with Use AutoPlay for all media and devices and hit the Save button.
- If you wish to enable AutoPlay for all devices and media, you can check the box associated with Use AutoPlay for all media and devices and hit the Save Button.
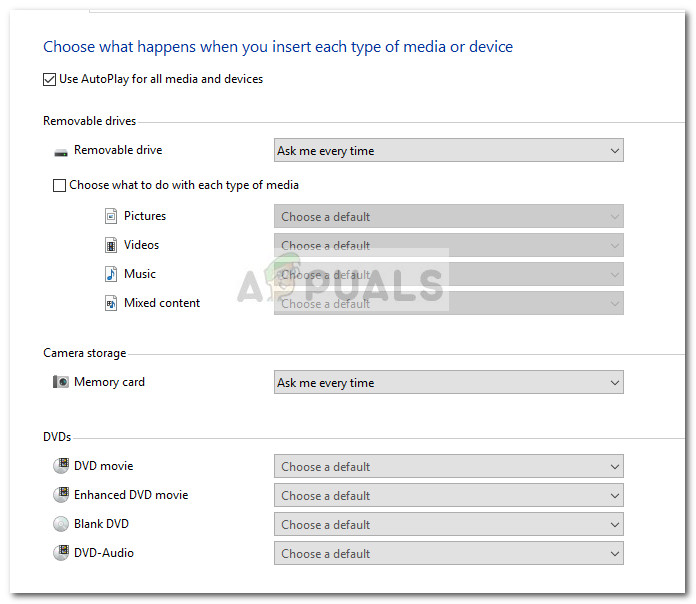 Note: Additionally, you can select default actions based on devices or media by using the various drop-down menus below. If you wish to reset the AutoPlay behavior to the default, scroll all the way down and click on the Reset all defaults button.
 - That’s it. The modifications will take effect as soon as you hit the Save button, so there’s no need to reboot your computer.
Method 3: Disabling or enabling AutoPlay using Registry Editor
If you’re looking for the most technical approach, definitely go for this Registry Editor hack that will enable to disable or enable AutoPlay. But keep in mind that this method is the equivalent of a basic ON and OFF switch, which means you won’t be able to configure the default behavior or reset it.
Here’s a quick guide on how to enable or disable Autoplay via Registry Editor:
Warning: Keep in mind that operating other changes via Registry Editor might affect the overall health of your PC. In order to avoid any unpleasantries, make sure that you follow step 2 where we backup the registry in order to ensure a fail-safe method.
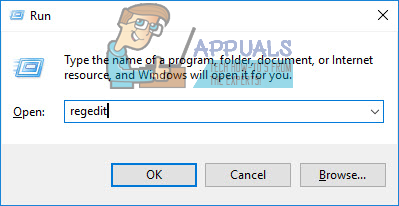
- Press Windows key + R to open up a Run box. Then, type “regedit“, hit Enter and then click on Yes at the UAC (User Account Control) prompt to open Registry Editor with administrative privileges.
- Inside Registry Editor, use the ribbon at the top to select File > Export. Then, choose a name and a location for the Registry backup and hit the Save button.
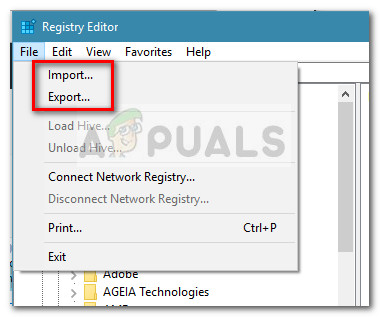 Note: In case anything goes wrong, go to File > Import and select the backup that you previously created to restore the Registry to a healthy state.
 - Using the left pane of Registry Editor, navigate to the following location: HKEY_CURRENT_USER \ Software \ Microsoft \ Windows \ CurrentVersion \ Explorer \ AutoplayHandlers
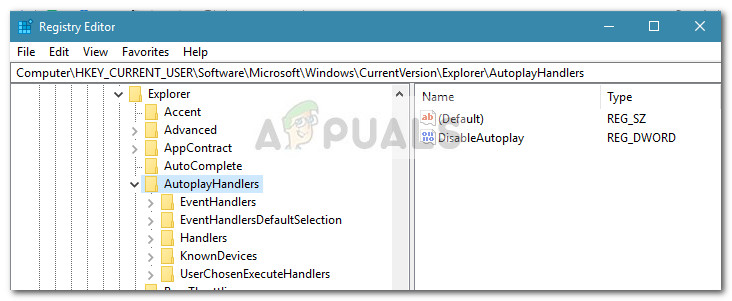
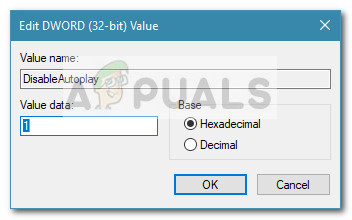
- Next, move over to the right pane and double-click on DisableAutoplay. In the DisableAutoPlay window, set the Value data to 0 in order to enable AutoPlay or set it to 1 in order to disable AutoPlay.
 Note: If you can’t find a DisableAutoplay value inside the previously specified location, you need to create it yourself. To do this, right-click on AutoplayHandlers key and select New > Dword (32-bit) Value Data and name it DisableAutoplay.
 - Close Registry Editor and reboot your computer in order to force the changes to take effect. At the next startup, AutoPlay will be enabled (or disabled).
Method 4: Disabling or Enabling AutoPlay via Local Group Policy Editor (if applicable)
Another way to turn AutoPlay On or Off is via the Local Policy Editor. But keep in mind that Local Group Policy Editor is only available in Windows 10 Pro, Windows 10 Enterprise, and Windows 10 Education versions. This method is to be preferred if you’re trying to enforce a rule that will apply to all users that are using the machine.
If this method is applicable, follow the steps below to either enable or disable AutoPlay by using the Local Group Policy Editor:
- Press Windows key + R to open up a Run box. Then, type “gpedit“, hit Enter and click the Yes button at the UAC (User Account Control) prompt to open the Local Group Policy Editor with administrative privileges.

- Using the Left pane of the Local Group Policy Editor, navigate to the following location: Computer Configuration \ Administrative Templates \ Windows Components \ AutoPlay Policies.
- With the AutoPlay Policies folder selected, move to the right pane and double-click on Turn off Autoplay. If you wish to enable Autoplay, set the toggle to Disabled or Not Configured and hit OK. If you want to disable Autoplay, set the toggle to Enabled and hit OK.
- Close Local Group Policy Editor and reboot your computer to force the changes to take effect.


