How to Delete the windows.old folder on Windows?
Some users have been complaining of the inability to delete the Windows.old folder. This is an extremely common problem with users that have recently upgraded to Windows 10 from a previous OS version or after applying the Windows 10 Anniversary update.

Note: When users try to delete the Windows.old folder in the first month after the upgrade, they are greeted by a Folder Access Denied error signaling that they don’t have the necessary permissions to delete the folder.
Depending on the previous versions and your computer specs, the Windows.old folder can end up hogging a lot of precious space. This is precisely why most users are looking for ways to delete it.
Keep in mind that this is by no means a bug or a sign of a malfunctioning Windows. In fact, it’s standard Windows behavior to create the windows.old folder and prevent it from being deleted to serve as a backup plan in case the user wants or needs to go back to the previous version.
What is the windows.old folder?
During an upgrade, the old files from your previous OS won’t get automatically deleted. There are a lot of things that can go wrong during the upgrade process and users are not always happy with the changes implemented with the new OS version.
This is where the Windows.old folder comes in – it serves as a backup plan in case, for some reason or another, the old operating system files need to be restored. The windows.old folder holds a collection critical OS files that are needed if the old Windows version will need to be restored.
With this in mind, if you aren’t pressed for space, there are very few reasons why you should start looking for ways to get rid of the windows.old folder. Keep in mind that Windows 10 is programmed to automatically delete the Windows 10 folder exactly one month after you performed the update.
Deleting the windows.old folder manually
If you’re heavily pressed by space and you can’t afford to wait one month until Windows 10 will automatically delete the Windows.old folder, you can also delete it yourself manually.
Note: If you’re still thinking about downgrading Windows 10 to the previous version, do not delete the Windows.old folder as you’ll lose the ability to downgrade.
Below you have a collection of methods that have helped other users in a similar situation to delete the Windows.old folder. Please follow whichever method seems more approachable based on your particular scenario and tech skills.
Note: Keep in mind that while the first three methods are extremely intuitive, most of them won’t be effective in case a badly written driver is preventing the deletion. If you consider yourself a tech-savvy person, follow one of the last three methods for the best results.
Method 1: Deleting the windows.old folder via Disk Cleanup
This first method is definitely the most user-friendly one out of the bunch since it’s all done through the Disk Cleanup interface.
However, some users report that this method wasn’t applicable in their situation or that the Disk Cleanup utility didn’t manage to delete all the files inside the Windows.old folder. Most reports are signaling that the utility might leave some leftover files inside the Windows.old (under 1 GB). Luckily, those can be deleted the old-fashioned way.
Here’s a quick guide to using Disk Cleanup to delete the Windows.old folder:
- Press Windows key + R to pop open a Run Window. Then, type “cleanmgr” and hit Enter to open the Disk Cleanup utility.

- In the Disk Cleanup window, select the Disk Cleanup tab and check the box associated with Previous Windows installation(s).
 Note: You can also check other entries if you’re severely struggling to open up new free space.
 - Hit Ok to start the cleanup process and wait until it’s completed. Next, return to the location of Windows.old ( it’s in C:\ by default) and see if the folder has been removed. If it still has some leftover files, right-click on it and choose Delete to remove it.
In case this method was not applicable, move over to Method 2.
Method 2: Deleting Windows.old from Storage settings
Another way to delete the Windows.old folder without getting too technical is by using the Storage Settings. This method makes use of the new and improved Windows 10 Settings wizard.
Here’s a quick guide to deleting the Windows.old folder from the Storage settings:
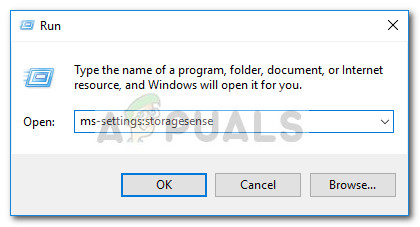
- Press Windows key + R to open up a Run command. In the Run command, type “ms-settings:storagesense” and hit Enter to open the Storage screen.
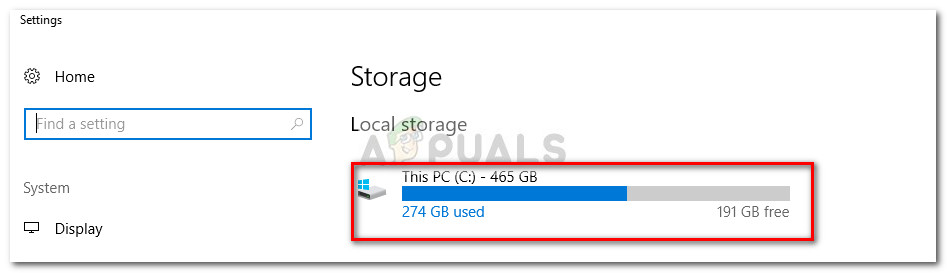
- On the right side, click on your C drive (or the drive letter that holds your Windows files).
- At the next screen, click on Temporary Files.
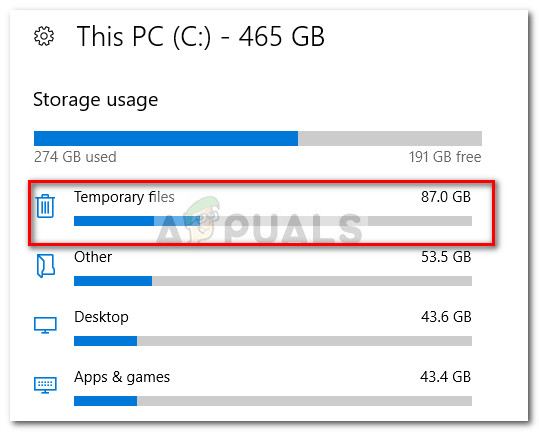
- Under Remove temporary files, check the box associated with Previous version of Windows, then click on Remove files.

- Wait until the process is finished, then you can safely close the Settings window. Finally, reboot your computer and see if the Windows.old folder is removed. If it isn’t, move down to the methods below.
Method 3: Deleting the Windows.ord folder via Storage Sense
This is the final method that will allow you to remove the WIndows.old folder without getting technical. But keep in mind that the Storage Sense settings will only become visible if you have Windows 10 build 16226 or older.
Here’s a quick guide to using the Storage Sense settings to remove the Windows.old folder from your system:
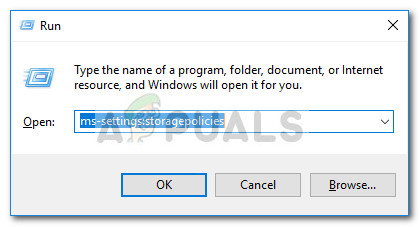
- Press Windows key + R to open up a Run box. Then, type “ms-settings:storagepolicies” and hit Enter to open the Storage Sense settings.
- In the Storage Sense settings, scroll down to Free up space now and check the box next to Delete previous versions of Windows.
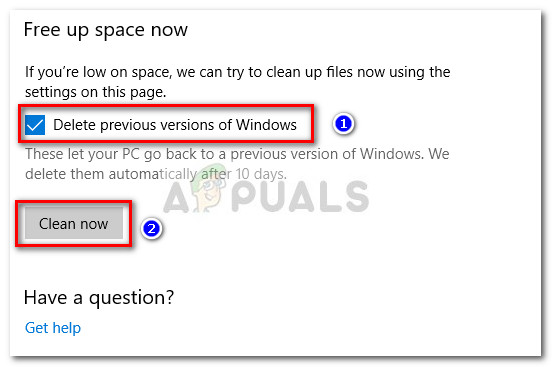
- Hit the Clean now button and wait for the process to complete. Once the process is complete, reboot your PC and see whether the Windows.old folder has been removed.
If you’re still seeing the Windows.old folders and still can’t remove it by deleting it conventionally, move down to more advanced ways of deleting it.
Method 4: Deleting Windows.old folder after claiming ownership
Most users that have been struggling with this issue for a while have finally managed to remove the Windows.old folder after claiming ownership of it.
Here’s a quick guide on how to claim ownership of the Windows.old folder in order to be able to delete it:
- Right-click on the Windows.old folder and choose Properties.
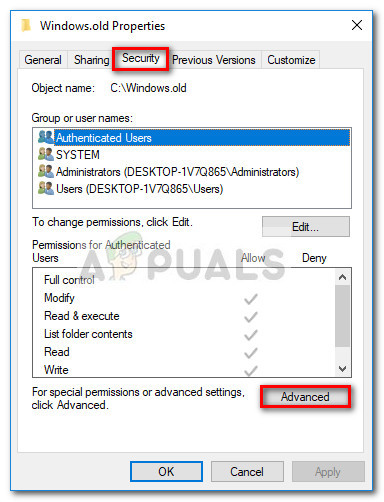
- In Windows.old Properties, go to the Security tab and click on Advanced.
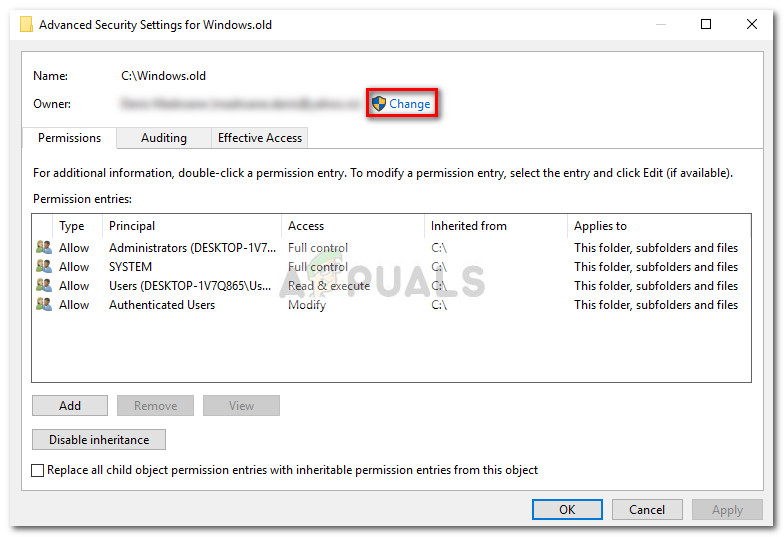
- Next, hit the Change button on the newly appeared box.
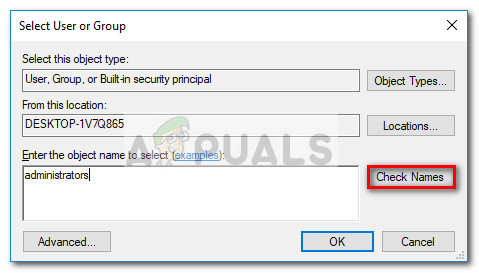
- In the Select User or Group window, type “administrators“, then click the Check Names button. Once the name has been identified, hit OK to close the Select User or Group Window, then hit Apply at the Advanced Security Settings for Windows.old window.
- Next, return to the Security tab and click the Edit button. Then in the Permissions for Windows.old folder, check the Allow box associated with Full Control, then hit Apply.
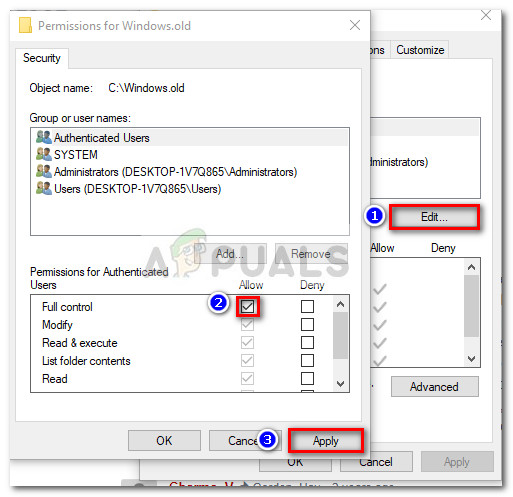
- Now that you took full ownership of the folder, you should be able to delete Windows.old conventionally. Simply right-click on it and choose Delete or use the keyboard button.
If you’re still prevented from deleting the folder, move down to next method.
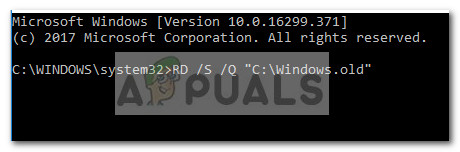
Method 5: Deleting Windows.old in an Elevated Command Prompt
This method involves using an elevated command prompt in order to delete the windows.old folder with administrative privileges. Although it requires a certain degree of technical knowledge, the steps below can be followed quite easily and a result is extremely probable.
Here’s a quick guide to opening an elevated command prompt and using it to delete windows.old:
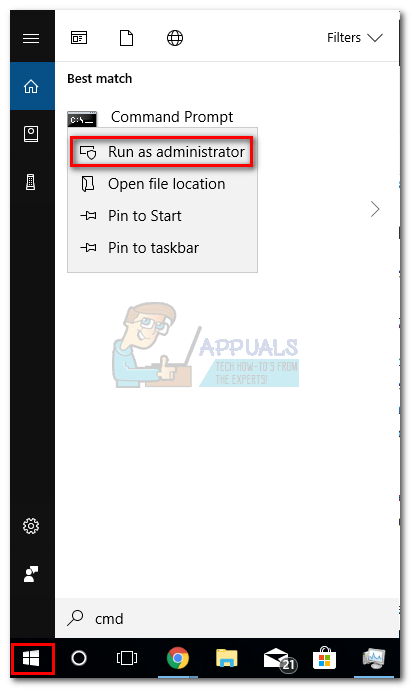
- Acess the Start menu and search for “cmd“. Then, right-click on Command Prompt and choose Run as Administrator.
- In the elevated Command Prompt, type or copy the following commands and press Enter after each one:
takeown /F “C:\Windows.old” /A /R /D Y
icacls “C:\Windows.old” /grant *S-1-5-32-544:F /T /C /Q
RD /S /Q “C:\Windows.old”
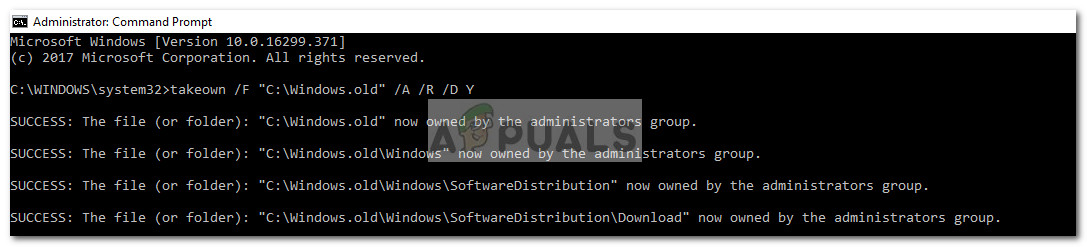 Note: Keep in mind that if you have a different OS drive, you’ll need to replace the “C” from the commands above with the right letter.
 - Once all commands have been properly introduced and applied, you can safely close the elevated command prompt. See whether the method has been successful by seeing if Windows.old has been removed.
If the method wasn’t successful in removing the Windows.old folder or if you got an error after inserting the last command, move over to the Method below.
Method 6: Deleting Windows.old Folder from Advanced Options
If an elevated command prompt wasn’t enough to acquire the necessary permissions to delete the Windows.old folder, using a Command Prompt at boot might just do the trick.
In order to follow the steps below, follow this guide (here) to access the Advanced Options of Windows 10, then click on Command Prompt.
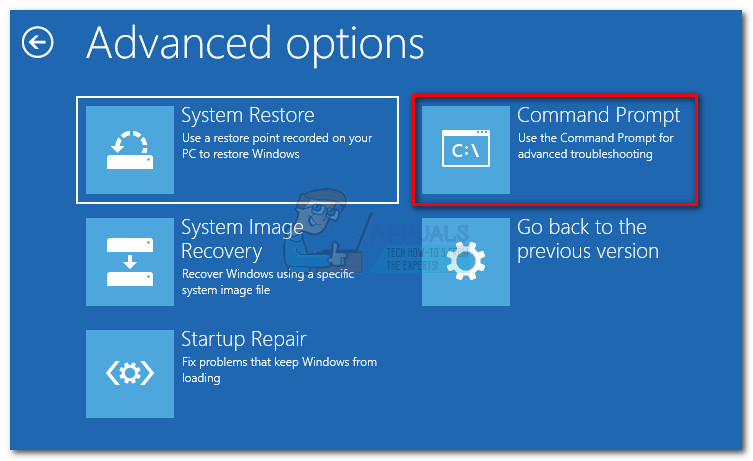
Once you’ve successfully entered Command Prompt during boot, follow the steps below to delete the Windows.old folder:
- In the Command Prompt window, type the following command and press Enter to apply it:
RD /S /Q “C:\Windows.old”
 Note: Remember to replace the letter “C” with a different one if you have a custom location for your OS.
 - Once the command has been successfully applied, close the Command Prompt and hit Continue to start your operating system normally. Once the startup is complete, navigate to the location of windows.old and see if it’s now removed.
If this method wasn’t effective, most likely the deletion is prevented by a badly written driver. In such a case, the user has little choice but to wait for the one month period to pass when Windows will automatically remove the Windows.old folder.


Thanks! Method 5 worked perfectly.