How to Delete System Error Memory Dump Files
When your system runs into some error (like BSOD), it collects a copy of your computer’s memory at the time of the crash to help diagnose what caused the discrepancy. There are many types of memory dumps your computer makes to help in the debugging process:
- Complete memory dump: This is the biggest type of memory dump possible. This contains a copy of all the data used by your operating system in the physical memory. So for example, if you have an 8GB of RAM and Windows was using 4GB at the time of the crash, the memory dump will be of 4GB.
- Small memory dump (256 Kb): this is the smallest memory dump and contains very little information. It is helpful in identifying the error but is useful when trying to debug a problem.
- Kernel memory dump: This memory dump is 1/3rd the size of your physical memory. It only includes the memory allocated to the Windows Kernel and hardware abstraction level. This also includes the memory allocated to kernel-mode drivers and other kernel-mode programs.
- Automatic memory dump: This contains the exact same size of memory of Kernel memory dump.
Windows saves all these memory dumps in form of System Error Memory Dump files in your local disk C. The disk cleanup utility can be used to delete these files and make the storage usable. These dumps can accumulate over time and even reach the size of 100GB. However, many users reported that the disk cleanup utility failed to delete the required files.
There are many solutions to tackle this problem. One is to use elevated disk clean-up or execute commands through the command prompt. Follow the solutions listed below.
Solution 1: Using Elevated Clean-up
We can try using the elevated clean-up utility to clear the memory dumps in your system. If the memory dump in your system is in the process to be analyzed or waiting to be taken action onto, you might not be able to clear it using the normal clean-up utility.
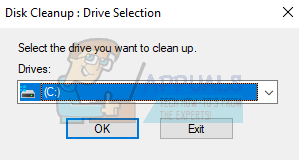
- Press Windows + S to launch the search bar. Type “disk cleanup” in the dialogue box.
- Right-click on the result which comes forth and select “Run as administrator”.
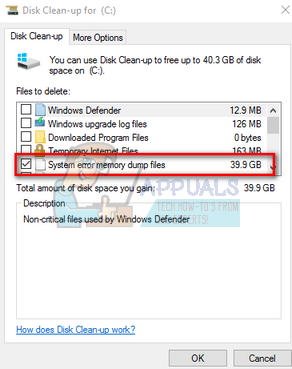
- You a small window will pop up asking you to select the drive you want to clean up. Select local disk C (if that’s where your operating system is installed) and press OK.
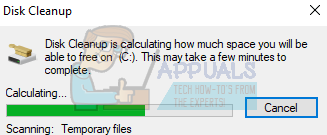
- Windows will now scan through the files and check how much space can be freed.
- Check all the boxes which you want to remove and press Ok. Windows will now clear your memory and allocate free space to your drive. Check if this method worked by opening the disk cleanup again or checking the free space on your disk drive.
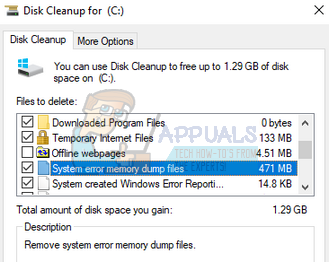
Note: Some users reported that the elevated cleanup and the normal cleanup had different values for System error memory dump files. If you see a larger value in the elevated versions, don’t worry. You can remove the files without any consequences.
Solution 2: Using Extended Disk Cleanup
We can try cleaning your dump files using the Extended Disk Cleanup utility. Unlike the normal one, it contains more options for you to choose from and gives you increased details (such as old versions of windows etc.) to choose from. Do note that you require an administrator account along with administrative privileges to use this solution.
- Press Windows + S to launch the search bar. Type “command prompt” in the dialogue box, right-click the result and select “Run as administrator”.
- Once in the command prompt, copy/paste the following command and press Enter.
cmd.exe /c Cleanmgr /sageset:65535 & Cleanmgr /sagerun:65535

- As you can see, there are various other options available in the extended disk cleanup. Select the ones you want to remove and press OK.
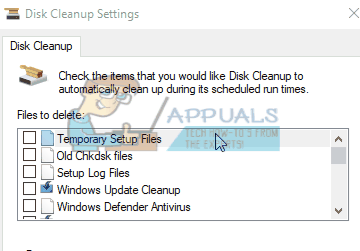
- Reboot your computer and check if this made a difference.
Solution 3: Deleting the dump files physically
If the above two solutions don’t work, we can try deleting the files physically. First, we will check the location where the dumps are being created, then navigate to the location via file explorer and delete the files manually.
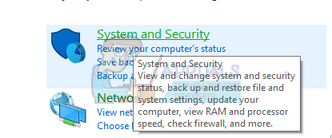
- Press Windows + R to launch the Run application. Type “control panel” in the dialogue box and press Enter.
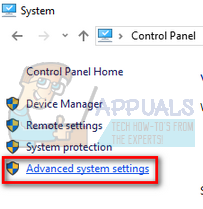
- Once in the control panel, select “System and Security”.
- Now navigate through the options until you find the category of “System”.
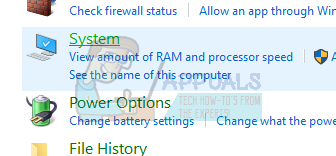
- Once in System, click “Advanced system settings” present at the left side of the window.
- Select “settings” under the tab of Startup and Recovery present at the bottom of the screen.
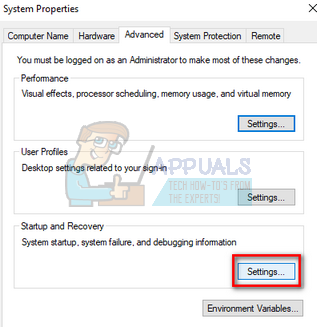
- As we can see in the Dump file dialogue box, the dump files are being saved in the system root folder. Click on the drop-down present on top (Automatic memory dump in this case); you will be able to select the type of dump files and check where each one of them is being stored.

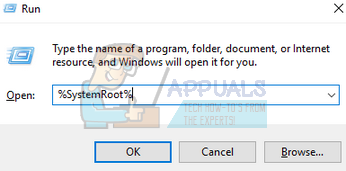
- Press Windows + R and paste the location of the dump file (erase the dump file name as we only want to navigate to the location).
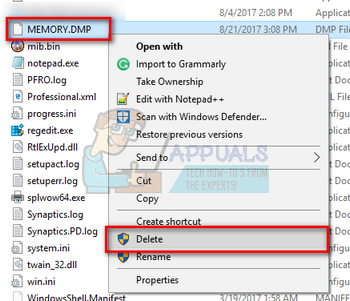
- Search for the file name (MEMORY.DMP) and delete You might require administrative privileges to perform this action.
Restart your computer and hopefully, the problem will be solved.
Solution 4: Disabling Indexing In Local Disk C
Indexing is a service in Windows which maintains the index of most of the files on your computer. This is primarily done to improve searches and file retrieval. The indexing is automatically and the index library is updated every once in a while.
However, many users reported that indexing was causing the problem. It was eating up space and wasn’t helpful in any way. Of course, each computer configuration might be different it isn’t necessary that this also applies to you. This solution is particularly helpful if space is occupied by an <unknown> object.
- Open your file explorer and navigate to “This PC”. Right-click on Local Disk C (or some other disk where you have installed your operating system) and click Properties.
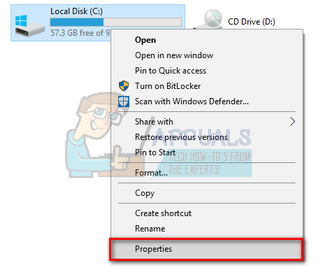
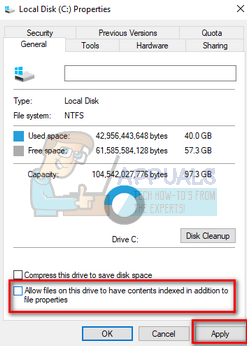
- Once the properties are opened, uncheck the option at the bottom which says “Allow files on this drive to have contents indexed in addition to file properties”. Press Apply to save changes and exit.
- Reboot your computer and check if the problem got solved.
Solution 5: Using WinDirStat to analyze space usage
WinDirStat is an open-source disk usage analyzer and cleanup software. The program scans the hard drive and displays the results in a colorful visualization for each used space. The advantage of using this tool is that you can get a clear concept about files that are consuming most of your disk space. It also features an option within its interface which allows you to delete the files from there. Download WinDirStat from the official website (be cautious while downloading from external links).
Note: Appuals doesn’t have any affiliations with any third-party programs. They are only listed for the benefit of the users. Install and use them at your own risk.
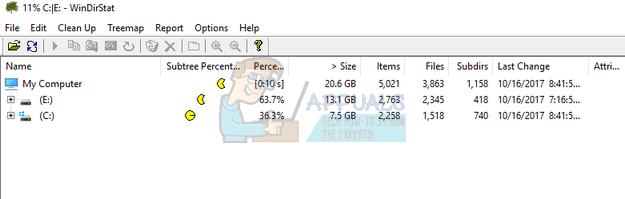
- After installing WinDirStat, open it. It will ask you which drives to scan; select all of them.
- The process of analyzing your drives can take several minutes as each and every file is looked upon and its space recorded. Wait patiently till the process is completed.
- After the analysis has completed, check for any dump files in your Local Disk C. In this case, there were two dump files (51 GB and 50GB) shown by two big blue blocks underneath. On the right side, we can see that these blue blocks stand for DUMP files.
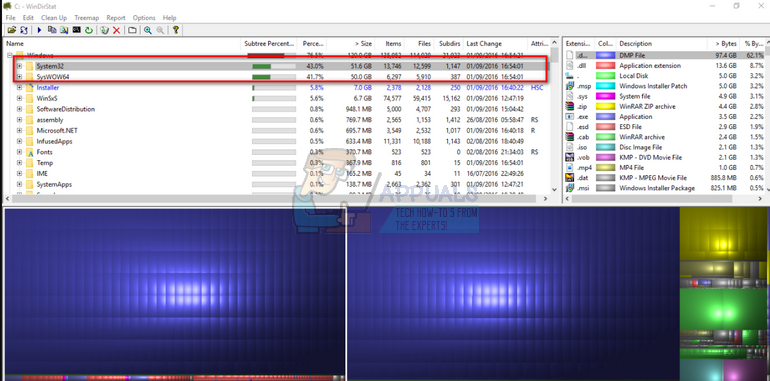
- Right-click on them and select “Delete (no way to undelete!)”. Restart your computer and check if the problem is solved.
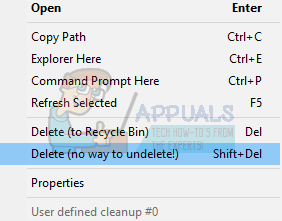
Note: Be careful while using this tool. Never delete items you don’t know about as you might accidentally delete system files which may render your PC unusable. In this case, we are only deleting DUMP which is of no use.
Solution 6: Executing some commands in Command Prompt
As a last resort, we can try executing some commands in an elevated command prompt and check if this frees any space. Do note that you require an administrative account to follow this solution.
- Press Windows + S to launch the search bar. Type “command prompt” in the dialogue box, right-click the result and select “Run as administrator”.
- Once in the command prompt, copy/paste the following commands one by one followed by an Enter.
fsutil usn deletejournal /d /n c:
chkdsk /scan
compact /CompactOs:never
winmgmt /salvagerepository
del “%temp%\*” /s /f /q
del “C:\$Recycle.bin\*” /s /f /q
del “%systemroot%\temp\*” /s /f /q
vssadmin delete shadows /for=c: /all /quiet
Dism /Online /Cleanup-Image /StartComponentCleanup /ResetBase
- Restart your computer and check if the problem at hand got solved.
nice