How to Connect Xiaomi Yeelight Devices to Android Without a Home Router
Using a 2nd Android Phone or Pocket WiFi
Xiaomi’s Yeelight series of smart home lighting devices are a great and affordable alternative to the more expensive Philips Hue – the bulbs are much cheaper than Philips Hue bulbs, and they don’t require a hub either, only a wifi network to connect to.
The problem people face is generally when they don’t understand exactly how home-based smart devices work, and it doesn’t help that there are many tutorial videos out there for the Yeelight series that fail to properly explain things. When looking at Yeelights online, you might believe that you can just add the devices to your phone and start controlling them, simple as that – and it’s a bit more complicated.
Yeelights devices require that when being added to the Yeelight app, the Yeelight devices are connected to the same WiFi network as the Android device – the problem here is that it cannot be the WiFi hotspot on the Android device being used to add the Yeelights!
See Also: How to Control Yeelight From a Windows PC
So if you’re someone who doesn’t actually own a home router and all you have is an Android device or pocket wifi, we’ve got you covered – in this guide, we will show you how to add Yeelight devices to Android without a router. We’ll then show you how to control the Yeelight from your Android hotspot by tricking the Yeelight into thinking its connected to the original WiFi used to add the device.
Requirements:
(You only need one of the below, not both)
- A 2nd Android device
- A pocket WiFi device
Because its really difficult to explain in words, here’s a quick diagram of what we’re doing:
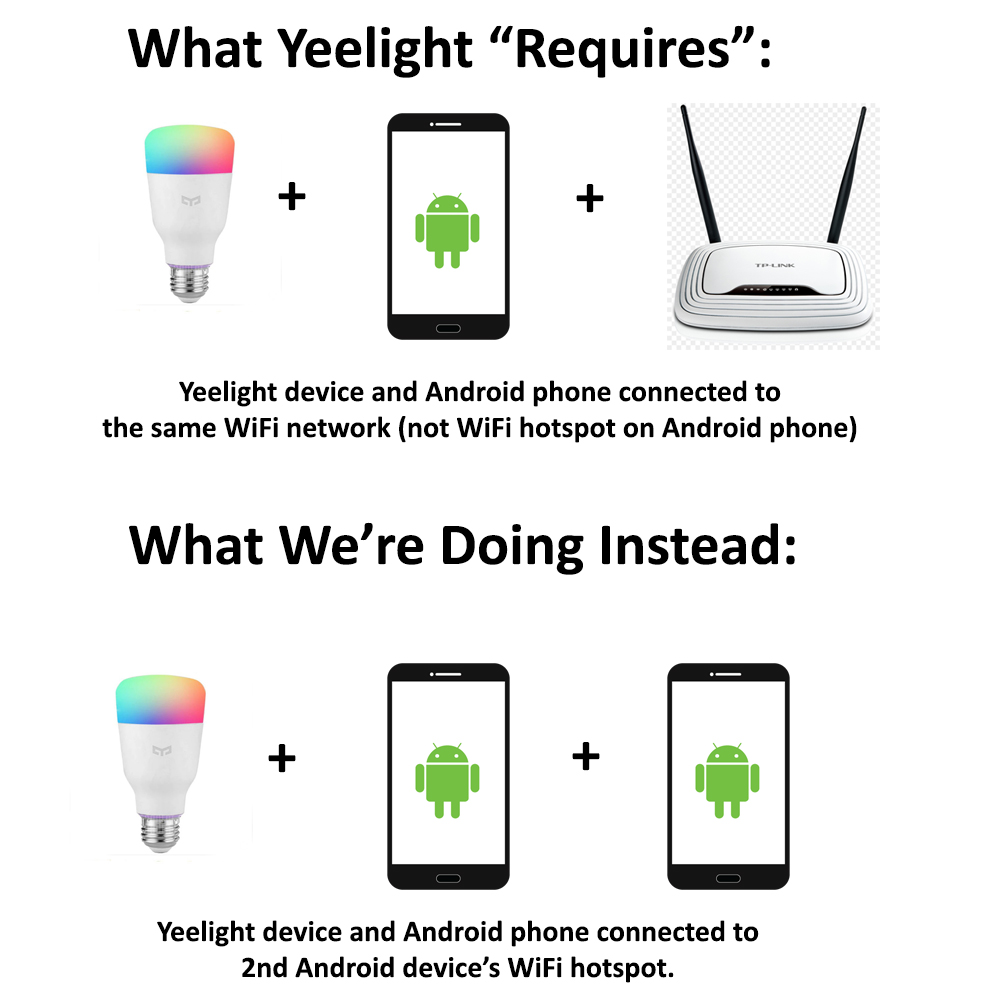
So as you can see in this illustration, in order to add Yeelight bulbs to the Yeelight app on your Android phone, the Yeelight bulbs and the Android device must be connected to an external WiFi network – it will not allow you to add devices to the Android app if the Yeelight is connected to the Android hotspot. We’re not sure exactly why it’s built this way, but it is.
So what we’re going to do is use the Android hotspot on a second Android phone (or mobile pocket WiFi device), and connect the Yeelight and first Android phone to that instead.
However, this is the very important part – you MUST rename your WiFi hotspot SSID and password to be the same as the one you used on the second Android phone!
So to accomplish this, follow these steps exactly in this order:
- Create a WiFi hotspot on the second Android device or mobile pocket WiFi, and give it an SSID / password you won’t mind using from now on.
- Open your WiFi on the first Android device, and connect to the hotspot you just created on the other.
- Launch the Yeelight app on the first Android device, and allow it to scan for nearby Yeelight devices.
- When it finds the Yeelight devices you want to add, enter the SSID / password of the WiFi network on the second Android device / pocket WiFi.
- After the Yeelight device has been successfully added to the Yeelight app, go ahead and play around with it and make sure it works.
- Now disconnect your first Android device from the WiFi hotspot, and create a new WiFi hotspot with the same exact SSID / password as the one you used on the other device.
Now when you open the mobile hotspot on your main Android device, the Yeelight bulb should connect to it and believe that its connected to the original WiFi network that you used to set this all up with!
You can now even download the Yeelight Toolbox software for PC, and connect your computer / laptop to your Android hotspot, and control the Yeelight bulbs from your PC! (You need to enable LAN Control for this to work).

To enable LAN control, just tap the Yeelight device inside the Yeelight app, then tap the downward arrow at the bottom right corner, and hit the “LAN Control” toggle switch.
Update: One Phone and Windows WLAN Method
We’re updating this article after discovering a new method, which only requires one mobile device, and creating a WiFi hotspot on your PC using a USB adapter (or Microsoft Virtual Wi-Fi Mini Port).
Create a WiFi hotspot on your mobile device, and allow your PC to connect to it.
Launch a command prompt (as administrator) on your Windows PC and type the following commands:
netsh wlan set hostednetwork mode=allow ssid=XXX key=XXX

netsh wlan start hostednetwork
In the ssid=XXX and key=XXX, you need to change the X’s to the exact same SSID and password of the mobile hotspot on your phone!
Now launch the Yeelight app on your mobile device, and go to Devices > Add Device.
Turn on the WiFi (this will disable hotspot) on your mobile device, and connect to the SSID being broadcast by your Yeelight devices.
Now in the menu where it asks for a WiFi network, enter the SSID and password of your mobile hotspot (which is also “cloned” on your PC).
Now when the Yeelight app starts updating, very quickly disable WiFi on your phone and enable hotspot. This will “trick” your Yeelights into connecting to your hotspot, while also seeing your mobile device on the WLAN, because your computer is also broadcasting the hotspot as a WiFi network.

After second windows command – “The hosted network couldn’t be started. The group or resource is not in the correct state to perform the requested operation.”