‘Configure and connect remotely on Windows Server using Radmin’
Remote Desktop access is one of the best technologies that exist out there. Having the ability to control a computer from almost anywhere is just mind boggling. There are tons of remote desktop applications available out there that are utilized for different purposes. One of the great things about this technology is you get to use a computer as if you were personally present there, in front of the computer. Having this capability while being miles away is incredible. There are so many use cases of the Remote Desktop technology that one could just go on and on about its different purposes. From being able to use your work computer while being at the comfort of your home to providing IT support to your employees and customers, the uses list of remote control software just goes on and on. However, that is not why we are here; to discuss the use cases.
One of the downsides of the remote desktop software is the security of the established connections. Most of the software or tools built for this purpose are often vulnerable to several exploits and your remote connection is not really secure. Hence, you are always on the edge of the sword. However, there exists a software that has been proved impenetrable in this department. Radmin is a secure remote access software that offers security and reliability to its customers. To establish a remote connection via Radmin, there are two main components required. Radmin Server and Radmin Viewer. The server is to be installed on the remote computer that you wish to access and the Radmin Viewer goes on your local PC. Hence, with the help of these tools, you can establish a connection to the remote computer.
Installing Radmin Server and Radmin Viewer
Before we get into the main topic and for you to be able to follow through, you will have to install Radmin Server and Radmin Viewer (download here) on your local and remote system. The installation process is very simple and does not require any configuring. Once you have downloaded the tool, extract the .zip file to any place of your liking. Make your way to the said place and then install the tools on their respective system.
How to Configure Radmin Server
Once you have installed Radmin Server on the remote PC, you will have to configure it. The configuration involves quite a few things but we will go through the most important and relevant things to make it easier. These include choosing a startup mode, IP filtering, setting up a password and more. So, without further ado, let’s get into it.
Choosing a Startup Mode
Once you install the server on the system, you will be prompted with the settings window of the Radmin Server. Here, you can do quite a few things, one of them being choosing a startup mode. Radmin Server can start automatically when the system boots up or you can choose to manually start it up whenever needed. Here’s how to choose a startup mode:
- On the Radmin Settings window, click on Startup mode.
- Choose either Automatic or Manual. If you wish it to be started automatically, go for Automatic otherwise choose Manual. Manual startup can improve overall security but in some cases, automatic is preferable so go for whatever you require.
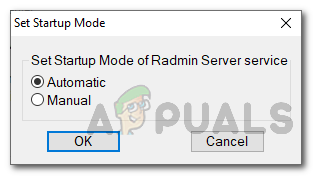
Startup Mode
Using Radmin Security
Using Radmin, you can even restrict the incoming remote connections to logins and passwords and thus specific users will be able to access the remote computer. For this purpose, you will have to add users to the Radmin Server. This will even strengthen the security of your remote connections. Here’s how to add a user:
- On the Radmin Settings window, click on Permissions.
- After that, click Permissions again in front of Radmin Security.

Radmin Security - On the new window the pops up, click Add User.
- Give the user a username and follow it up with a password. Once done, click OK.
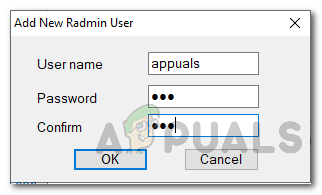
Adding User
IP Filtering
If you wish to restrict the incoming remote connections from a specific network, you can use the IP filter functionality of the tool. This will restrict the incoming connections to a specific IP or an IP address range. Here’s how to do it:
- On the Settings window, go to Options.
- On the left-hand side, click IP Filter and then tick the Enable IP Filter box.
- After that, click on Add to provide an IP address range.
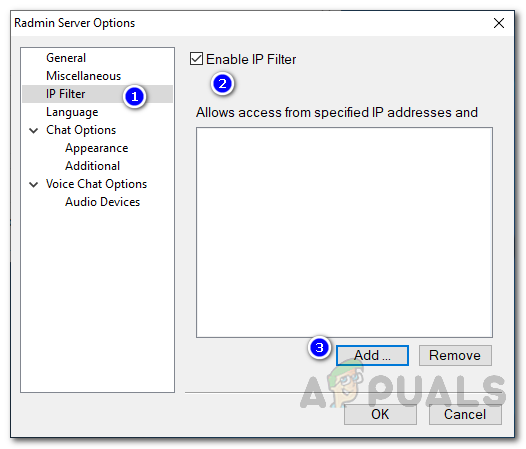
IP Filtering - You can either provide a specific IP or an IP address range. Once you have done so, click Add to restrict the access to the provided IP address/range.
Asking User Permission and Logging
On Radmin Server, you can configure it to ask the remote user permission every time you try to connect to the remote computer. Other than that, you can also have the server create log files whenever any error occurs so you can know what is causing the issue. Here’s how to set this up:
- On the Radmin Settings window, go to Options.
- There, tick the Ask user permission checkbox if you wish to enable it. You can also configure it to automatically reject or allow connections after a specific time period.
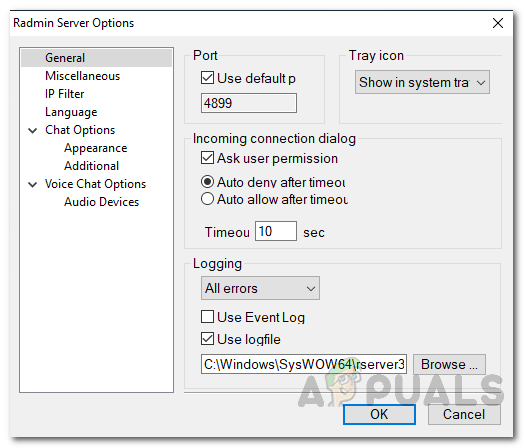
General Options - For logging, you can log different types of errors. The options can be seen in the drop-down menu provided. To change the log file location, click on Browse and then choose where you would like it to be saved.
- Finally, click OK.
How to Securely Connect to a Remote Computer
Now that we have configured the Radmin Server, we are ready to connect to the remote computer. To be able to connect, make sure you have installed Radmin Viewer on your local computer/home PC. Once you have installed the Radmin Viewer, you can connect to the remote system. To do this, you will need the IP address of the remote computer. You can find the IP address by opening a command prompt (cmd) and typing ipconfig in the prompt. You can also transfer files to the remote system via Radmin Viewer. The file transfer goes the other way around as well. Once you have the IP address, do the following to access the remote system:
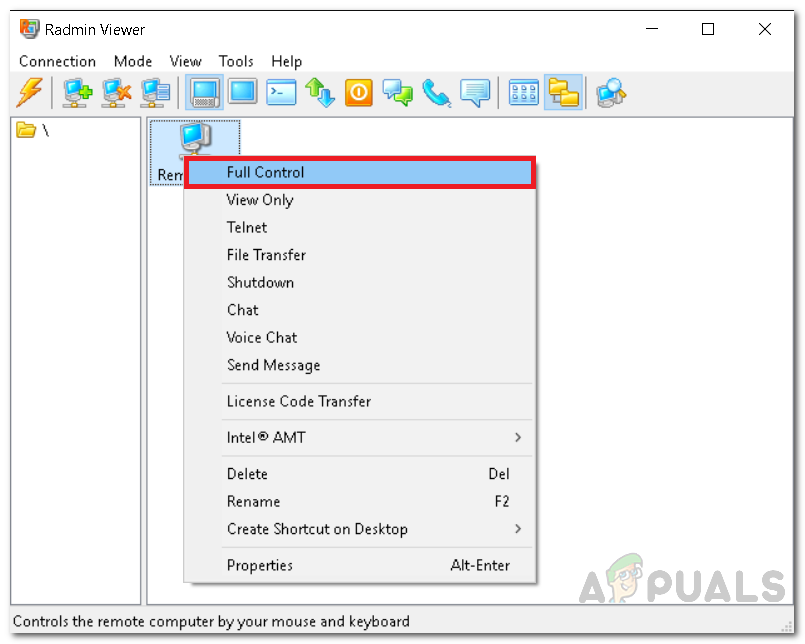
- Open up Radmin Viewer.
- Once it loads up, click on the thunder icon found under the menu bar.
- Provide the IP address of the remote computer and make sure Full Control is selected from the drop-down menu.
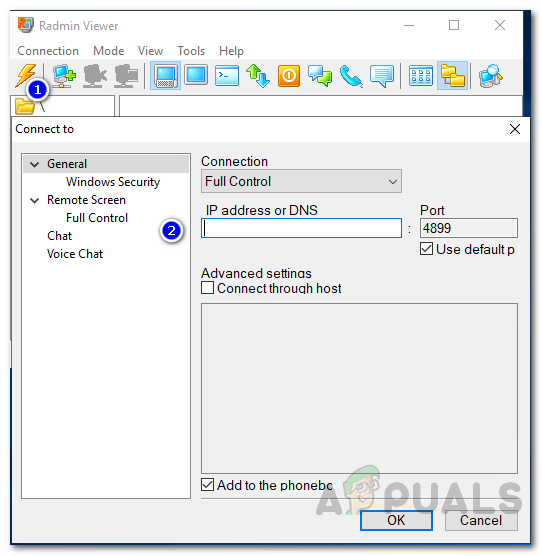
Connecting to Remote Computer - After that, click OK.
- Provide the login user name and password as per the Radmin Server security configuration.
- A window will appear displaying the remote computer’s screen.


