How To Check & Delete Usage History On Your Windows
Whenever you use your computer, it keeps tabs of your activity. It keeps track of how long you were using your computer, when, and for what purpose. It may not outwardly display these details, but they can be accessed from the system for anyone whose looking for them. If you have lent out a computer to someone or sent it for repair somewhere you do not trust and are looking to see how the person you sent it to was using it, you can easily access your computer’s usage history to see its recent usage information. You may want to use this to keep tabs on your children or family members’ usage or for other personal reasons as well. Whatever your reason, there is a way to go about this and we are going to break it down step by step in this article.
Now that you know that you can access your computer’s usage information, you must know that this means that someone can access your usage information and see how you have been using your device as well. If you would like to remove traces of your usage information so that anyone else that knows how to access this information does not see your usage activity, you can go about removing that too. That is another thing that we will be breaking down further in this article step by step. We will teach you how to keep tabs on device usage and how to be one step ahead in protecting your own privacy when it comes to device usage history on Windows PC devices.
Checking Usage History
To check your Windows PC’s usage history, carry out the following steps:
- Type “run” in the search box on the bottom left of your screen and hit enter. You can also access this by pressing the Windows Key and the R key simultaneously.
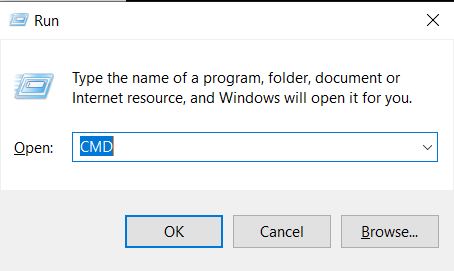
Running Command Prompt Through The RUN Command Line. - Type “CMD” in the field beside “Open” and click “OK.” A command window will pop up.
- In the command prompt window, type in “systeminfo” and hit enter.
- You can scroll down the information that follows and have a look at System Boot Time to see when the computer was started up.
For further details, carry out the following steps:
- Head back into the “run” window by searching for it in the search bar or pressing the Windows and R keys simultaneously.
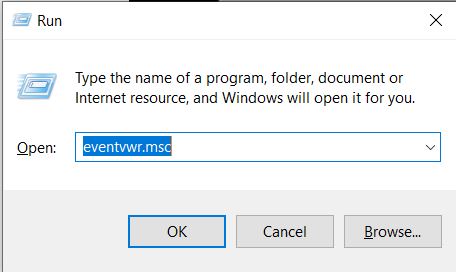
Launching The Event Viewer Application Through The RUN Command Line. - Type in “eventvwr.msc” in the field beside “Open:” and press “OK.”
- An event viewer window will pop up on your screen.
- In the left side directory panel, under Event Viewer (Local) > Windows Logs, click on “System.” This will open up the detailed system log. In here, you will be able to see all of the recent activity of your computer including any error messages, warning messages, permissions granted, or general information generated on your device. A date and time column will also specify when exactly that event was carried out.
Removing Traces Of Usage History
If you would like to remove traces of your usage history from the event viewer logs shown above, you can carry out the following steps:
- Launch the event viewer application by starting up “run,” typing in “eventvwr.msc”, and clicking on “OK.”
- Head into the system log by entering Event Viewer (Local) > Windows Logs > System. This will bring you to where all of your system logs are visible
- In the ribbon across the top of the window, click on “Action” and then click on “Clear Log.” The window will now prompt you to either save the logs before clearing them or to clear them directly. Based upon what you prefer, you can choose either and then have the logs cleared.
If anyone were to enter the Event Viewer application and try to scavenge your system logs, they would not be able to find any information from here after your logs are cleared.
However, clearing logs does not remove complete traces of your usage activity. Windows tends to keep tabs on what you are doing, which applications you are using, and what your preferences are so that it can recommend those in quick access areas. These preferences can be seen to gauge your usage history. For example, if you access a particular file often, it will come up in the recommendations in your Windows File Explorer under recently viewed files. If you would like to hide this trace and other such traces of your applications and general computer usage, carry out the following steps:
- To Clear your Application Usage History:
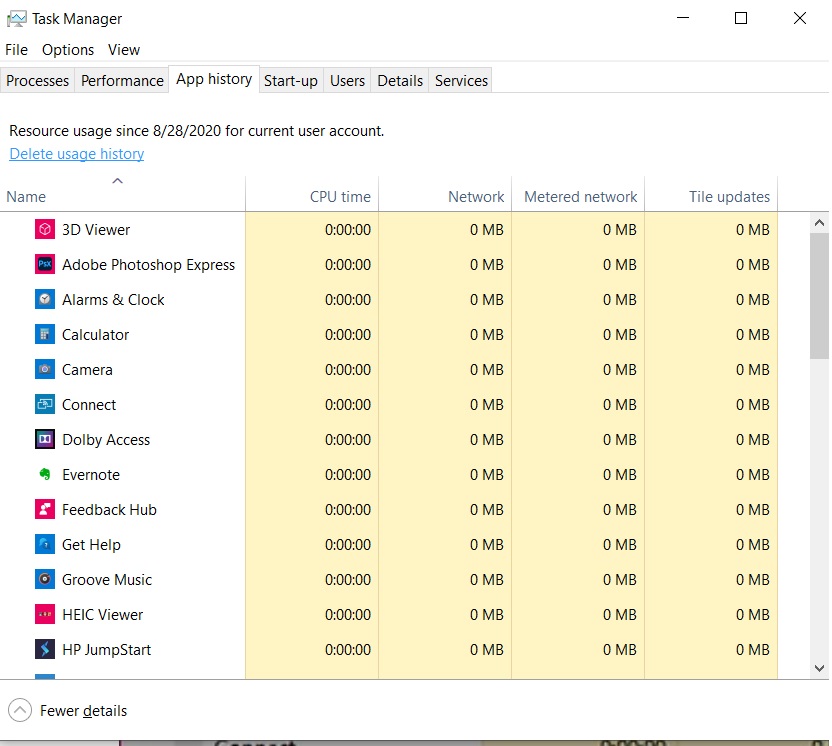
The Task Manager Showing Application Usage & The Option To Delete App Usage Data.
-
- Find the Windows Key at the bottom left of your Windows 10 desktop screen. Right click on this and then click on “Task Manager.” This will launch your Windows task manager application. You can also access this by pressing Ctrl + Alt + Del and then clicking on “Task Manager” or simply pressing Ctrl + Shift + esc to launch it directly.
- Head into the App History tab and then click on Delete usage history displayed at the top under this tab. This will clear your application usage information.
- To Clear your File Usage History in the Windows File Explorer:

Accessing Folder Options To Wipe File and Folder Usage History. -
- Launch the File Explorer application. You can search for this in the search bar at the bottom left of your screen.
- Click on “View” at the top application ribbon.
- Click on “Options” in the right side of this bar. This will open up folder options.
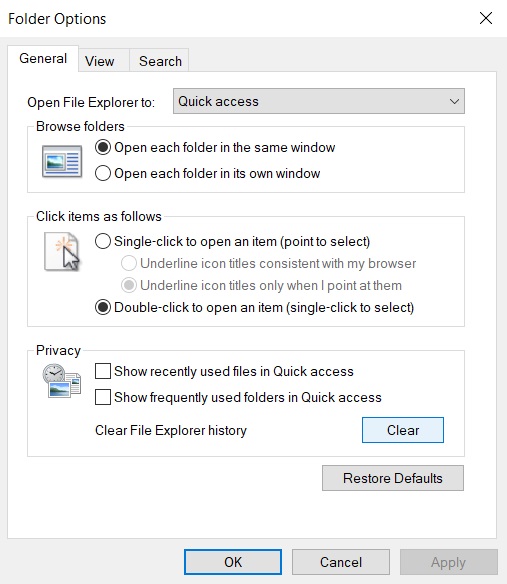
Folder Properties Window. - Click on the “General” tab. In the “Privacy” section, untick “Show recently used files in Quick Access” and “Show frequently used folders in Quick Access” to stop Quick Access from keeping tabs on your file access activity and displaying it. To clear the preferences stored up until now, click on the “Clear” button in this section. Click “Ok” and exit the file properties dialogue box to implement these changes. They will be effective immediately.
-
- To Clear your Start Menu Search History:
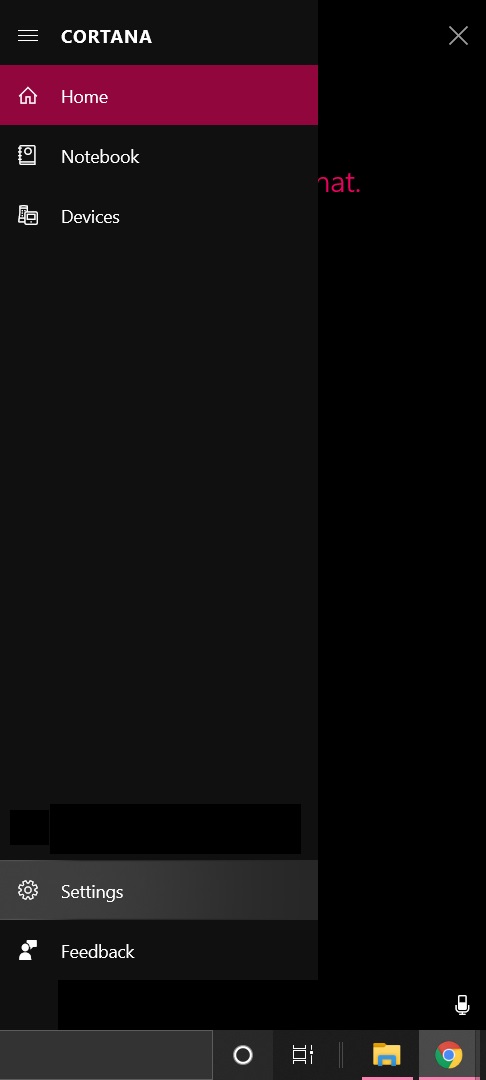
Accessing Cortana’s Settings To Wipe Search History. -
- Click on the round ring beside the search bar. This is the Cortana assistant’s button. In the left panel of this menu, click on the gear icon to access its settings.
- In the Cortana settings, click on “Permissions & History” and disable device history to prevent further recording if you would like. To clear the history saved up until this point, click on “Clear my device history.”
-
Final Thoughts
Your Windows PC stores a lot of information on your usage and preferences to tailor your experience and make it seamless based on your clicks, decisions, choices, and activity. To view general computer usage information, you can head into your system logs via the Event Viewer or take a look at system boot up from the command prompt. To clear the detailed system logs in the Event Viewer, you can access the clear logs option from within the application as well. Beyond this, Windows keeps track of the files and folders you open, the things you search for in the start menu, and your app usage history. The procedures outlined above discuss how to clear these traces. You can also clear browser search history for your particular browser but with these tips above, you’ll clear your Windows Operating System of your traces properly.


Good content!!