How to Fix Hogwarts Legacy Black Screen Issue on PC?
The black screen in Hogwarts Legacy after the seizure warning is often due to the ray tracing technology the game is using. This can be the result of the graphics driver installed on your computer. In addition, third-party overlays from NVIDIA Experience and AMD can also cause the game to present a black screen while loading.

In most cases, the black screen eventually goes away after a few minutes. Therefore, you should start off by waiting for a few minutes to see if the black screen disappears. However, if the black screen is prevalent, you can use the various methods that we will mention below to get rid of the issue.
1. Disable AMD/NVIDIA Overlay
The first thing you should do when starting to troubleshoot the black screen is to disable in-game overlays of the software accompanied by your graphics driver. This includes the in-game overlay of NVIDIA GeForce Experience of AMD Radeon in the case of AMD graphics cards.
These overlays inject files in order to present the in-game overlay which interferes with the game process and can cause various issues, which can result in the game crashing, and more. Follow the instructions below for your respective software to turn off the in-game overlay.
GeForce Experience
- First, open the GeForce Experience app on your computer by searching for it in the Start Menu.
- Click on the Settings icon at the top-right corner.
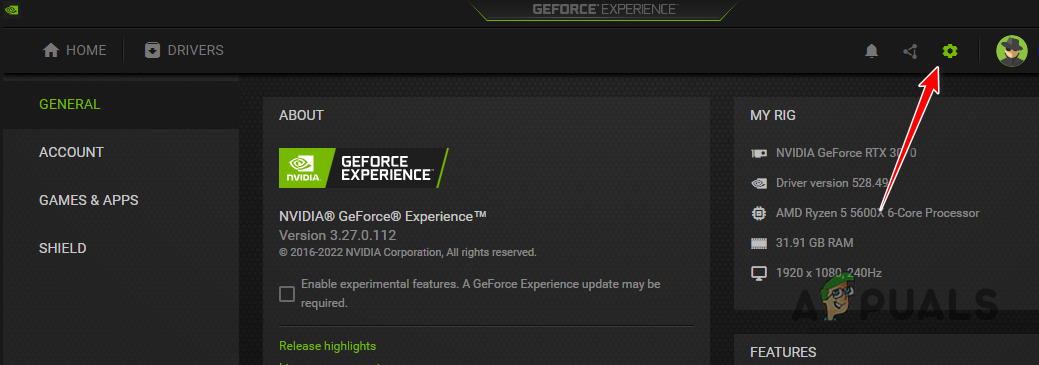
Navigating to GeForce Experience Settings - On the Settings page, use the In-game Overlay slider to turn it off.
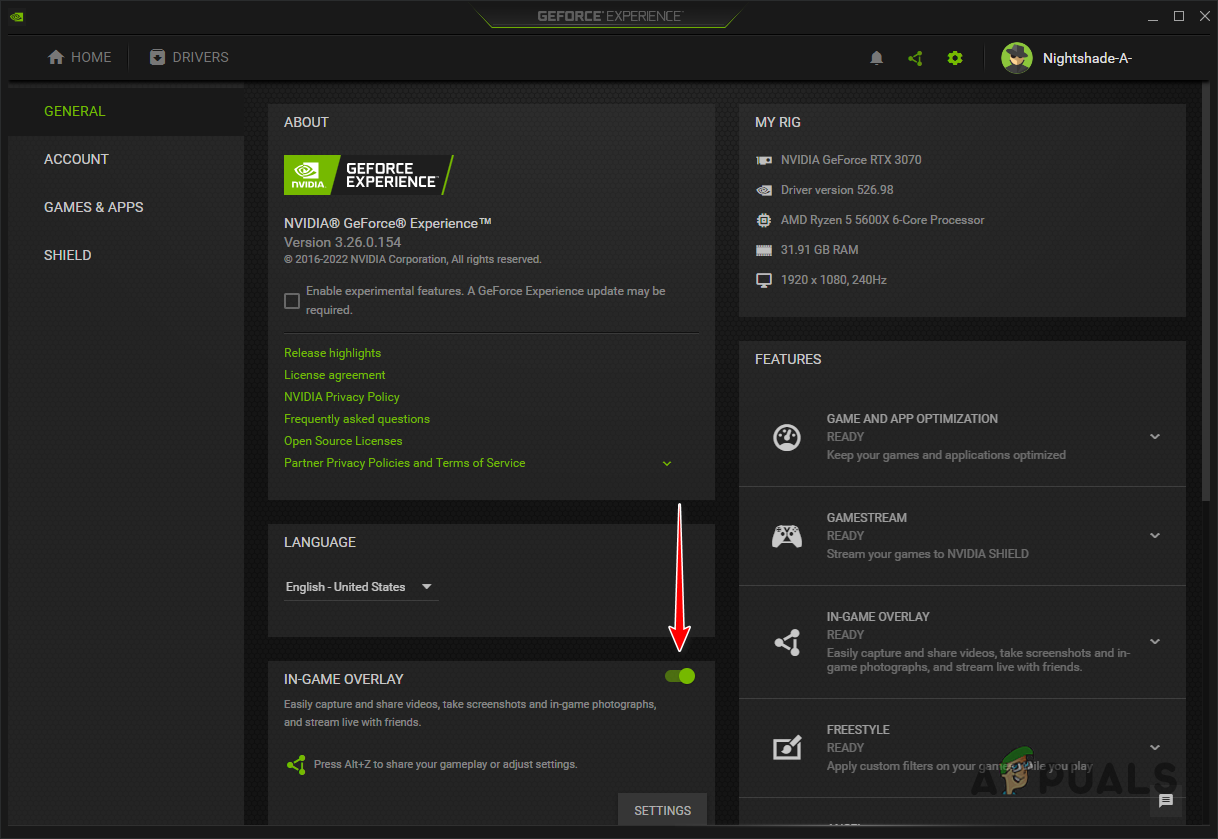
Disabling GeForce Experience In-Game Overlay
AMD Radeon
- Start with opening the AMD Radeon Software on your PC. You can do this by pressing ALT + R on your keyboard.
- In the top-right corner, click on the Settings icon.
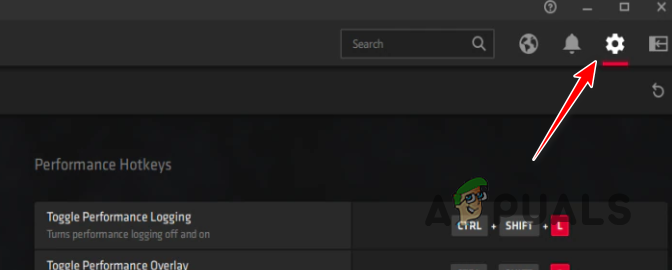
Navigating to AMD Radeon Settings - Switch to the General tab on the Settings screen.
- Under Preferences, use the In-Game Overlay slider to disable it.
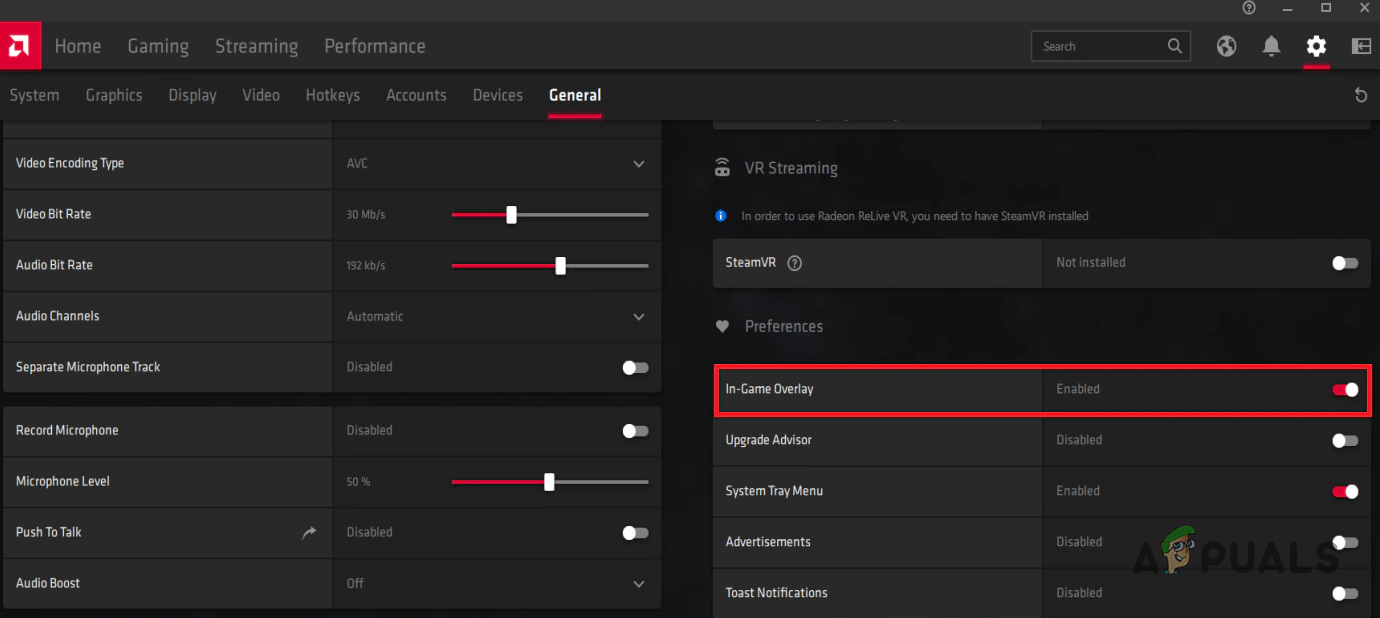
Disabling AMD Radeon In-Game Overlay - Once you do that, open the game to see if the black screen goes away.
2. Disable Shader Pipeline Cache
Pipeline cache is a concept in Unreal Engine 5 that allows developers to control the shader precompilation and reduce stutters. The black screen in Hogwarts Legacy could be due to the pipeline cache enabled which allows the cache to load existing data from your disk and precompile it.
You can mitigate the black screen in Hogwarts legacy by disabling the shader pipeline cache via the game config file on your computer. This can be done via the r.ShaderPipelineCache.Enabled variable. Follow the instructions below to do this:
- First, open the Run dialog box by pressing the Windows key + R on your keyboard.
- In the Run dialog box, type in %localappdata% and hit Enter.
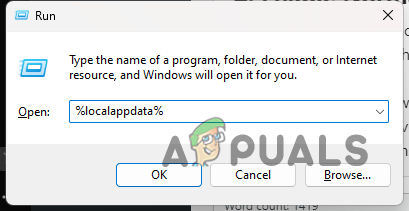
Opening Local AppData Directory - After that, in the File Explorer window that opens, navigate to Hogwarts Legacy > Saved > Config > WindowsNoEditor.
- There, open the GameUserSettings.ini file.
- Inside the user settings file, locate the ShaderPipelineCache.CacheFile section. You can use CTRL + F to find it.
- Finally, add r.ShaderPipelineCache.Enabled = 0 underneath and save the file.
- If you cannot find the ShaderPipelineCache.CacheFile section, simply add the above line at the bottom of the file and save it.
- After doing that, open the game and see if the error goes away.
3. Disable Ray Tracing
Ray Tracing technology is being adopted in all modern games due to its capabilities and advantages. Upscaling is a common aspect used by most games to improve the graphics of the game without compromising the performance of the game by a lot.
In some instances, the game can be presenting a black screen due to the Ray Tracing capabilities of your graphics card. This can occur due to the graphics drivers installed on your system or a general bug with the game which needs to be resolved by the developers.
Meanwhile, you can circumvent the issue by disabling ray tracing in the game. You will have to do this manually via the config file. Follow the instructions below:
- First, open the Run dialog box by pressing the Windows key + R on your keyboard.
- Type in %localappdata% in the Run dialog box and hit Enter.

Opening Local AppData Directory - After that, navigate to the Hogwarts Legacy > Saved > Config > WindowsNoEditor directory.
- There, open the GameUserSettings.ini file.
- Search for RayTracing in the file and disable it by replacing the true boolean with false. You will find multiple occurrences of RayTracing in the file, make sure to do it for all of them.
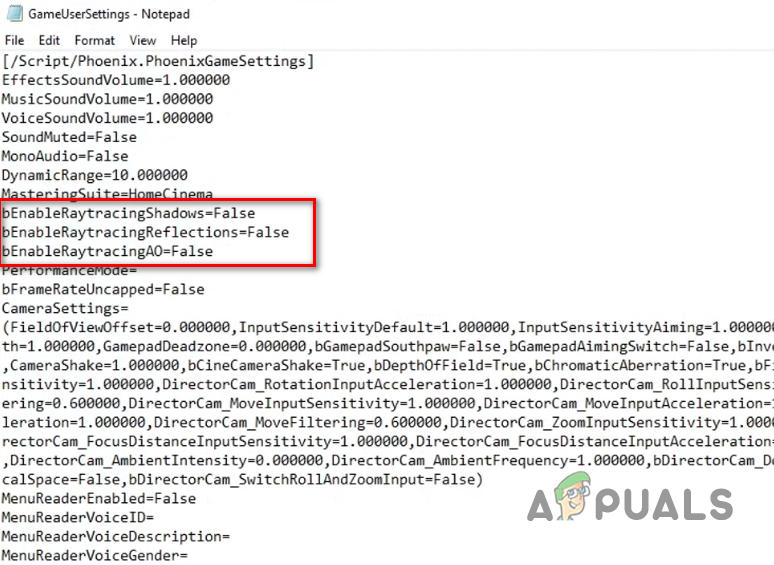
Disabling Ray Tracing from the Config File - Finally, save the file and open the game to see if the issue persists.
4. Verify Game Files
The black screen issue can also occur due to missing or corrupted game files on your system. In such a scenario, you will have to use the scan and repair feature on your respective platform to resolve the issue.
This can be done quite easily on both Steam and the Epic Games Launcher. The clients will scan your game files for any discrepancies and download new files in case of an issue. Follow the instructions below for your respective platform to do this.
Steam
- First, open the Steam client on your computer.
- In the Steam client, navigate to Library.
- Right-click on the game and choose Properties from the drop-down menu.
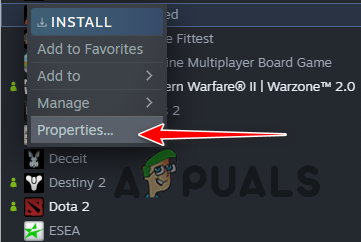
Opening Game Properties - On the Properties window, switch to the Local Files tab.
- There, click on the Verify integrity of game files option.
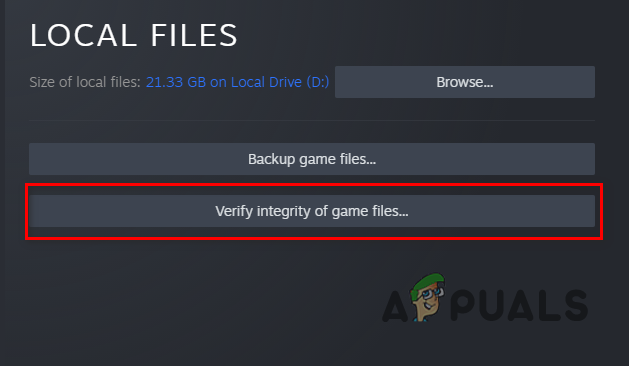
Verifying the Integrity of Game Files on Steam - Wait for it to complete.
- Finally, launch the game to see if the issue is still there.
Epic Games Launcher
- Start with opening the Epic Games Launcher client.
- Navigate to Library and click on the three-dot option next to Hogwarts Legacy.
- From the drop-down menu, choose Manage.
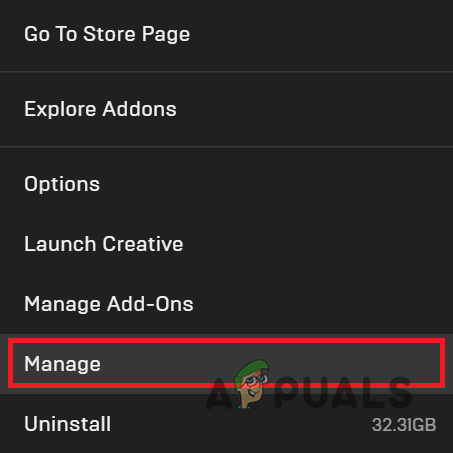
Navigating to Manage Menu - Then, click on the Verify option to scan and repair the game files.
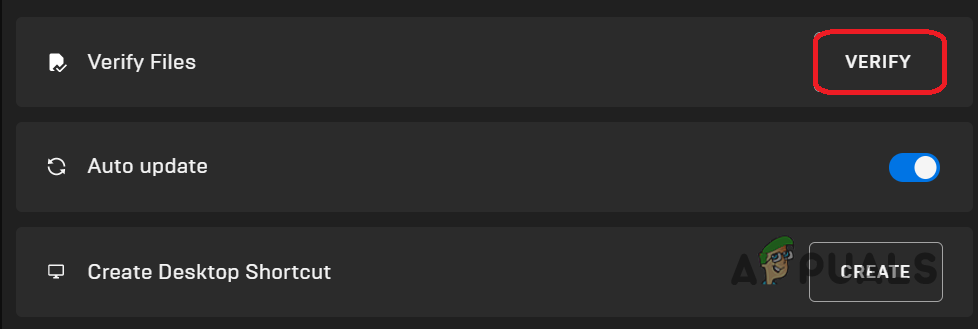
Verifying the Integrity of Game Files on Epic Games Launcher - Once it’s done, open the game and see if the black screen appears.
5. Reinstall Graphics Drivers
Finally, if none of the above methods resolves the issue for you, it is likely the black screen is occurring due to the graphics drivers installed on your computer. Games rely heavily on graphics drivers since they are used to communicate with the graphics card installed on your motherboard.
In such a scenario, you will have to uninstall the graphics drivers using a third-party utility like Display Driver Uninstaller and perform a fresh installation. DDU will remove all traces of the current graphics driver from your computer which will allow you to do a fresh install of the latest version available.
Follow the instructions below to do this:
- First, download the latest version of DDU available from the official website here.
- Extract the downloaded file to a location of your choice.
- Navigate to the extracted folder and open the Display Driver Uninstaller.exe file.
- Once DDU opens, you will be shown a General Options window. Click Continue to proceed.
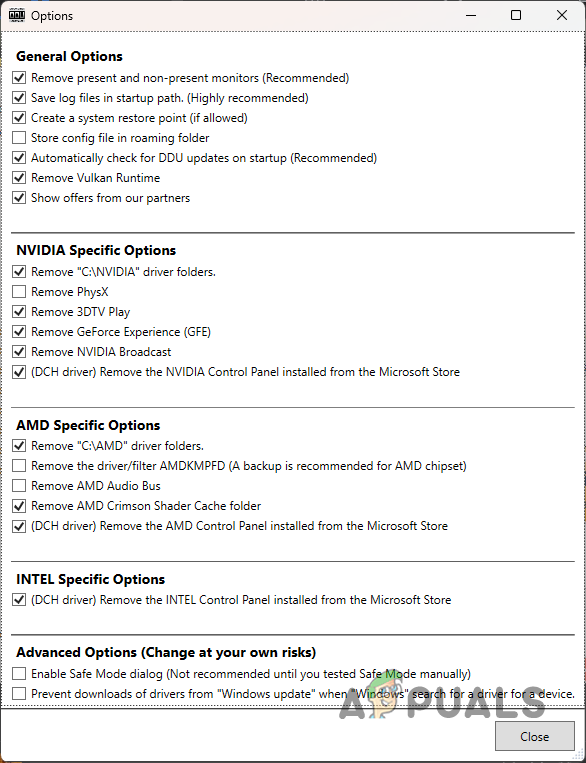
DDU General Options - After that, choose GPU from the Select device type drop-down menu.
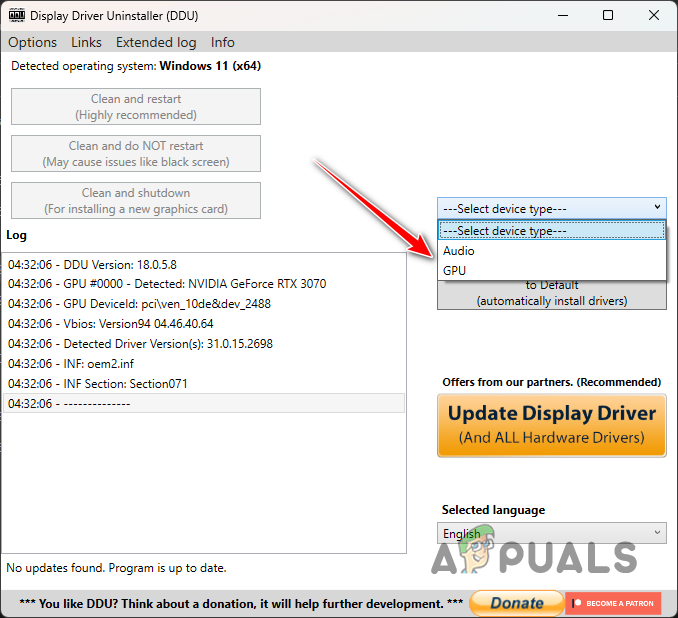
Selecting Device Type - Follow it up by choosing the manufacturer of your graphics card from the Select device drop-down menu.
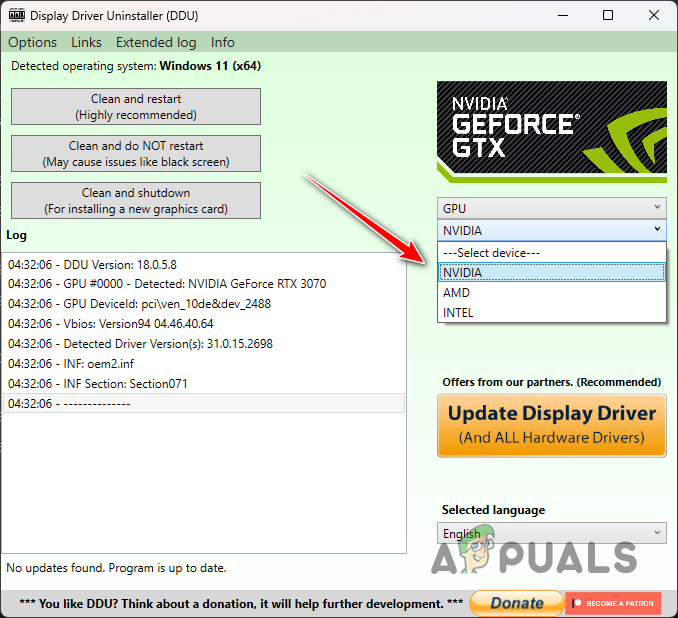
Selecting GPU Manufacturer - Finally, click on the Clean and restart option to uninstall your current graphics drivers.
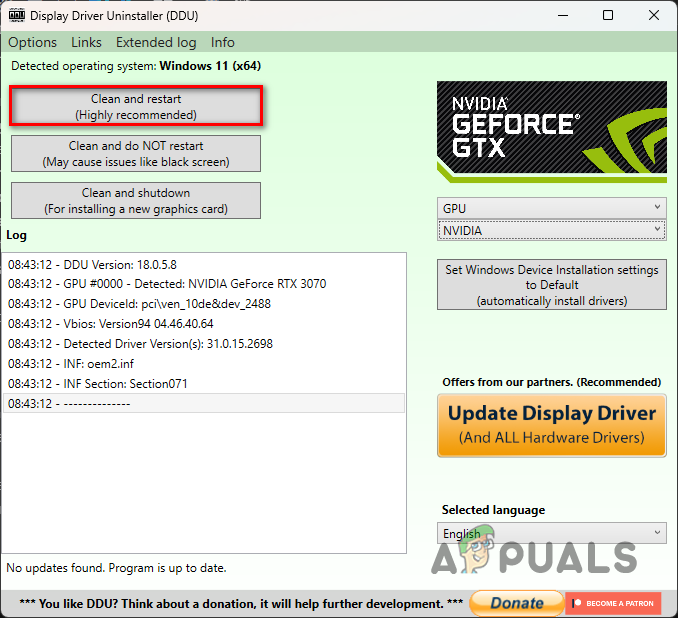
Uninstalling Graphics Drivers - After your PC boots up, head to your manufacturer’s website and download the latest version of drivers available for your graphics card.
- Install the new drivers on your computer.
- Launch the game and see if the problem is still there.


