How to Resolve ‘Halo CE DX Fatal Error’ on Windows 10?
The Halo CE DX Fatal Error is encountered when Windows 10 users attempt to play the legacy version of Halo: Combat Evolved. The sub error suggests that the issue happens due to a missing DirectX 9 installation, but in most cases, this is not actually the source of the error.
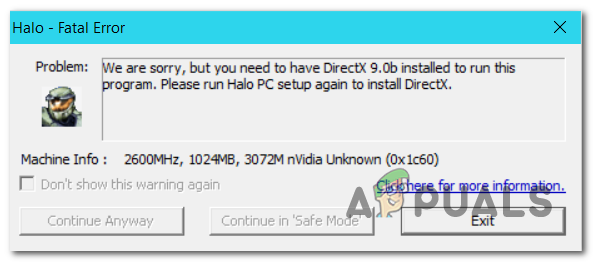
If Direct X 9.0b is not installed, you will encounter this issue due to some missing DLL (Dynamic Link Library) files. The easiest way to fix the issue, in this case, is to run the runtime installer of DirectX web.
But in the vast majority of cases, the problem occurs due to the game’s incompatibility with Windows 10. To get around this, you can either install Bungie’s patch, run the executable in compatibility mode or install the Custom edition of Halo Combat Evolved (Halo CE CE).
Method 1: Install Direct X 9.0b
Even though this is probably not what’s causing the issue, it’s still recommended that you start this troubleshooting guide by ensuring that your machine has all the DLL (Dynamic Link Library) files necessary for this game to run.
There are several ways that will allow you to this, but the easiest route is to simply run the DirectX web installer and install everything that it recommends. This web utility will scan your system and automatically install the DirectX packages that are missing from your installation.
Here’s a quick guide on updating the DirectX versions to the latest:
Note: Keep in mind that this is a cumulative installation, meaning it will install every previous version of DirectX, not just the latest one.
- Visit this link (here), select an appropriate language, then click on the Download button.
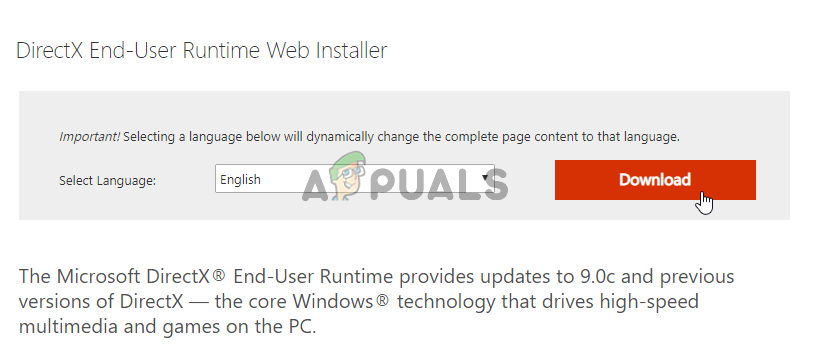
Downloading the DirectX End-User Runtime Web Installer - After you get to the next screen, make sure to uncheck the Microsoft bloatware recommendations by clicking on No thanks and continue with DirectX End-user Runtime Web installer button.
- Wait until the dxwebsetup.exe installer is downloaded, then double-click on it and accept the UAC (User Account Control) prompt if needed. Next, follow the on-screen prompts to complete the installation.
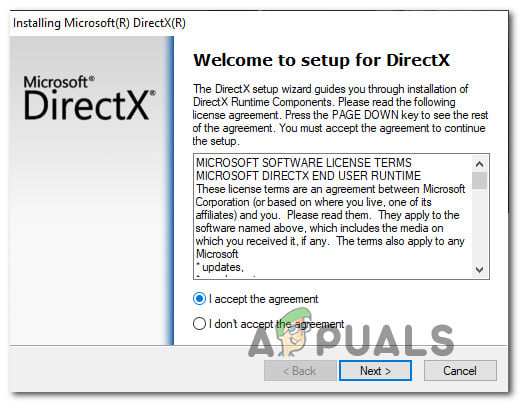
Installing DirectX End-User Runtime - After the installation is complete, restart your computer and launch the game after the next startup to see if the issue is now resolved.
In case you’re still encountering the same Halo CE DX Fatal Error, move down to the next potential fix below.
Method 2: Install Bungie’s patch for Windows 10
Since Halo Combat Evolved is a legacy game that wasn’t originally built for the new Windows infrastructure present on Windows 8.1 on Windows 10, you might experience a series of issues caused by incompatibility (including the Halo CE DX Fatal Error).
Fortunately, the studio behind this game (Bungie) has released a patch by working closely with some community members that allows the legacy game to run smoothly on Windows 10.
The patch is extremely light-weight and it automatically installs over your existent game files.
Here’s a quick guide on how to download & install it in order to fix the Halo CE DX Fatal Error issues:
- Open your default browser and visit this link (here) to download the patch.
- After the download is complete, double-click on the executable and click on the UAC (User Account Control) prompt to grant admin access.
- Next, the installer should automatically find your Halo CE game files and override them with the new patch, making it compatible with Windows 10.
- Once the operation is complete, restart your computer and see if the issue is resolved after the next computer startup.
In case you’re still encountering the Halo CE DX Fatal Error when trying to launch Halo Combat Evolved, move down to the next potential fix below.
Method 3: Running Halo CE in compatibility mode
One quick workaround that might work for you if you’re encountering the issue on Windows 10 is to force the launch executable to run in compatibility mode with Windows XP.
While several users have found this workaround to be effective in allowing them to launch the game, it doesn’t fix the issue entirely. As several affected users have reported, this issue can cause certain maps to trigger a crash during the loading period.
But if you want to try this, here’s a quick guide on forcing the Halo CE executable to launch in compatibility mode:
- Right-click on the launch shortcut of HALO CE and choose Properties from the context menu.
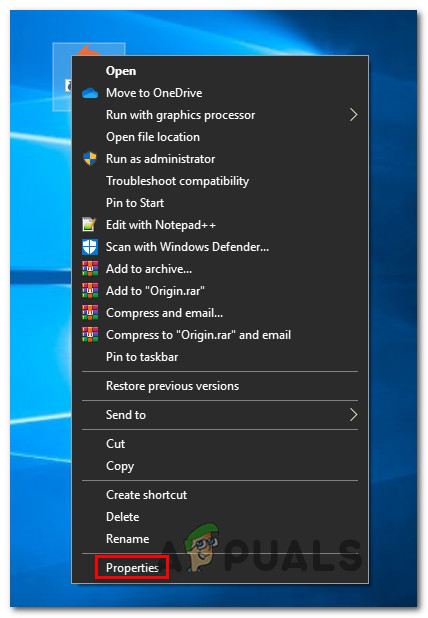
Accessing the Properties screen of Halo - Inside the Properties screen of Halo CE‘s executable, select the Compatibility tab from the ribbon bar at the top.
- Next, check the box associated with Run this program in compatibility mode and select Windows 7 from the drop-down menu.
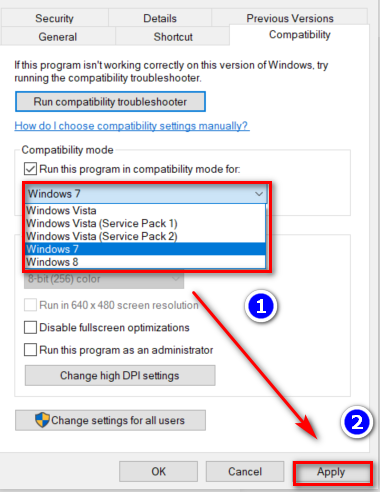
Using Compatibility Mode with Windows 7 - Save the modification, then launch the game to see if the issue has been resolved.
In case the same Halo CE DX Fatal Error is still occurring, move down to the next potential fix below.
Method 4: Installing Halo CE Custom Edition
Keep in mind that the standard version of Halo CE is not designed to work on either Windows 10 or Windows 8.1. This is mainly because these newer operating systems have replaced parts of Direct Draw and Direct 3d with newer, performance-enhanced CPU software emulation.
Some Halo players are saying that with the newer Windows 10 builds, this is the only way to run Halo CE to run on Windows 10 since it’s the only game version equipped with a transition layer that converts Direct Draw and Direct 3D calls into Open GL.
Here’s a quick guide on how to install this version and configure it to run on your Windows 10 computer:
- Visit this link (here) to begin the installation of Halo CE CE (Custom Edition).
- Wait until the download is complete, then double-click on the installation executable and click Yes at the User Account Control prompt to grant admin access.
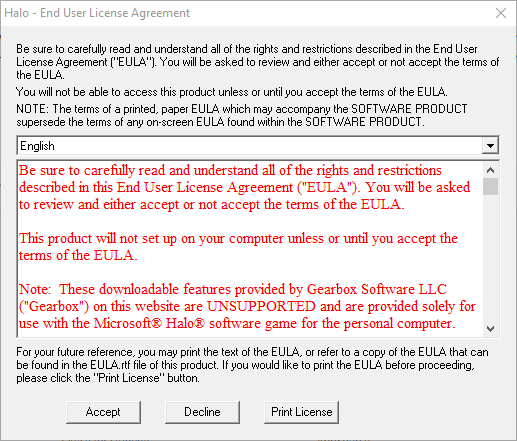
- Next, agree with the License Agreement and choose a location to start the installation of Halo CE CE (Custom Edition).
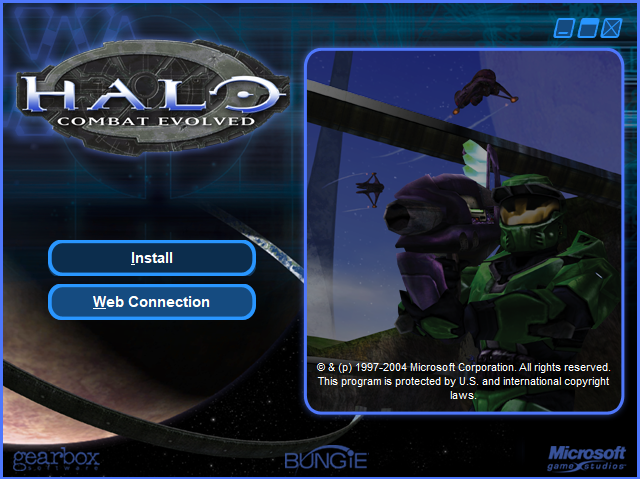
Installing Halo CE CE - Hit Install to begin the installation, then wait for the process to complete.
Installing Halo Combat Evolved (Custom Edition) - Input your license key and complete the installation, then restart your computer.
- After the next startup sequence is complete, launch the game and install every update that has since become available.


