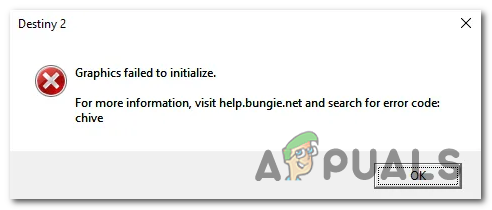
How to Resolve the Graphics Failed to Initialize Error on Destiny 2
The ‘Graphics Failed to Initialize’ error is encountered a couple of seconds after the user tries to launch Destiny 2. The error code is ‘CHIVE‘ which suggests that there’s a problem with the graphics drivers. This error appears when the Game cannot load the Graphics.
What’s causing the Destiny 2 ‘Graphics Failed to Initialize’ Error on PC?
- Windows 7 Glitch – As it turns out, this issue will occur on Windows 7 regardless if your PC configuration meets the minimum specifications or not. If you’re using this OS version, you’ll need to install one particular platform update KB2670838 if you plan on using the game. This can be done manually following the official channels.
- OS is launching the game with integrated GPU – On a laptop with an Nvidia GPU, the most common culprit that will cause this behaviour is a scenario in which Nvidia Control Panel has labelled the Destiny 2 executable as a utility, so it’s using the integrated GPU to run it. If this scenario is applicable, you can fix the issue by forcing your OS to use the dedicated GPU by adjusting the Nvidia Control Panel 3D settings.
- Outdated GPU drivers – Outdated drivers are another fairly common that might cause this problem. This is applicable for both Nvidia and AMD. In this case, you can fix the issue by using Device Manager to update the drivers or by using the proprietary software (GeForce Experience and Adrenalin).
Method 1: Installing Microsoft Update KB2670838 (Windows 7 Only)
If you’re encountering the issue on Windows 7, there’s a high chance that you will be able to bypass the ‘Graphics Failed to Initialize’ error by installing one particular platform update (KB2670838).
We’ve managed to find dozens of user reports who confirmed that this method allowed them to finally launch the Destiny 2 game without encountering this game-breaking startup error. The operation was confirmed to be effective for gamers using GTX 760, GTX 660 and AMD Radeon 9 270.
Here’s a quick guide on installing the Microsoft Update KB2670838 to fix the ‘Graphics Failed to Initialize’ error:
- Visit this link (here) and download the KB2670838 update by scrolling down to the Platform Update for Windows 7 section, selecting the language and clicking on the Download button.
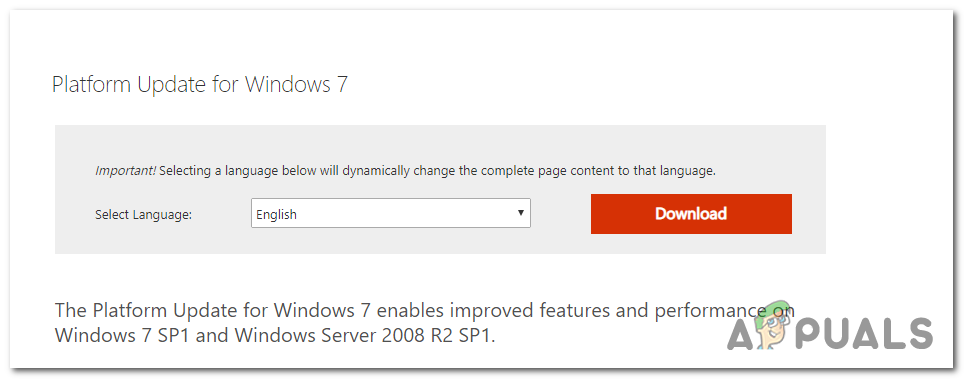
Downloading the platform update - Once you’re at the next screen, check the box associated with the type of OS infrastructure that you’re using. If you’re using Windows 7 32 bits, select Windows6.1-KB2670838-x86.msu and click on Next. On the other hand, if you’re using a 64-bit version, check the toggle associated with Windows6.1-KB2670838-x64.msu and press Enter.

Downloading the appropriate platform update version - Wait until the download is complete. Once it’s finished, double-click on the installation executable and follow the on-screen prompt to complete the installation of the platform update.
- Once the platform update is installed, restart your computer and see if the issue is resolved at the next system startup.
If you’re still encountering the ‘Graphics Failed to Initialize’ error when you try to launch Destiny 2 after following the instructions above (or the instructions above weren’t applicable), move down to the next potential fix below.
Method 2: Using the high-performance GPU for Destiny 2 (if applicable)
As it turns out, this error code is quite frequent with users that are trying to launch the game from a gaming laptop using an Nvidia dedicated GPU. In this case, it’s very likely that the ‘Graphics Failed to Initialize’ error occurs due to the fact that the Nvidia Control Panel is labelling the Destiny 2 executable as a utility app and it’s using the integrated GPU to run it (instead of the dedicated option).
If this scenario is applicable, you can fix the problem by accessing your Nvidia Control Panel window, going to the 3D Settings menu and forcing the usage of the dedicated GPU at every Destiny 2 launch.
Here’s a quick guide on ensuring that you’re using the high-performance GPU for Destiny 2:
- On your desktop, right-click on free space and choose the Nvidia Control panel from the newly appeared context menu.
- Once you’re inside the Nvidia Control Panel, expand the 3D Settings and select Manage 3D Settings.
- Move over to the right-hand pane and start by clicking on the Program Settings tab.
- Next, click on the Add button, then use the Browse button to find and select the Destiny 2 executable that you launch the game from. With the correct executable selected, click on Add Selected Program.
- Launch the Destiny 2 once again and see if the issue is now resolved.
If you’re still encountering the same ‘Graphics Failed to Initialize’ error when you try to launch the Destiny 2 game, move down to the next potential fix below.
Method 3: Updating all GPU drivers
As it turns out, this particular issue can also occur if you’re trying to launch the game while using outdated GPU drivers (this is applicable for both Nvidia and AMD GPUs). It’s now been confirmed that Bungie had some launch issues that were only rectified after the relevant GPU manufacturers released updates that eventually fixed the problem.
If you followed the instructions above and you’re still encountering the ‘Graphics Failed to Initialize’ error when trying to launch Destiny 2, it’s very likely that you need to update your GPU drivers. In order to do this, you can either rely on Device Manager or you can use the proprietary updating applications.
Here’s a quick guide on updating all GPU drivers in order to fix this issue:
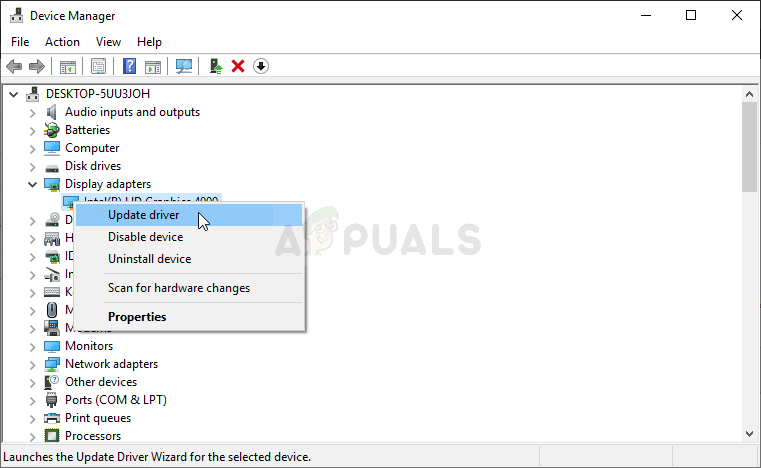
- Press Windows key + R to open up a Run dialogue box. Next, type ‘devmgmt.msc’ inside the text box and press Enter to open up Device Manager.

Running Device Manager - Once you manage to get inside Device Manager, scroll down through the list of installed devices and expand the drop-down menu associated with Display Adapters. Next, right-click on the dedicated GPU that you’re using when launching the game and choose Update driver from the newly appeared context menu.
Updating the graphics driver - Once you get to the next screen, click on Search Automatically for updated driver software. Then, wait for the initial scan to complete before following the instructions to installing the latest software available
- Once the new driver is installed, restart your computer and see if the issue is resolved at the next system startup.

Downloading the latest graphics driver - In case you’re still encountering the same issue or Device Manager wasn’t able to a newer driver version, you can use the proprietary software according to your GPU manufacturer to make sure you’re using the latest version available for your graphics card model. Use the applicable manufacturer according to your GPU manufacturer:
GeForce Experience – Nvidia
Adrenalin – AMD - If a new version is discovered with this 3rd party utility, restart your computer once again and see if the fix is resolved at the next startup.


