Fix: Google Lens not Working
Google Lens is unarguably a gargantuan advancement in the fields of Artificial Intelligence and machine learning. However, at the end of the day, the program is just that – a program. And like all compiled collections of lines of code, Google Lens too is prone to breaking down, malfunctioning, and outright not working. Google itself admits that Lens is still in its infancy – the technology is nowhere near perfect, and it does not, as of yet, completely embody what Google had envisioned.
There are a number of different ways Google Lens may stop working. Lens may simply not work the way it’s supposed to and identify objects within images, or it might not even start up and, instead, display an error message of some kind to the user – or one of half a dozen different things. In addition, there is a different cause behind each instance of Lens not working.
What causes Google Lens to not work?
- The Google Lens app not being installed. If you’re trying to access Google Lens from Google Assistant and the Google Lens icon is nowhere to be found, you simply don’t have the app installed on your device. Right now, you cannot use Lens in real-time unless you have the corresponding app installed on your Android device.
- Google Lens was unable to identify any objects . Lens’ knowledge of real-world objects is finite, so if the program fails to identify any Points of Interest, it might just be because it couldn’t find any (or simply needs to take another look).
- The area you’re scanning is too dark for Google Lens to identify any objects. Lens can only identify objects if there is enough light for it to process and recognize them, so if you’re using Lens in a low-light environment, you might just need to brighten things up.
- Google Lens has not been configured on your device. If you’ve never used Lens on your device before, you might have to configure and activate it before you can start using it.
- A problem with the Google Photos app. If Google Lens doesn’t work when you try to access it through the Google Photos app, the underlying cause may be some kind of an issue with the Photos app.
How to Resolve Issues with Google Lens
Since there are a number of different possible causes for Google Lens not working on your device, there is no one cure-all solution or magic bullet to combat this predicament. There are, however, a few different solutions you can use to try and resolve this problem.
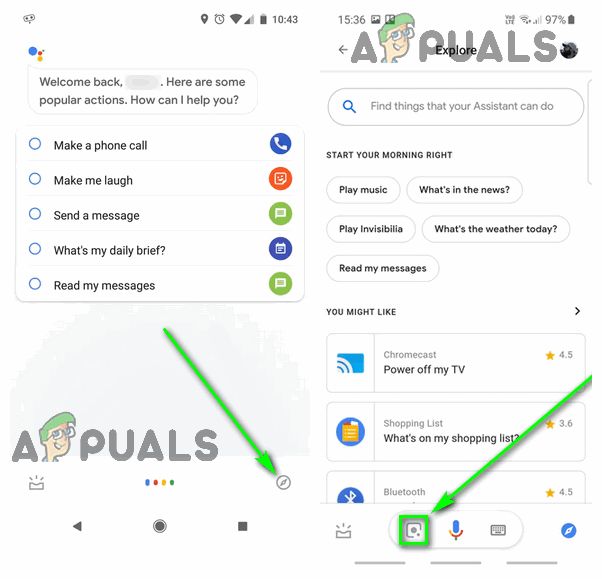
1. Make sure that the Google Lens app is installed on your device
Google Lens has a dedicated app on the Android Operating System, and only when this app has been downloaded do most Android devices become capable of using Lens in real-time. Unless you have the app installed on your Android device, you will not be able to see the Google Lens icon in Google Assistant. If the problem you’re faced with is not having the Lens icon anywhere in Google Assistant, head on over to the Google Play Store and download the Google Lens app.
Once the app has been installed, fire up Google Assistant by long-pressing the Home button and tap on the Compass icon in the bottom-right corner of your screen – you should now see the Google Lens icon next to the Microphone icon on the Explore page.
2. Try scanning the area of interest again
If Google Lens is unable to identify any objects in real-time, one of two things is happening: there are simply no objects in the shot that Lens is capable of identifying and interacting with, or Lens is malfunctioning. Google Lens depends on a combination of AI, machine learning and image recognition to identify and interact with objects in real-time, and if any of these technologies fail, it will not be able to do what it is supposed to do. In any case, scanning the area of interest at least once more is definitely worth it.
- Tap on the Back button.
Tap on the Back button - Point your device’s camera away from the area of interest and have it scan other areas as a means of re-calibrating Lens and bringing it to its senses.
- Point your device’s camera back to the area of interest and allow Lens to scan it for POIs.
Note: If Lens identifies the wrong object, simply tap on Back, scan the area again and, if need be, tap on the object you’re interested in to nudge Lens in the right direction.
3. Turn on your device’s flash to illuminate the area
If you’re using Google Lens in a low-light environment, there is a good chance the program will misidentify Points of Interest (or won’t be able to identify any at all!). If that is the case, you can simply brighten up the area you’re scanning using your device’s flash.
- Navigate to the Google Lens viewfinder.
- Tap on the Flash icon in the top-left corner of the viewfinder to turn your device’s flash on.
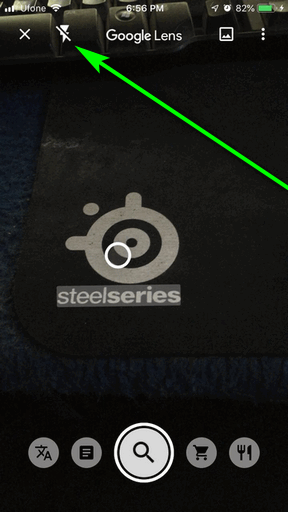
Tap on the Flash icon to turn flash on - Move the viewfinder around, and then point it to the area of interest and allow Lens to focus on it.
4. Activate Google Lens
Google Lens may be glitching out on you or not working because you haven’t set it up yet. Android users who have downloaded the Google Lens app need to first set up and activate Lens before they can use it seamlessly.
- Press and hold the Home button on your device until Google Assistant is pulled up.
- Tap on the Compass button in the bottom-right corner of your screen.
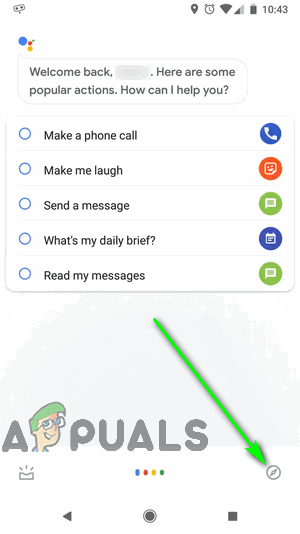
Tap on the Explore button - On the Explore page, tap on the Google Lens icon located to the immediate left of the Microphone icon at the bottom of your screen.

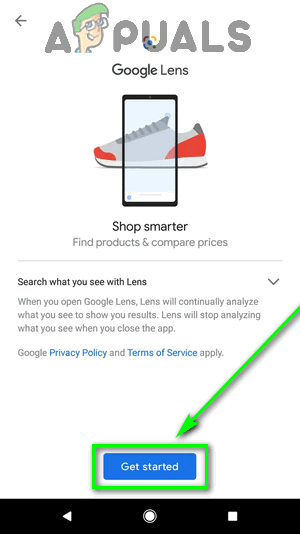
Tap on the Google Lens icon - Tap on Get Started.
Tap on Get Started - Follow the onscreen instructions and prompts to set up and configure Google Lens on your device.
5. Clear the cache and data for the Google Photos app
People trying to use Google Lens on existing images through the Google Photos app have reported Lens not working and displaying an error message that reads:
“Something went wrong. Google Lens is not available.”
If you’re in a similar situation, the root of this problem actually lies not in Google Lens, but in the Google Photos app, and is fixable. The Android OS maintains a cache partition for the entire device, as well as a small cache for each individual app. Clearing this cache for the Google Photos app, along with the app’s data, might just be enough to get Google Lens working for you.
- Navigate to your device’s Settings.
- Tap on Apps, Apps & notifications, Application Manager, or something similar to launch your device’s app manager.
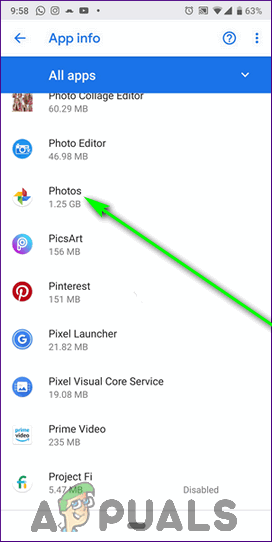
- Locate and tap on the Google Photos app within the list of applications installed on your device.
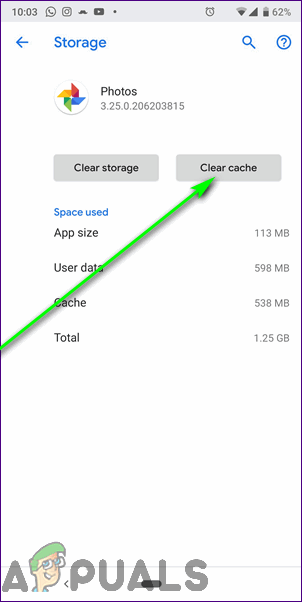
Locate and tap on Photos - If you see the Clear cache button on the next screen, proceed. If you don’t see the Clear cache button, tap on Storage and then proceed.
- Tap on Clear cache and, if required to do so, confirm the action.
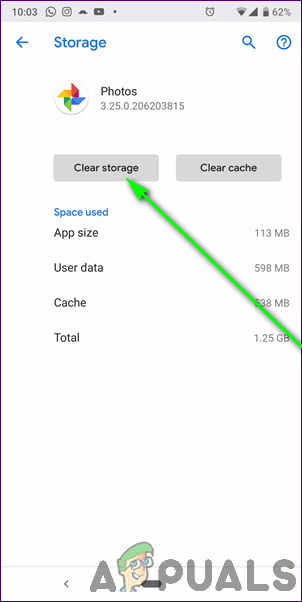
Tap on Clear cache - Tap on Clear data or Clear storage and, if required to do so, confirm the action.
Tap on Clear storage or Clear data - Restart your device.
- When your device boots up, launch the Google Photos app and check to see if you can now successfully use Google Lens through it.


Oh thanks a lot, kevin. More helpful than the google help page itself, might i add