How to Fix Google Calendar/Mail not Syncing in Windows 10?
Some Windows users that are attempted to connect their Google account to the Mail to the default Calendar apps inside Windows 10 have reported that neither of them is syncing. Some affected users are reporting that the Calendar app is completely empty for them.
After investigating this particular issue, there are several different underlying causes that might be responsible for triggering this particular error code. Here’s a list of potential culprits that might be responsible for the apparition of this problem:
- The app is not permitted to access the Calendar – As it turns out, one fairly common situation that might cause this behavior on Windows 10 is if the Calendar app is hindered by a privacy setting that is preventing it from syncing data. If this scenario is applicable, you should be able to fix this problem by accessing the Privacy tab of the Calendar app and modifying the problematic privacy setting.
- Underlying syncing glitch with your Google Account – Under certain circumstances, you can also expect to see this issue occurring due to an underlying glitch that affects the Google account integration with the Calendar app. To get around this issue, you need to re-sync the Google account with the Calendar app from the Settings menu.
- Two-Factor Authentication is enabled on your account – If you’re using two-factor authentification across your Google account, chances are you will either need to disable it or you need to generate a dedicated password for the Windows Mail app in order to get around this issue.
- Corrupted Mail & Calendar app installation – According to some affected users, you can also expect to see this issue in those instances where you’re actually facing this problem due to some kind of corruption issue that is affecting the local installation of the Mail & Calendar app. In this case, you can fix the issuer by resetting the Mail and Calendar app from the Settings menu of Windows 10.
- Corrupted temporary files – File corruption can also be responsible for the apparition of this particular syncing problem. Several affected users have reported that they managed to fix the problem by temporarily removing the Google account from the Calendar app and clearing the Temporary Files from the Windows 10 Settings menu.
Now that you know every potential culprit that might be responsible for this particular issue, here are a couple of verified methods that other affected users have successfully used to fix this annoying syncing issue with Google accounts on Windows 10:
Method 1: Letting Apps access Calendar data
In most documented cases, this particular issue is caused by an instance in which the Calendar app is configured in such a way that no Windows 10 apps (native or not) can access Calendar data from it. Depending on your Windows version and if you have migrated it from an older Windows version, you might found that this setting was disabled by default.
If this scenario is applicable, you should be able to fix the problem by accessing the Privacy Settings of Calendar and enabling the Let apps access my calendar.
If you’re looking for step by step instructions move down to the next potential fix below:
- Press Windows key + R to open up a Run dialog box. Next, type ‘ms-settings:privacy-calendar’ inside the text box and press Enter to open up the Calendar app. If you’re prompted by the UAC (User Account Control) prompt, click Yes to grant admin access.
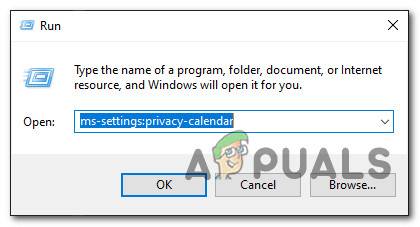
Opening the Calendar app via Run box - Once you’re inside the Calendar tab of the Settings app, move over to the right-hand section and enable the toggle associated with Allow apps to access your calendar.
- Next, click on the Change button directly under Allow access to calendars on this device, then set the toggle that just appeared to On.
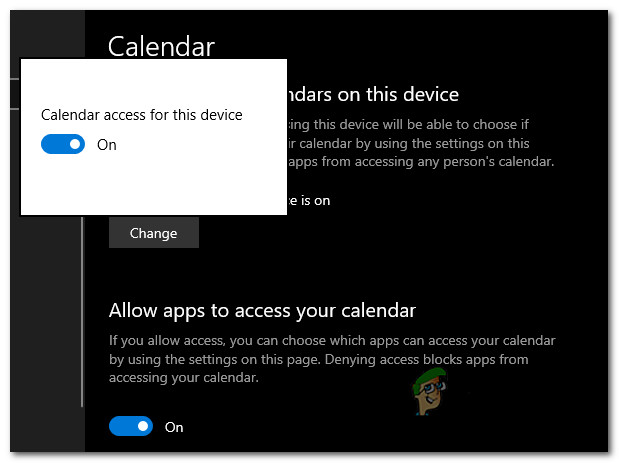
Allowing apps to access the Calendar - Restart your computer and see if the problem is fixed once the next startup is complete.
If the Calendar app is still not syncing correctly when connected to your Google account, move down to the next potential fix below.
Method 2: Re-syncing Google Calendar
Once you’ve made sure that you’re not encountering this issue due to a permission issue, you should also consider that this syncing issue is occurring due to a temporary glitch with the Calendar app on Windows 10.
Several affected users that were dealing with the same problem have confirmed that they finally managed to fix the issue by temporarily disabling the sync settings of the Calendar app before re-enabling it again.
If you haven’t tried this yet, follow the instructions below to launch the Calendar app on your computer and force it to re-sync all data via the Settings menu:
- Press the Windows key on your computer, then use the search function to type ‘calendar’. Next, from the list of available options, click on the Calendar app to open it.
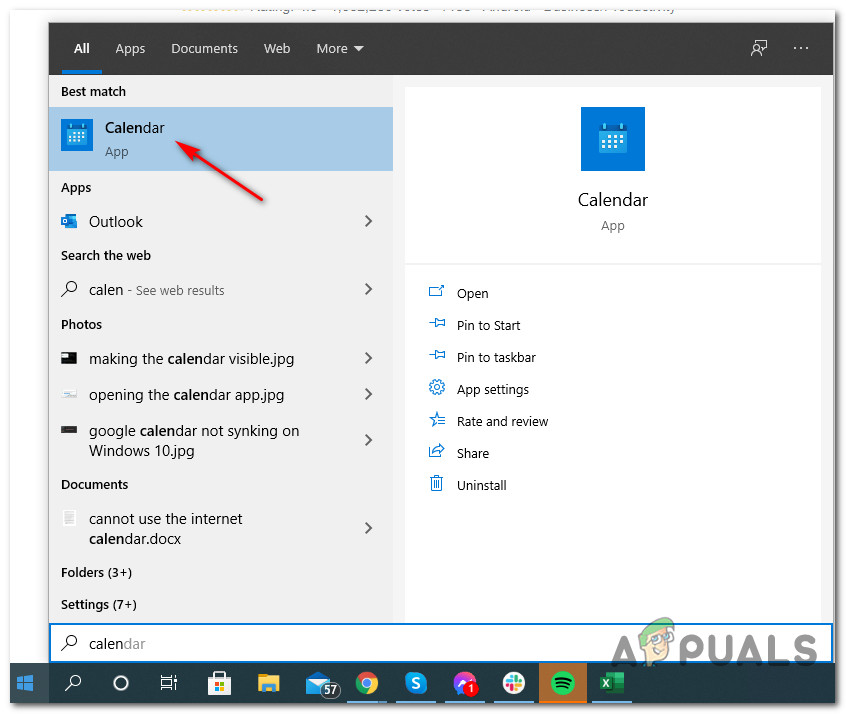
Opening the Calendar app - After you manage to open the Calendar app, click on the Settings icon (bottom-left section of the screen), then click on Manage Accounts (under Settings) from the context menu that just appeared.
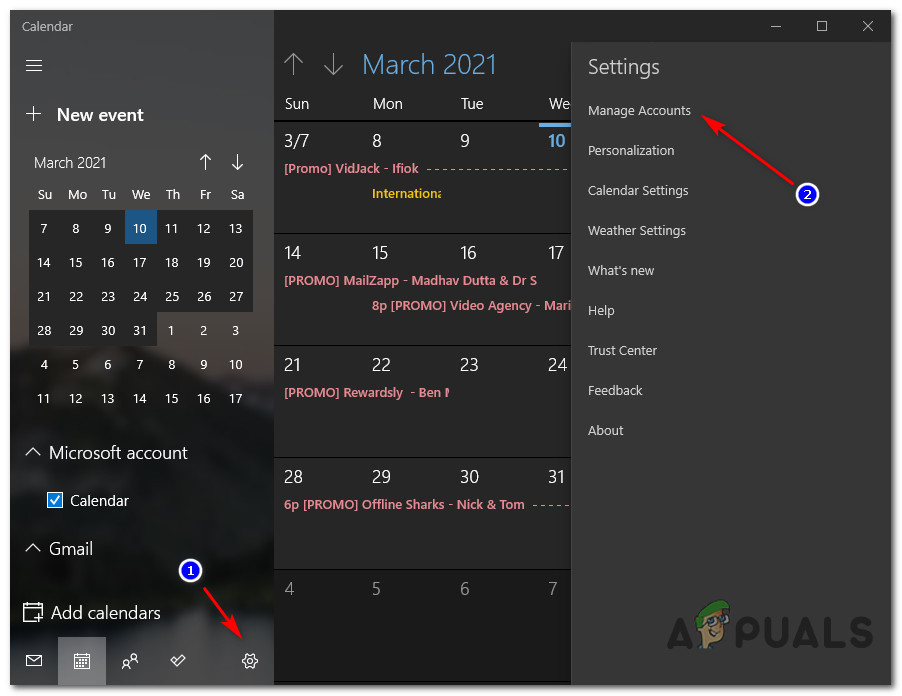
Opening the Settings menu of the Calendar app - Next, from the list of connected emails associated with the Calendar app, select the Google account that you’re currently having syncing issues with.
- Once you’re inside the Gmail account settings menu, click on the Options for syncing your content hyperlink (under Change mailbox sync settings).
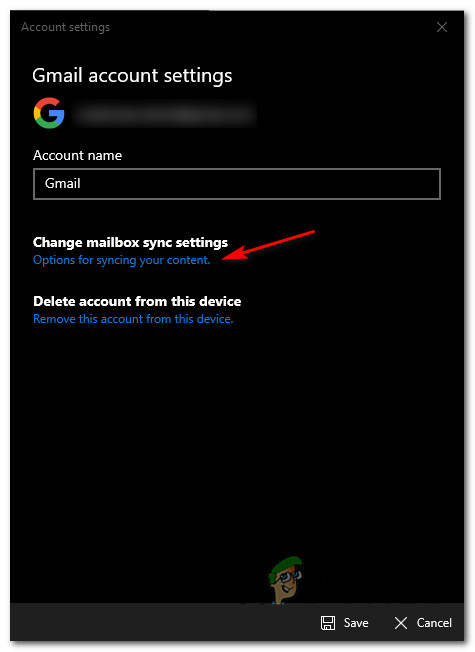
Accessing the syncing your content - Once you’re inside the Sync Settings of Gmail, go under Sync Options and disabler the toggle associated with Calendar.
- After the syncing is disabled via the associated Calendar toggle, wait for a full minute before re-enabling the google associated with Calendar.
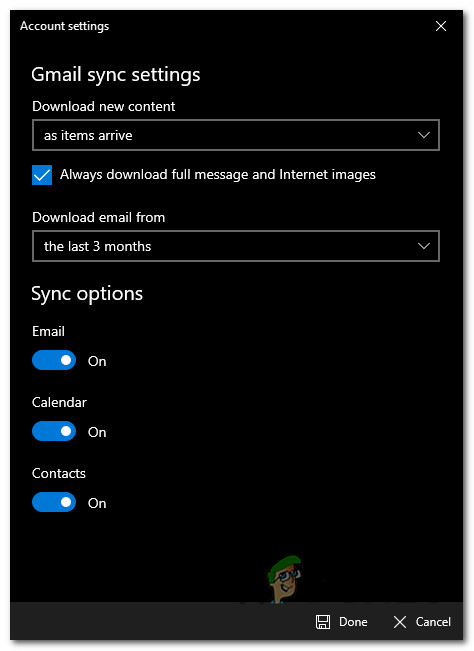
Disabling the Calendar Syncing toggle from Gmail Sync settings - Click on Done to save the changes, then restart your computer and see if the problem is now fixed.
In case the same kind of issue is still occurring, move down to the next potential fix below.
Method 3: Disable 2-Factor Authentication on your Google Account (if applicable)
As it turns out, you can also expect to face these types of syncing issues if you have 2-Factor Authentication enabled on your Google Account. I lot of users that were using 2-Factor authentication for Google have reported that they only managed to fix the issue after they disabled 2-Factor authentication on their computer.
Update: If you’re not willing to disable two-factor authentication on your Google account in order to fix this syncing issue, you will have to generate a password for the Windows Mail app in your Google account from the Apps & Passwords tab.
If this scenario is applicable and you’re using 2-Factor authentication for your Google account, you can probably fix the syncing issues inside the Calendar app by accessing your Google account settings and disabling the feature for every connected app.
Follow the instructions below to disable 2-Factor Authentication on your Google Account:
- Open your default browser, open the Google account page and sign in with your user credentials.
- Once you have successfully signed in with your account, click on the Security tab from the vertical menu on the left-hand side.
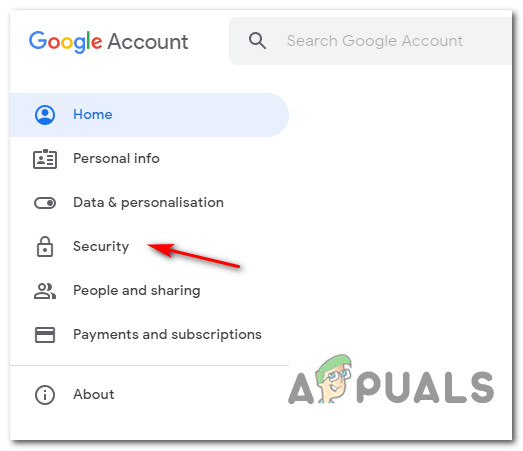
Accessing the Security tab - Once you’re inside the Security tab, scroll down to the Signing in to Google tab, then click on the toggle associated with 2-Step verification.
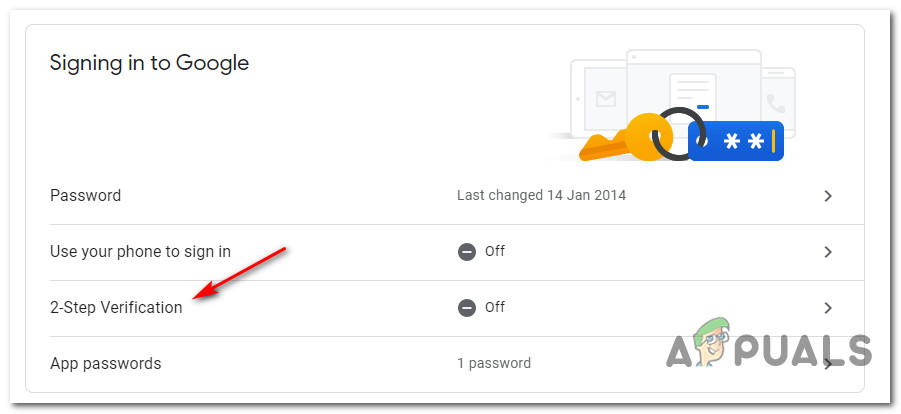
Accessing the 2-step verification menu inside your Google Account - Next, a pop-up window will appear, asking you if you want to turn off 2-Step Verification. When it pops up click on Turn Off. Next, at the confirmation prompt, click Turn Off once again to confirm the operation.
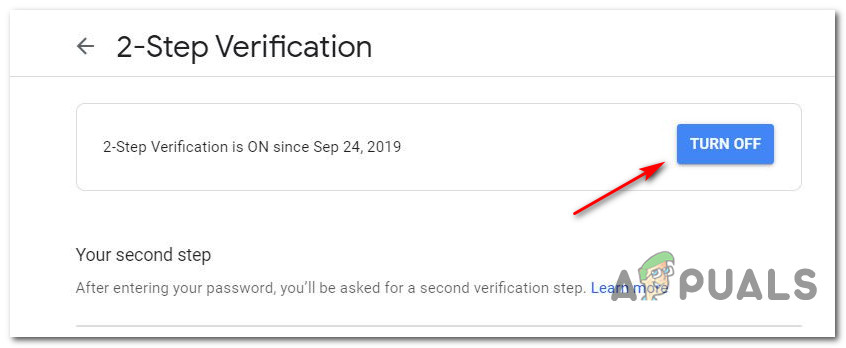
Disabling 2-step verification on your Google Account - Re-establish syncing on your Windows 10 calendar app and see if the problem is now fixed.
Note: You can use Method 2 above for step-by-step instructions on how to do this.
If this method didn’t fix your syncing issues or the steps above were not applicable to your particular situation, move down to the next potential fix below.
Method 4: Reset the Mail & Calendar apps
If none of the other fixes above have worked in your case, you should consider the possibility that you’re dealing with some type of corrupted cached data that is preventing the Calendar app from syncing events properly.
Fortunately, as it’s been confirmed by several affected users, you might be able to fix this problem by resetting the Calendar app via the official channels – But since the Calendar app and Mail app share the same dashboard, you will need to reset both.
If you’re encountering this issue on Windows 10 and you haven’t tried fixing the issue by resetting the Calendar app yet, follow the instructions below:
- Press Windows key + R to open up a Run dialog box. Next, type ‘ms-settings:appsfeatures’ inside the text box, then press Enter to open up the Apps & Features tab of the Settings app on Windows 10.
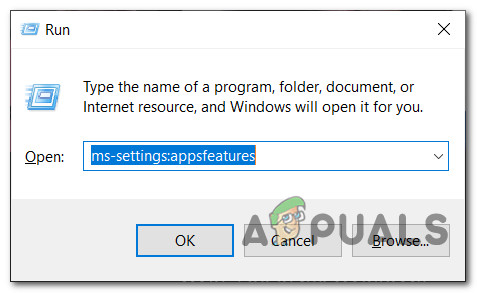
Accessing the Apps & Features menu Note: If you’re prompted by the UAC (User Account Control) prompt, click Yes to grant admin access.
- Once you’re inside the Apps & Features screen, scroll down to the right-hand section and use the search function to search for ‘calendar’.
- From the search results, click on Mail & Calendar, then click on the Advanced options hyperlink from the context menu that just appeared.
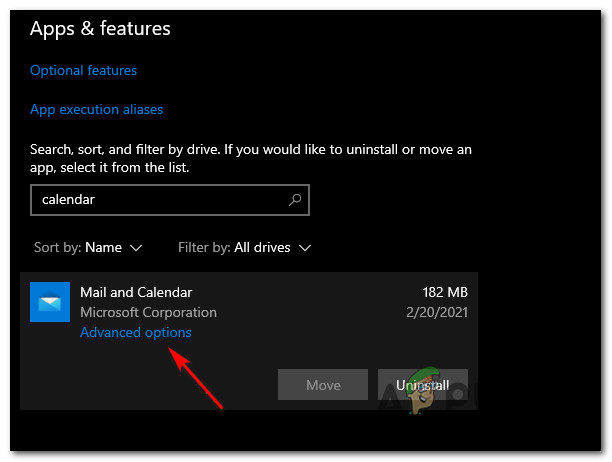
Accessing the Advanced Options menu of Mail and Calendar - Once you’re inside the Advanced Options menu of the Mail and Calendar apps, scroll down to the Reset tab and click on the Reset button.
- At the confirmation prompt, click on Reset once again and wait for the operation to complete before restarting your computer.
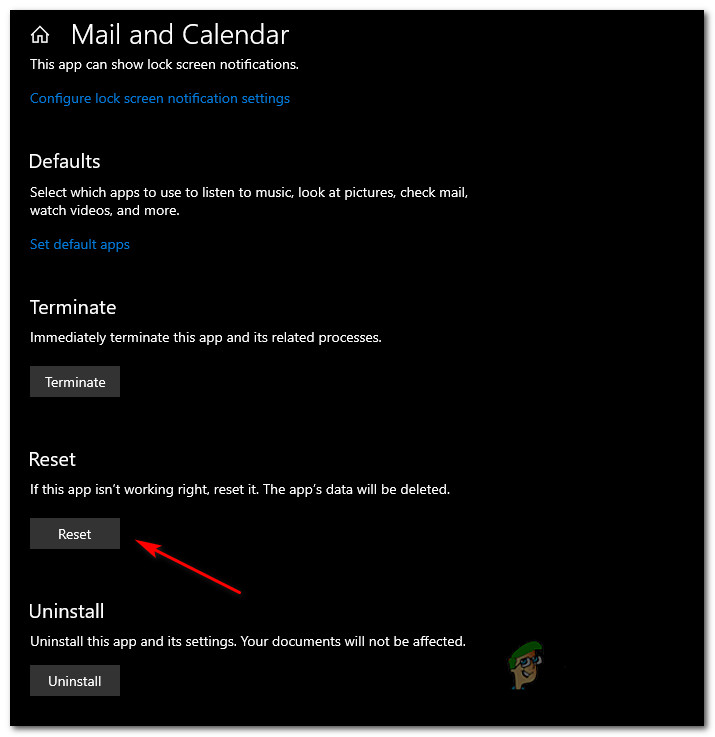
Resetting the Calendar app - Attempt to sync the Calendar once again and see if the problem is now fixed.
In case the same problem is still occurring, move down to the next potential fix below.
Method 5: Deleting the Temporary Files
If none of the methods above have been effective in your particular case, there’s one last thing you can do in order to fix the problem is to remove the Gmail account that’s currently connected to the Calendar app and clearing the Temporary files before syncing the account once again.
Several affected users have confirmed that this approach was the only thing that successfully allowed them to finally fix the syncing bug associated with their Google account.
If this scenario is applicable and you haven’t tried to do this yet, follow the instructions below to remove your google account before deleting the temporary files that might be causing issues with your Google account:
- Press the Windows key on your computer’s keyboard, then use the search function to type ‘calendar’ once the search function appears. Then, click on the Calendar app from the list of available options.

Opening the Calendar app - Once you’re inside the Calendar app, click on the Settings icon (bottom-left section of the screen), then access the Manage Accounts menu (under Settings) from the menu on the right-hand side.
 Opening the Settings menu of the Calendar app
 - If you have multiple connected emails associated with the Calendar app, select the Google account that you’re currently having syncing issues with.
- Inside the Account settings menu, click on Remove this account from this device (under Delete account from this device)
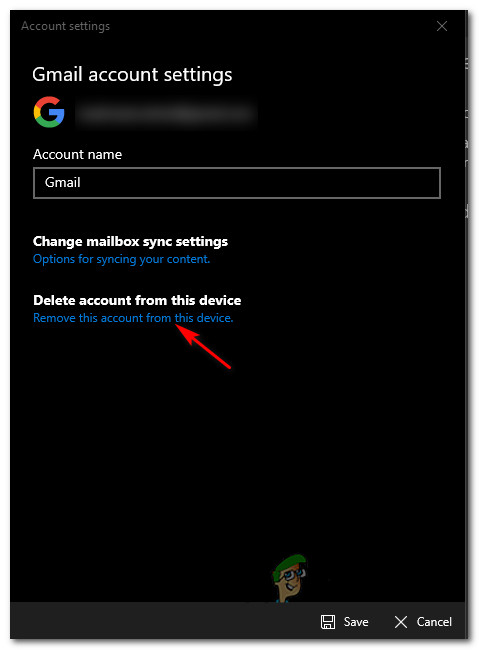
Removing the Google Account - At the confirmation prompt, confirm the operation and wait for your Google account to be removed from the Calendar app.
- Press Windows key + R to open up a Run dialog box. Next, type ‘ms-settings:storagesense’ and hit Enter to open the Storage tab of the Settings menu on Windows 10. If you’re prompted by the UAC (User Account Control) window, click Yes to grant admin access.
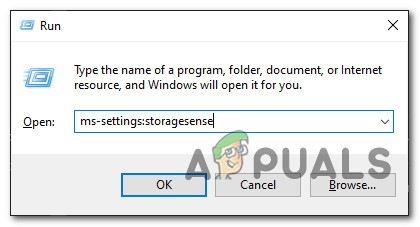
Accessing the Storage menu on Windows 10 - Once you’re inside the Storage menu, scroll down to the list of items and click on Temporary Files.
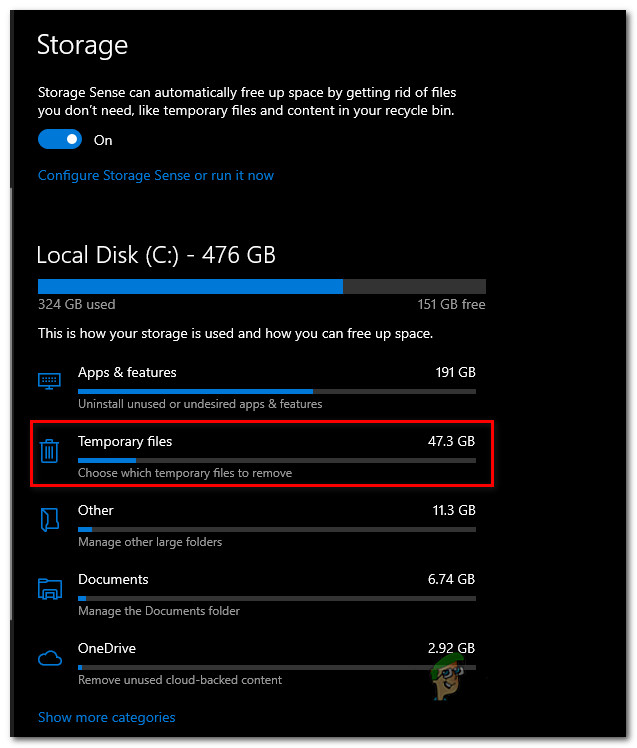
Accessing the Temporary files menu - Once you’re inside the Temporary files menu, wait until the initial scan is complete, then check the box associated with Temporary files and click on Remove from the context menu.
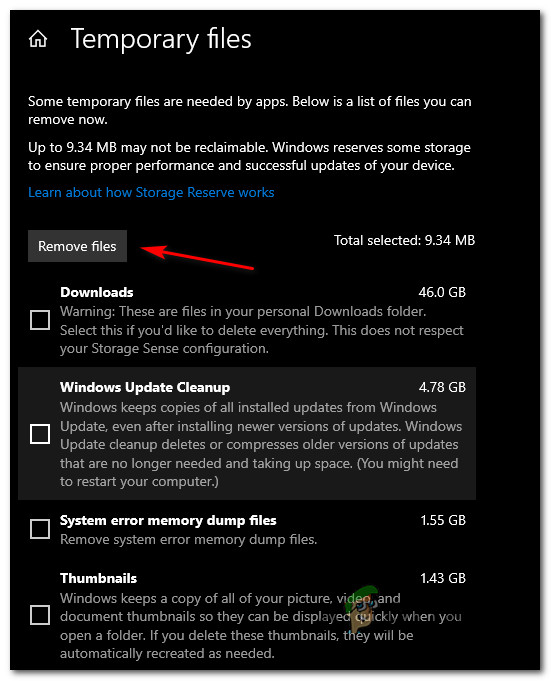
Removing the Temporary Files via the cleanup utility - Once the temporary files are all removed, reboot your computer and wait for the next startup to complete.
- Once your computer boots back up, set up your Google account with the calendar app once again and see if the issue is now fixed.


