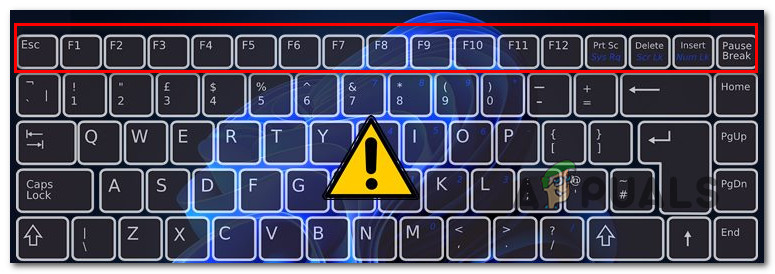
Function Keys Stopped Working on Windows 11? Try these fixes
Some Windows 11 are reporting that they suddenly lost the ability to use their function keys after installing a pending Windows update. Most affected users are reporting that sound controls, brightness controls, and camera FN keys have all stopped working at once.
We’ve investigated this particular issue thoroughly and we realized that there are several different underlying causes that might be responsible for the particular error. Here’s a shortlist of potential culprits that might be responsible for this particular error code:
- Function keys are disabled via shortcut – One of the most common causes that might be responsible for this issue is not actually a bad Windows 11 update. In most cases, this problem will appear after an accidental keys combination press that ended up disabling all the function keys. In this case, all you need to do is press the same shortcut key once again to re-enable the function keys’ functionality.
- Windows 11 build is older than 22000.120 0 – Windows 11 build 22000.100 had a known issue that caused certain hardware keys and buttons to stop working for some devices. This problem particularly affected function keys. Fortunately, Microsoft resolved this problem with build 22000.120, so all you need to do to fix this problem (if this scenario is applicable) is to install every pending Windows 11 update.
- Function keys are disabled via BIOS or UEFI Settings – Keep in mind that many laptops will ship with firmware that has the option to disable the keyboard’s function keys directly from the UEFI or BIOS settings. If you didn’t meddle with the BIOS or UEFI settings recently, it’s also possible da a recent BIOS or UEFI update ended up disabling the function keys.
- Corrupted Lenovo Pointing Device driver – If you’re experiencing this issue on a Lenovo laptop, chances are you’re dealing with a classic case of a corrupted pointing device driver. This was an issue on Windows 10 and it seems to have transitioned to Windows 11 too. The solution, in this case, is to uninstall the driver via Device Manager in order to force Windows Update to reinstall the driver.
- PC is using a Windows 11 insider build – If you’re still on an insider build and you don’t really have a use for it, you should be able to avoid this problem entirely by clean installing a stable Windows 11 release. As new features are tested on insider builds, new issues of this kind are to be expected.
Now that you are aware of every potential reason why you might be suddenly noticing that the function keys stop working, let’s get to the actual fixes.
Follow the instructions below for a few repair strategies that other affected users have successfully used to fix the functionality of the function keys on Windows 11.
Enabling the Function keys
When you’re troubleshooting this particular issue, the first thing you should do is check if the function keys are not actually hard disabled by a shortcut key.
Keep in mind that most laptops have a dedicated function key shortcut that will allow you to disable the function keys at will – for some laptops is FN + F1, for others, it’s FN + F11 and for Dell models, it’s usually FN + ESC.
Chances are you accidentally pressed this function key and ended up disabling this functionality without even realizing it.
You can investigate if this is the case by pressing the function keys shortcut once again and see if you get the functionality back.
Note: You can do an online search with ‘enable function keys + ‘laptop model’ and you should be able to find the shortcut you’re looking for.
In case you already made sure that the function keys are enabled via the shortcut or your particular laptop doesn’t have an FN shortcut for deactivating the function keys, move down to the next potential fix below.
Enable Function keys from BIOS or UEFI Settings
Another reason why you might expect to deal with this particular issue immediately is a case where the function keys are actually disabled from your BIOS or UEFI settings. This type of change can most likely be enforced manually, but there are some cases (the most recent one is with ASUS) where a BIOS update ended up disabling the function keys.
Fortunately, if you’re dealing with this particular issue, the fix is very simple – you’ll need to access your BIOS or UEFI settings and enable the function keys manually.
Follow the instructions below for approximate instructions on how to do this:
Note: While the process of accessing your BIOS settings is the same, your BIOS / UEFI screen will be different depending on your manufacturer. We can’t give you specific instructions once you reach the BIOS or UEFI menu (only general guides).
- Trigger a system reboot or start your PC if your computer is already turned off.
- Once you get to the first screen, press the Setup key a soon as the initial screen appears.

Accessing the Setup screen Note: If the Setup key doesn’t appear on the screen, search online for specific steps of accessing the BIOS or UEFI settings on your particular motherboard.
- Once you’re inside the BIOS or UEFI settings menu, access the Advanced menu and look for an option named Function Key Behavior.
- Once you locate the correct setting, ensure that the Function Key Behavior is set to Function Key and not to Multimedia key.
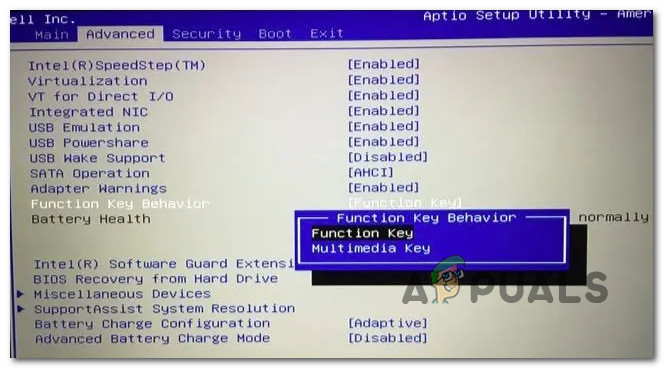
Accessing the Function key Note: Depending on your laptop manufacturer, your BIOS / UEFI menu might be entirely different.
- Once you modify the default behavior of the BIOS or UEFI settings menu, save the changes and boot your PC normally before checking if the Function keys are still not working.
If the problem is still not fixed, move down to the next potential fix below.
Install Windows 11 Build 22000.120 or over
Keep in mind that this behavior can also result from a Windows 11 glitch that got introduced along with build 22000.100. This bad update caused certain hardware keys and buttons not to work on some devices, particularly function keys.
Although Microsoft has not given an official list of affected devices, they do seem like they managed to fix the issue starting with Windows 11 build 22000.120.
So if you’re still on Windows 11 Build 22000.100 or 22000.110 and you didn’t upgrade yet to 22000.120 (or older), fixing this weird function key behavior should be as easy as installing every pending Windows update via WU.
Follow the instructions below to bring your Windows 11 build to the latest and fix the Windows 11 function key glitch:
- Press Windows key + R to open up a Run dialog box. When you’re prompted by the text box, type ‘ms-settings:windowsupdate’ inside the text box and press Enter to open up the Windows Update screen inside the Settings screen.
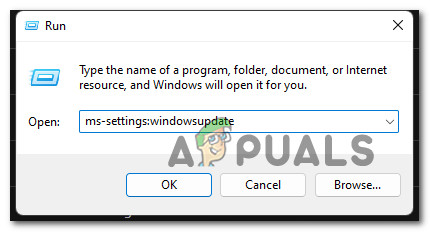
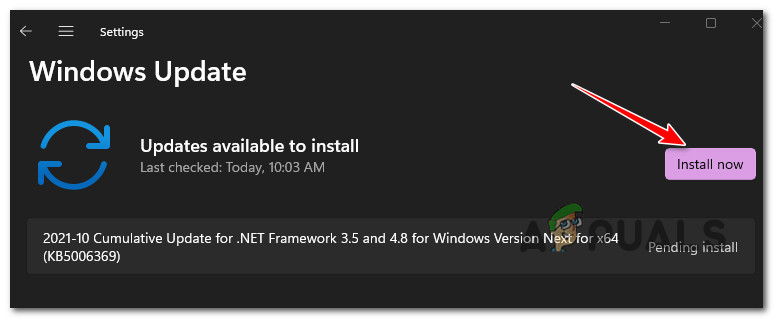
Open up the Windows Update screen - Once you’re inside the Settings screen, move over to the right-hand section of the screen and click on the Check for updates button.
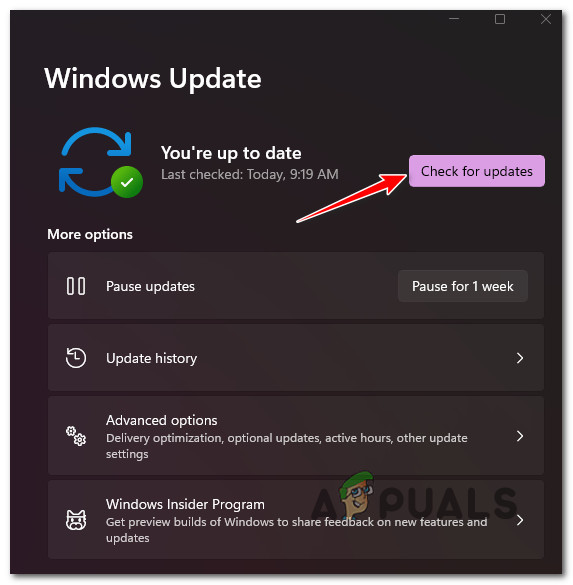
Checking for Updates - If a new update is identified, click on Install Now and follow the remaining prompts to install every pending update until you bring your Windows 11 build up to date.
Install pending Windows 11 updates Note: If you are prompted to restart before every pending update gets installed, do as instructed, but make sure to return to this menu once the next startup is complete to resume the installation of the remaining updates.
- After you manage to bring your Windows build to the latest, reboot your PC before checking if you regained the functionality of your function keys.
If the same kind of problem is still occurring or you already had the latest updates installed, move down to the next potential fix below.
Reinstall the Lenovo Pointing Device (Lenovo Laptops Only)
Another potential reason why you might see this issue occurring is a situation where the function keys are unreachable due to a corrupted Lenovo Pointing Device driver.
This is a well-known bug that was affecting Lenovo laptops on Windows 10 and it seems to have transitioned to the new Windows 11 too.
Several affected users that we’re also dealing with this issue have confirmed that they managed to fix this issue by using Device Manager to uninstall the potentially corrupted driver. By doing this, you’ll end up forcing the Windows Update component to reinstall the driver at the next system startup (once your operating system realizes that it’s missing this driver)
Follow the instructions below for a step-by-step guide on reinstalling the Lenovo Pointing Device Driver:
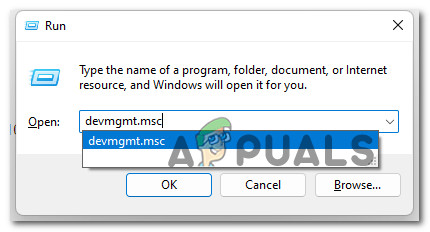
- Press Windows key + R to open up a Run dialog box. Next, type ‘devmgmt.msc’ inside the text box, then press Ctrl + Shift + Enter to open up Device Manager.
Open up Device Manager - Once you’re prompted by the User Account Control, click Yes to grant administrative privileges.
- Once you’re inside Device Manager, expand the drop-down menu associated with Mice and other Pointing Devices.
- Next, right-click on Lenovo Pointing device and choose Uninstall device from the context menu that just appeared.
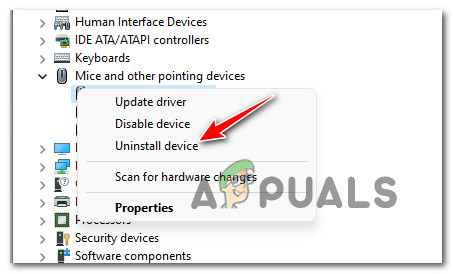
Uninstalling the Device - At the confirmation prompt, click on Uninstall once again, then wait until the operation is complete.
- Restart your PC and wait until the next startup is complete. During this next startup, your operating system will notice that the pointing device driver is missing and install a generic equivalent that will hopefully fix the issue for good.
If the same kind of issue is still occurring even after you follow the instructions above or this method was not applicable to your particular scenario, move down to the next potential fix below.
Clean install Official Windows 11 Release
If none of the instructions above have allowed you to fix the issue in your case and you’re on a development build, you should really think about making the transition to a stable release.
Truth be told, insider builds will always be vulnerable to these kinds of issues, so if you don’t have any use for an insider build, you should really consider making the transition to a stable release.
If you’re looking for specific instructions on performing a clean install procedure, follow this guide that will walk you through the whole thing.


