How to Flash Custom ROM For S4 Mini 3G/LTE with Cyanogenmod 13
Rooting your Android phone is your first step towards freedom, customization and community delevopers supported content, after rooting your phone there are many choices in regards to customization, you can download and flash a custom recovery to backup your data or flash ROMs, you can use Xposed Framework for simple customization or you can go full on and flash a custom rom for your device. A Custom ROM is a modified version of the Android operating system. Tweaks, additional features, different themes or an enhanced performance are included.
Custom ROMs also offer the possibility of a newer version of Android, which maybe unreleased for your device due to limitations put by your manufacturer or carrier, and that is the case today, today we are going to show how to flash Cyanogen mod 13.0 rom for your Galaxy S4 mini, Cyanogenmod 13 is the newest version of the Android system (Marshmallow 6.0.0). Please note that this is a nightly version, meaning it could be a little bit unstable.
Before starting this guide please know that this ROM works only on GT-I9190 and GT-I9195 variants, if you have a different variant of the galaxy S4 mini please do not download or flash any of these ROMs as they may be harmful to your device. If you are not sure what variant of the S4 mini you have please check by going to Settings -> About phone -> Model number.
This method requires a rooted Galaxy S4 Mini, if your phone is not rooted you can followour guide here first.
Next, make sure the following requirements are met
a) Access to a Laptop or Desktop with Internet and USB Port
b) A USB cable to connect your phone to the Computer
c) Battery should be fully charged
Using your laptop, Install odin from here and then install the recovery image from here, it is going to be in .tar.md5.zip format, use any program to extract this zip file so it is in .tar.md5 format, unzip odin and then press on the .exe file (should be in the folder you just unzipped into), turn off your phone and boot it into download mode by holding home button, Power button and VOL down button, once you enter download mode you will be greeted with a warning screen asking whether you would like to continue or reboot, press VOL UP button to continue. Then connect it to the laptop using a usb cable, there should be a highlighted blue box in odin (Indicating that odin has read the device), if you do not see this box then you probably need to download Samsung USB drivers for your computer from here.
In odin uncheck F.Reset Time and Auto reboot then click on the AP button, search for the extracted .tar.md5 file you extracted earlier and press the start button. A blue transfer bar will appear on the device showing the recovery being transferred. Check the Message Window in Odin for: “All threads completed. (succeeded 1 / failed 0). The transfer has successfully completed. Once done turn off your phone by long pressing your power button then turn it back on after disconnecting it from the USB cable.
Now for flashing the ROM.
Before flashing, install Easy Backup & Restore from Market, run it and backup your Call log, SMS history, Bookmarks, contacts and applications.
Using your phone download the ROM from here for the GT-I9190 (Download the latest Cyanogen mod Build) and here for the GT-I9195. For both versions you must download the Google applications from here , choose ARM in platform, 6.0 in android version and the micro package then download it.
First, turn off your phone and boot into recovery by holding volume up, home button and power buttons simultaneously, make a full backup just in case you want to go back to your old system or if anything fails during this process, you can make the back by pressing on Backup checking all of the boxes and swiping to do the back up.
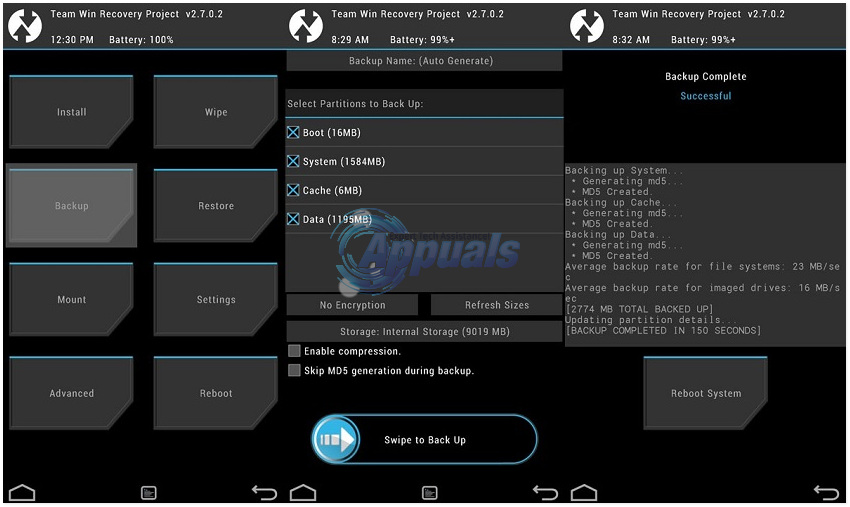
When done press return and then access Install, first browse to the cyanogen mod build zip you downloaded earlier and select it and swipe to flash, when done repeat the same process with the Google applications package you installed. When done with flashing these two zip files reboot your phone, it should take a while at first to upgrade you applications but after that it should work. (The flashing process should look like the picture below, except using the Cyanogen mod build zip and the Google apps zip)

After you setup your Google account, reinstall Easy Backup & Restore from Market in order to restore most of your apps, call log and SMS history.
When you are finished with setup and restoring your backups you might want to turn the root access back on, you can do this by going to Settings -> About phone -> Build number tap on it 7 times until you are greeted with a You are now a developer message press return and access developers options, in it choose root access and choose APPS only.