How to Fix Brightness Won’t Change on Windows 10/11
When brightness adjustment stops working on Windows, moving the brightness slider or using function keys has no effect, leaving the screen too bright or too dim. This issue often happens after Windows updates or driver changes, indicating a problem with the system’s communication with the display settings.
The most common cause is outdated or incompatible display drivers, particularly after a major update. Additional causes include corrupted system files or conflicts with power settings, especially when auto-brightness options are enabled.
In this article, we will discuss different solutions to solve this problem.
1. Adjust the Brightness from Power Options
Sometimes, the brightness setting might not work because of a miscommunication between the display driver and the system’s power settings. By adjusting brightness in the Power Options menu in the Control Panel, Windows can reconfigure these settings and re-sync the display controls, helping the system recognize the adjustments correctly.
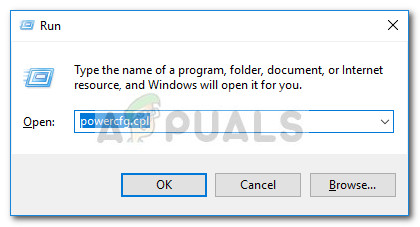
- Press Windows key + R, type ‘powercfg.cpl‘, and hit Enter to open the Power Options menu.
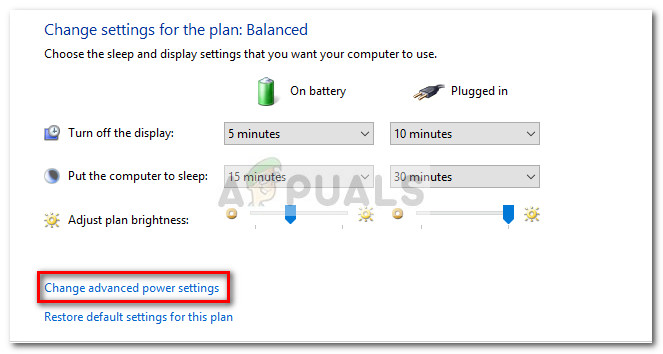
- In the Power Options menu, click Change plan settings, then Change advanced power settings.
- In the next window, scroll down to Display, click the ‘+’ icon to expand the menu, then expand the Display brightness menu and adjust the values to your preference.
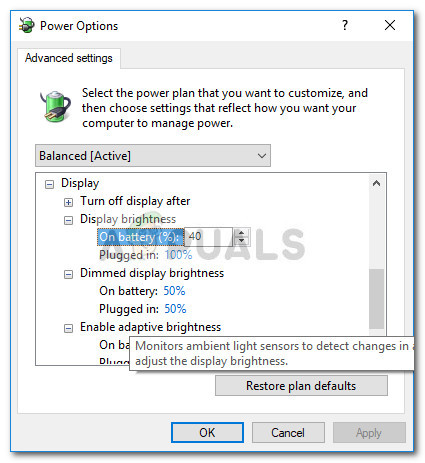
- Repeat the step above for Dimmed display brightness and ensure that Enable adaptive brightness is turned off. After configuring the settings, click Apply; your screen brightness should adjust to the selected values.


2. Change the Brightness Options from the Graphics Properties Menu
Using the Graphics Properties Menu allows direct control over display settings via the graphics hardware. This bypasses potential issues with Windows’ display controls that may malfunction after updates or driver problems. Adjusting brightness directly through the graphics card’s control panel (Intel, AMD, or NVIDIA) ensures better compatibility and reliability for managing brightness.
Note: The following steps are for the Intel Graphics and Media Control Panel. Screens may differ with various graphics drivers.
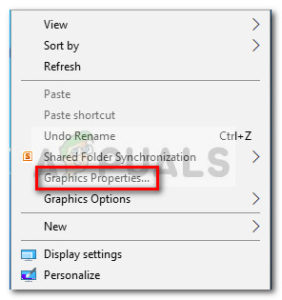
- Right-click on the desktop and select Graphics Properties.
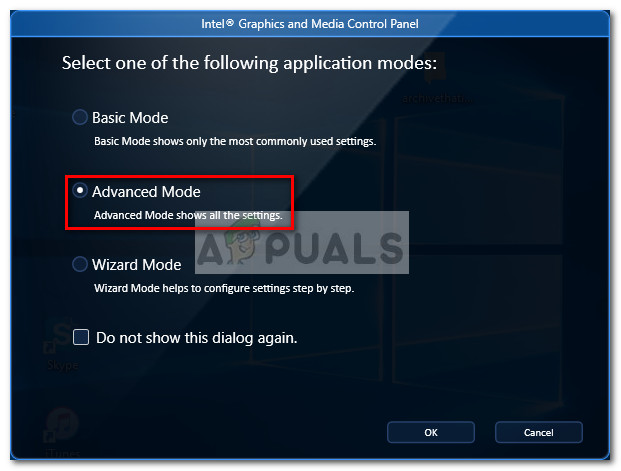
- Choose Advanced Mode and click OK.
- Expand the Display menu, click on Color Enhancement, and use the Brightness slider to adjust the brightness to your satisfaction.
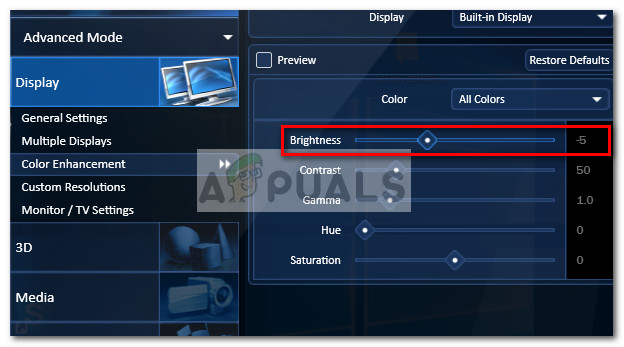
- Click Apply to save your new brightness setting.


3. Update the Graphics Drivers
Updating your GPU drivers can fix brightness issues because outdated or corrupted drivers might not work correctly after system updates. Installing the latest drivers ensures that your display adapter works with the latest Windows changes, helping to restore control over screen brightness settings.
- Press Windows key + R, type ‘devmgmt.msc‘ and press Enter to open Device Manager.

- In the Device Manager, expand the Display adapters section, right-click on your GPU and select Update Driver.
Note: Laptop users may see two different GPUs under Display Adapters. If so, right-click on the integrated graphics (such as Intel(R) HD Graphics 3000). - Click “Search automatically for updated driver software” to see if a new version is found. Follow the on-screen instructions to install it, if available.
 Note: During this step, Windows will use your internet connection to download the latest driver. Ensure that you have a stable internet connection.
- If a new driver is found and installed, restart your computer and check if you can now adjust the brightness. If the driver search indicates you have the latest version or the new driver doesn’t change the behavior, continue with the steps below.
- Go back to the main screen of Device Manager, right-click on your integrated GPU driver, and choose Update Driver again.
- This time, click on Browse my computer for driver software.

- Select Let me pick from a list of available drivers on my computer.

- Check the box next to Show compatible hardware, select Microsoft Basic Display Adapter, and click Next.

- Once the Basic Display Adapter driver is installed, restart your computer. With the next boot, the problem should no longer persist.
For detailed guide, check our article here.
4. Re-enable Generic PnP Monitor
Re-enabling the Generic PnP Monitor helps Windows rediscover the display, fixing issues caused by faulty drivers or incorrect detection after system updates. This refreshes the display settings, allowing brightness controls to work properly again.
- Press Windows key + R, type ‘devmgmt.msc‘, and hit Enter to open Device Manager.
- In Device Manager, expand the Monitors section, right-click on Generic PnP Monitor, and select Enable Device.
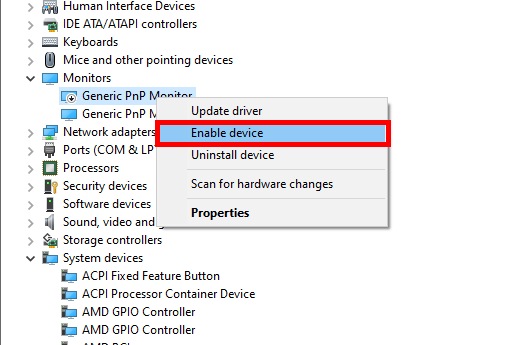
- Restart your system and check if you can now adjust the screen brightness.
5. Change the Display Type to Discrete in BIOS (Lenovo)
Switching to “Discrete Graphics” in the BIOS on Lenovo laptops forces the system to use the dedicated GPU, bypassing issues with the integrated graphics. This often resolves brightness adjustment problems caused by driver conflicts or system updates.
To fix this manufacturer-specific problem, access your BIOS (by pressing F2 during startup), navigate to the Configuration tab, and change the Graphics Device setting from Switchable Graphics to Discrete Graphics. Save the changes with F10 and then allow the computer to boot.
6. Fix the Catalyst Bug via Registry Editor (ATI GPUs)
By modifying certain registry entries, you disable power management settings that conflict with brightness controls. This restores proper communication between Windows and ATI drivers, allowing brightness adjustments to work correctly again.
- Press Windows key + R, type ‘regedit‘ and press Enter to launch Registry Editor.

- In Registry Editor, navigate to the following key:
HKEY_LOCAL_MACHINE\SYSTEM\ControlSet001\Control\Class\{4d36e968-e325-11ce-bfc1-08002be10318}\0000 - Double-click on MD_EnableBrightnessIf2 and change the Value to 0. Repeat for KMD_EnableBrightnessInterface2.
- Next, navigate to:
HKEY_LOCAL_MACHINE\SYSTEM\CurrentControlSet\Control\Class\{4d36e968-e325-11ce-bfc1-08002be10318}\0001 - Modify MD_EnableBrightnessIf2 and KMD_EnableBrightnessInterface2 to set their values to 0.
- Exit Registry Editor and restart your computer. Upon the next startup, the screen brightness issue should be resolved, and control restored.
8. Adjusting Screen Brightness Using PowerShell
Using PowerShell lets you directly access system settings, allowing you to manually adjust brightness when regular settings fail. Running specific commands can fix issues caused by corrupted drivers or system updates, bypassing malfunctioning interfaces and restoring proper functionality.
- Right-click on the Start menu and select Windows PowerShell (Admin) to open PowerShell with administrative privileges.

- Type the following command to view your current brightness level and press Enter:
Get-WmiObject -Namespace root/WMI -Class WmiMonitorBrightness
- To set a new brightness level, first determine the instance name of your display using this command:
(Get-WmiObject -Namespace root/WMI -Class WmiMonitorBrightnessMethods).InstanceName
- Adjust the brightness to your desired level (between 0 and 100) by executing the following command. Replace ‘InstanceName’ with the actual name obtained from the previous command, and ‘BrightnessLevel’ with the brightness level you want. Here’s an example:
(Get-WmiObject -Namespace root/WMI -Class WmiMonitorBrightnessMethods -Filter "InstanceName = 'InstanceName'").WmiSetBrightness(1, 50)
In this example, replace ’50’ with the desired brightness level.
- If the command is successful, your screen brightness should change immediately to the level you set.


Thank you SO much for this article! My brightness buttons have not been working for a whole YEAR and by using method 1 and enabling my adaptive brightness, I can finally change my brightness!