3 Basic Fixes ‘VT-x/AMD-V hardware acceleration is not available’
Several users are getting the ‘VT-x/AMD-V hardware acceleration is not available on your system’ error when trying to install or launch a virtual machine in Oracle VM Virtualbox. The issue is not specific to a certain Windows version as it’s reported to occur with every recent Windows release.
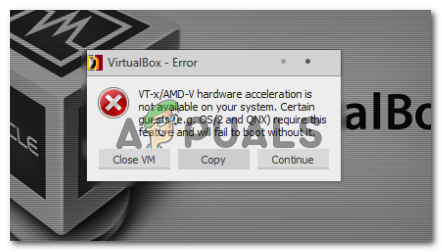
What is causing the ‘VT-x/AMD-V hardware acceleration is not available on your system’ error
We investigated this particular issue by looking at various user reports and the repair strategies that they used to get the issue resolved. Based on what we gathered, there are several common scenarios that will trigger this particular error message:
- Your CPU doesn’t support VT-x/AMD-V – Some older CPUs are not equipped to support Intel’s VT-x or AMD-V. If your computer dosen’t supports any virtualization technology, you will be unable to circumvent or resolve the error message.
- VT-x/AMD-V was disabled by Hyper-V – Hyper-V is Microsoft’s proprietary virtualization technology. The most recent Windows versions will enable Hyper-V automatically and disable VT-x/AMD-V in order to avoid any conflicts. However, Hyper-V does not work well with virtual machines.
- VT-x/AMD-V is disabled within BIOS – Another reason why you might see this error message is that the virtualization technology that your CPU uses is disabled from BIOS. In this case, accessing the BIOS settings and enabling VT-x/AMD-V will resolve the error message and allow you to run virtual machines.
If you’re currently struggling to resolve the ‘VT-x/AMD-V hardware acceleration is not available on your system’ error, this article will provide you with a collection of verified troubleshooting steps. Down below, you’ll find several popular methods that other users in a similar situation have used to resolve the error message.
In order to spare yourself from trying out unnecessary fixes, follow the methods below in the order that they are presented. You should eventually find a method that resolves (or at least provides an answer for) your problem.
Before continuing, try performing an SFC scan.
Method 1: Verifying if your CPU supports virtualization
Before trying out anything else, it’s important that you take the time to investigate whether your computer is equipped to use VT-X or AMD-V. All the newer CPUs will support virtualization nowadays (including the ones in the low-range). However, if you’re working with an older CPU, you should start by verifying if your CPU support virtualization.
There are a couple of ways to verify whether your CPU is equipped to use virtualization – you either use a dedicated program that will tell you if virtualization is supported on your CPU or do things manually. Follow whichever guide is closer to your preferred approach.
How to verify if your CPU supports Virtualization automatically
One of the easiest ways to find out if your computer supports virtualization is to use a dedicated tool called SecurAble. Among other things, this tool will analyze the presence of operational model process features including virtualization. Here’s a quick guide on using SecurAble:
- Visit this link (here) and click on Download now to download the latest version of Securable.

Downloading SecurAble - Open the SecurAble executable and click Yes at the UAC (User Account Control) prompt.
- If your computer is equipped to support hardware virtualization, you will see a green Yes above Hardware Virtualization.
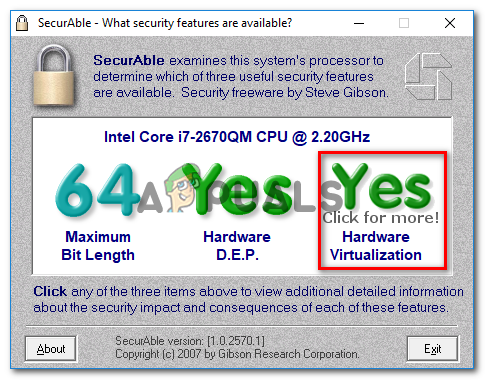
Verifying if virtualization is supported
If the answer is Yes, it means that your computer’s CPU is equipped to support virtualization and one of the next methods below will allow you to resolve the error message. If you determined that hardware virtualization is not supported, follow the other methods below will not resolve the error message.
How to verify if your CPU supports Virtualization manually
If you prefer to do things manually, you can verify whether your CPU supports VT-x (on Intel) or AMD-V (on AMD) by investigating the specifications of your CPU manually. To do this, follow one of the two guides below (according to your CPU manufacturer):
Intel
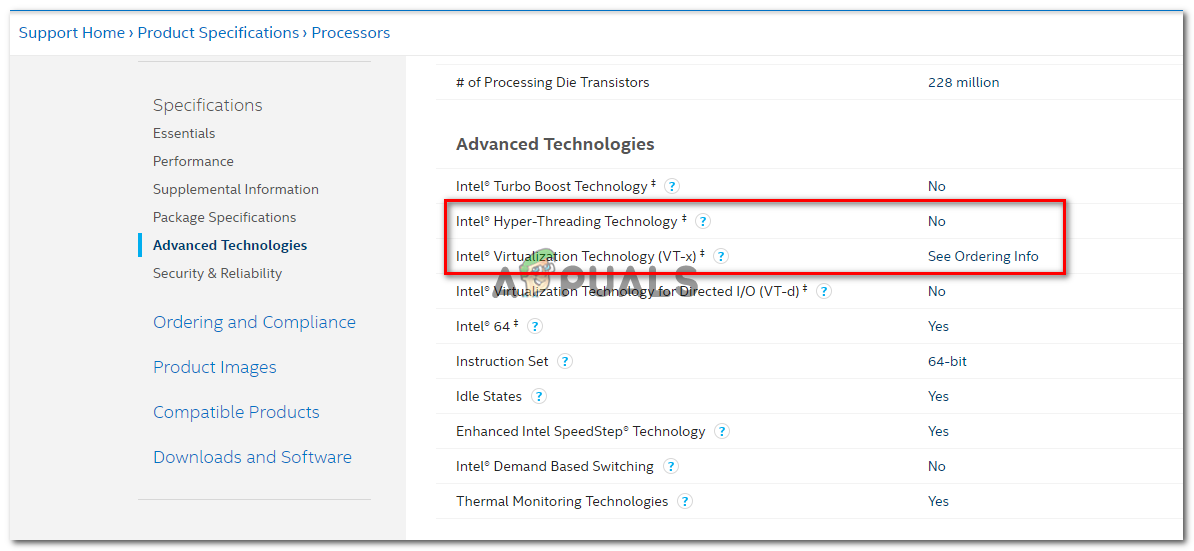
With Intel processors, you can see whether Virtualization is supported by looking at the Processor Documentation which can be found on ARK.INTEL.COM. Once you get there, use the search function to search for your specific CPU model.
Then, scroll down to the Advanced Technologies tab and see the status of Intel® Virtualization Technology for Directed I/O (VT-d) and Intel® Virtualization Technology (VT-x). If any of them is labeled as No, then virtualization technology is not supported by your processor model.
AMD
If you have an AMD processor, you can verify if it supports virtualization by looking at the specifications on AMD’s website. Use the search function to find your specific model or choose it from the list. Once you arrive at the webpage dedicated to your CPU model, expand the Key Features drop-down menu and see if Virtualization is among the Supported Technologies.

If you found that virtualization is supported, proceed with the next methods below in order to get the issue resolved.
Method 2: Disabling Hyper V
Hyper-V (formerly known as Windows Server Virtualization) is Microsoft’s proprietary virtualization technology. Hyper-V is perfectly capable of creating virtual machines on x86 and x64 system running Windows, but it’s not used by VirtualBox or VMware for stability reasons.
However, the most recent Windows versions are programmed to prioritize Hyper-V over VT-X or AMD-V. And since Hyper-V will conflict with similar virtualization technology, VT-x or AMD-V will be disabled by default whenever Hyper-V is enabled.
As you can imagine, this will create errors with Virtualbox, VMware or similar software, since most of them are not designed to work with Hyper-V.
Fortunately, disabling Hyper-V will resolve the ‘VT-x/AMD-V hardware acceleration is not available on your system’ error if the issue. There are multiple methods that you can follow to disable Hyper-V and allow VT-x or AMD-V to take over. Feel free to follow whichever one you feel more comfortable with.
Disabling Hyper-V via Command prompt
The easiest way to disable Hyper-V is by typing a command inside an elevated Command Prompt window. Here’s what you need to do:
- Press Windows key + R to open up a Run dialog box. Then, type “cmd” and press Ctrl + Shift + Enter to open up an elevated Command Prompt. When prompted by the UAC (User Account Control), click Yes to grant administrative privileges.
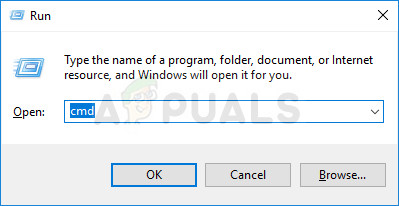
Opening Command Prompt via Run dialog box - In the elevated Command Prompt, type/paste the following command and press Enter to disable the Hyper-V function:
dism.exe /Online /Disable-Feature:Microsoft-Hyper-V
As soon as you’ve finished running this command, Hyper-V will be disabled and the virtualization technology provided by your processor will be reinforced.
Disabling Hyper-V via GUI
Another method that will enable you to disable Hyper-V technology is to use the Control Panel interface. This method is slower but should be preferred if you’re not comfortable with running commands via the terminal. Follow the steps down below to disable Hyper-V via the Programs and Features screen:
- Press Windows key + R to open up a Run dialog box. Then, type “appwiz.cpl” and press Enter to open up the Programs and Features screen.

Type appwiz.cpl and Press Enter to Open The List of Installed Programs on Windows - Inside the Programs and Features screen, click on Turn Windows features on or off from the left-hand pane.
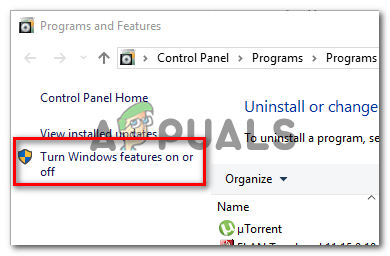
Accessing the Windows features menu - From the Windows Features menu, expand the Hyper-V folder and make sure to uncheck Hyper-V Management Tools and Hyper-V Platform before clicking OK.
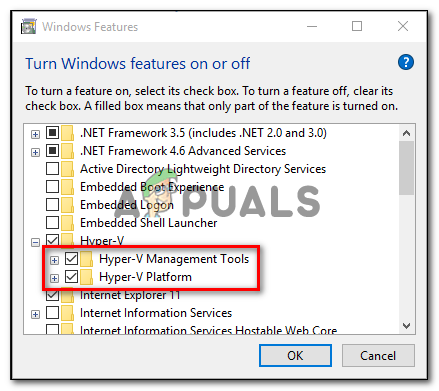
Disabling Hyper-V via the Windows Features screen - Restart your computer and see if the error has been resolved at the next startup.
If you’re still encountering the ‘VT-x/AMD-V hardware acceleration is not available on your system’ error, move down to the next method below for steps on ensuring that virtualization is enabled from BIOS/UEFI.
Method 3: Enabling virtualization withing BIOS/UEFI
Another reason why you might get the ‘VT-x/AMD-V hardware acceleration is not available on your system’ error is due to virtualization being disabled from your BIOS settings. Although virtualization is enabled by default on most computer configurations, this is quite a common occurrence. For a lot of affected users, a BIOS update is what ended up disabling the virtualization technology in BIOS.
Fortunately, you can write this wrong quite easily by accessing your BIOS/UEFI settings and re-enabling the virtualization technology from there.
Note: Motherboard released prior to the release of Windows 8 are likely to use BIOS, while most modern PC builds are using UEFI.
On a BIOS-powered computer, you’ll need to press the Setup key during the initial startup screen. The Setup key is usually one of the F keys (F2, F4, F6, F8) or the Del key. If you can’t identify the setup key specific to your motherboard, do an online search on the ‘motherboard model + setup key‘.
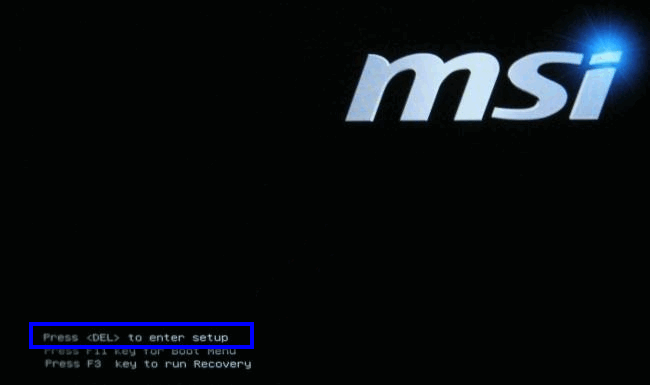

Once you gain entry into your BIOS/UEFI settings, start looking for an option labeled Intel VT-x, AMD-V, Intel Virtualization Technology, Vanderpool, etc. You can typically find the option under Processor, Security, Chipset, Advanced, Advanced Chipset Control, Advanced CPU configuration, etc.
When you manage to find the option, make sure you enable it.

Note: The settings you’ll find inside your BIOS/UEFI will be different depending on your motherboard and CPU manufacturer. If you can’t find the option yourself, search online for specific steps on enabling hardware virtualization on your configuration.
Once you manage to enable virtualization, save the changes and restart your computer. At the next startup, the ‘VT-x/AMD-V hardware acceleration is not available on your system’ error should no longer occur when you try to install or run a virtual machine.


