Fix: Total Identified Windows Installations: 0
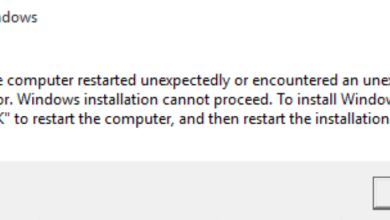
The worst kind of Windows errors is the one which can’t be solved easily because of the fact that you haven’t actually booted into your computer yet. It’s immeasurably easier to solve a problem when you have already booted into your Windows operating system and when you are able to use various troubleshooters and tools.
This is what makes this error so difficult to solve. It appears during startup and nothing works. Whatever you try, a “Total Identified Windows Installations: 0” message appears leaving you helpless. Follow the instructions in the article below in order to try and solve the problem.
Preparation:
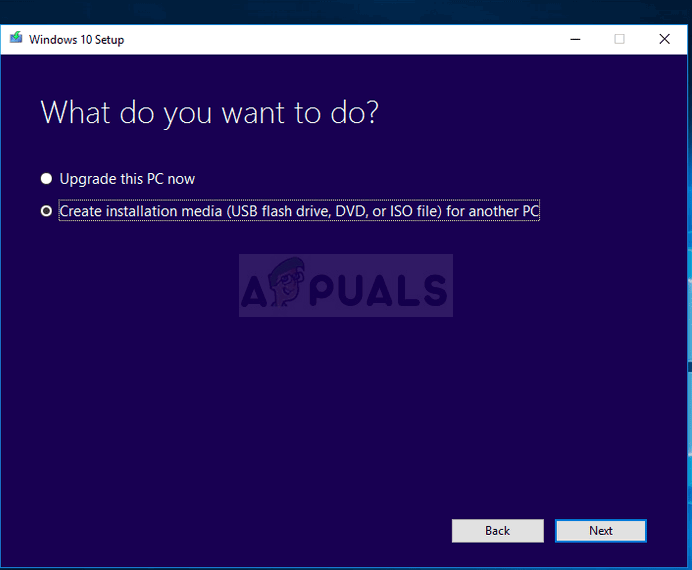
In order to perform any of the troubleshooting explained in this article, you will need to prepare a Windows installation media DVD or USB which you will use to troubleshoot everything. For older versions of Windows (older than Windows 10) you will need to use the original disc you received with the operating system. However, for Windows 10, you can create it easily.
- Download the Media Creation Tool from Microsoft’s official website. Double-click on the downloaded file called MediaCreationTool.exe in order to launch the wizard. Tap Accept.
- Select the Create installation media (USB flash drive, DVD, or ISO file) for another PC option from the initial screen.
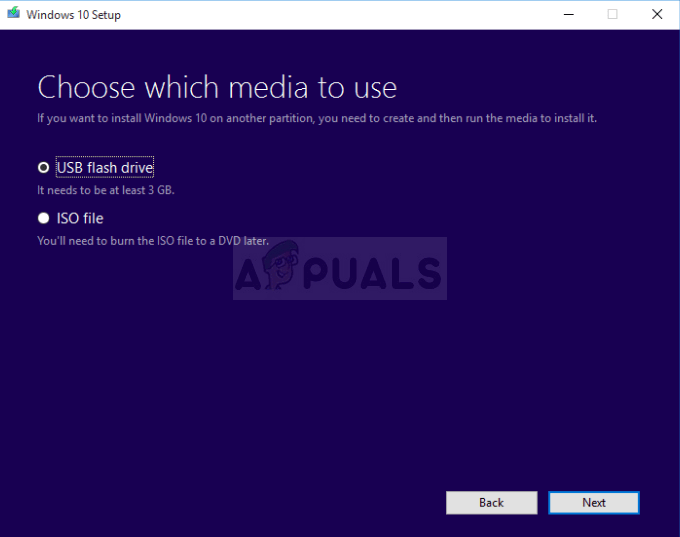
- The language, architecture, and edition of the bootable drive will be selected based on your computer’s configuration, but you should clear the Use the recommended options for this PC setting in order to select the correct settings for your broken PC (you are probably creating this on a different PC).
- Click Next and click on the USB flash drive or DVD option when prompted to choose between USB or DVD, depending on which device you want to use.
- Click Next and choose the drive from the list which displays the storage devices connected to your computer.
- Click Next and the Media Creation Tool will proceed to download the files necessary to install create the installation media.
Solution 1: Registry Recovery
Recovering the registry is one of the only rational steps you can undertake in order to solve the problem. You should still be aware of the fact that the problem can be caused by various circumstances. If one of your components such as the drive where your operating system is located has gone corrupt, there is nothing else you can do but replace it.
However, if the problem is indeed related to corrupt registry entries, you can fix it by following the steps below:
- Insert the recovery drive you own or which you created for your operating system and start your computer. The following steps differ from one operating system to another so follow them accordingly:
WINDOWS XP, VISTA, 7: Windows Setup windows should open prompting you to enter the language along with time and date settings. Enter them and choose the Repair your computer option at the lower part of the screen after proceeding. Keep the first radio button checked when prompted with Use recovery tools or Restore your computer and click on the Next button. Choose Command Prompt when presented with the Choose a recovery tool screen.
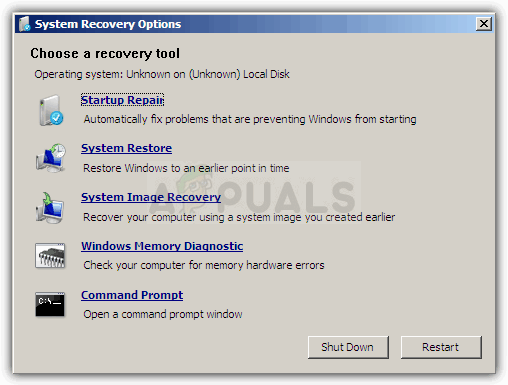
WINDOWS 8, 8.1, 10: You will see a Choose your keyboard layout screen so choose the one you want to use. The Choose an option screen will appear so click on Troubleshoot >> Advanced Options >> Command Prompt.
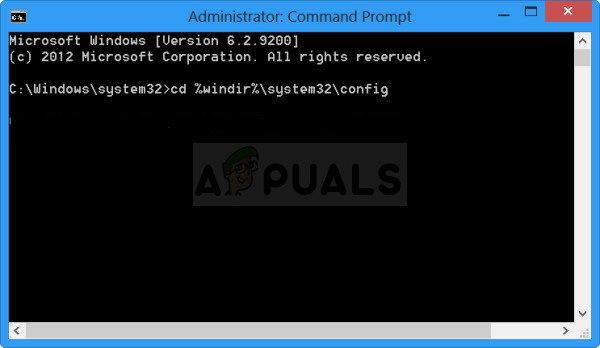
- Navigate to the following folder in the Command Prompt “C:\Windows\System32\config” by using the command displayed below. Make sure you click Enter after each one.
cd windows
cd system32
cd config
Run the following commands in order to replace the folders DEFAULT, SAM, SECURITY, SOFTWARE and SYSTEM:
del c:\windows\system32\config\sam
del c:\windows\system32\config\security
del c:\windows\system32\config\software
del c:\windows\system32\config\default
del c:\windows\system32\config\system
copy c:\windows\tmp\software c:\windows\system32\config\software
copy c:\windows\tmp\system c:\windows\system32\config\system
copy c:\windows\tmp\sam c:\windows\system32\config\sam
copy c:\windows\tmp\security c:\windows\system32\config\security
copy c:\windows\tmp\default c:\windows\system32\config\default
- Check to see if the problem is solved now after restarting your computer and trying to boot without the recovery DVD.
Solution 2: Boot Recovery
There is a useful in-built feature called Boot Recovery and it can be accessed easily via Command Prompt. As it name suggests, this tool can help you boot into your computer easily and help you fix various issues which may have appeared with the boot process.
- If you are unable to access Command Prompt otherwise, follow the same set of steps from above in order to access Command Prompt from the recovery drive.
- Type in the following command and make sure you click Enter after you type it in correctly:
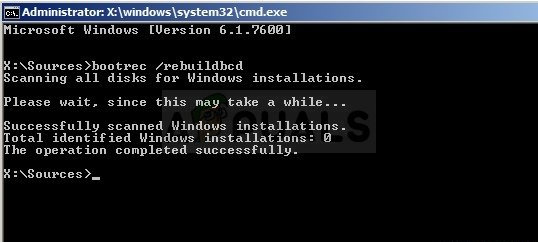
bootrec /rebuildbcd
- You should be able to see the message saying:
Scanning all disks for Windows installations.
Please wait, since this may take a while…
Successfully scanned Windows installations.
Total identified Windows installations: 0
The operation completed successfully.
- Since you obviously have Windows installed, you will need to ‘remove’ and rebuilt it again from the list using the following commands:
bcdedit /export c:\bcdbackup
attrib c:\boot\bcd -h -r -s
- The first command created a backup of the previous BCD store and the second one removed certain attributed which restricted the actions you could undertake with it. Now you can delete or rename it and rebuild it again by using this command:
ren c:\boot\bcd bcd.old
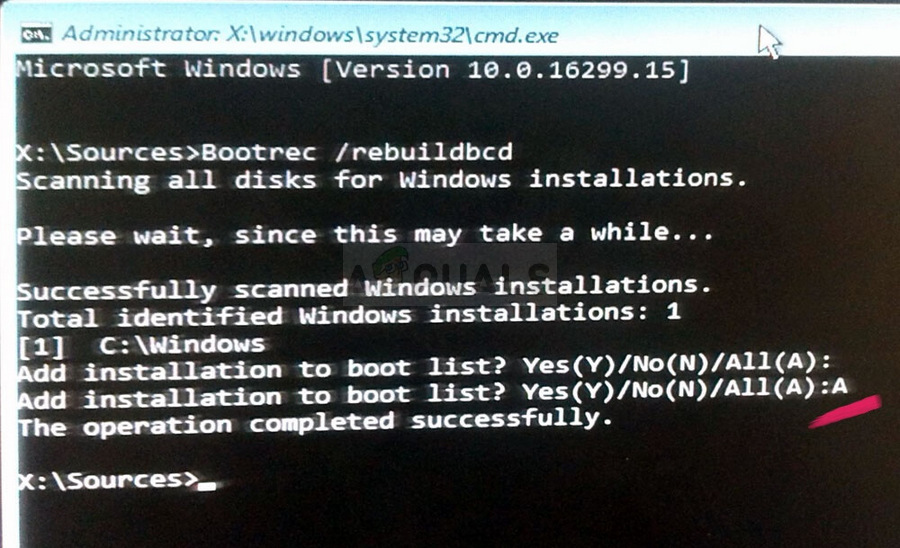
- Now you can repeat the same command we tried in the beginning where we received the 0 Windows installations message:
bootrec /rebuildbcd
- The following message will appear:
Please wait, since this may take a while…
Successfully scanned Windows installations.
Total identified Windows installations: 1
[1] D:\Windows
Add installation to boot list? Yes<Y>/No<N>/All<A>:
- Press Y and you should see the “The operation completed successfully” message meaning that the BCD rebuild is complete. Restart your computer and check to see if you are able to boot normally.


Still get Total Identified Windows Installations: 0
My disk is healthy, etc….but after putting in a new mobo I can’t get windows to fire. I am missing something.
bootrec /fixboot gives me “Access is denied”