(7 Fixes) This device can’t find enough free resources that can use
The “This device cannot find enough free that it can use (Code 12)” problem is displayed within the device’s properties windows in the Device status box. That error is usually a hardware conflict which arises when two devices are assigned the same I/O port but there are other culprits as well.
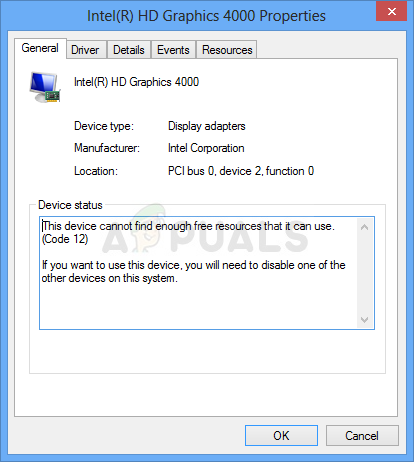
This device cannot find enough free resources that it can use (Code 12)
Device Manager can also be the home to other errors which share similarity with the one we dedicated this article to, both in the things that cause it and the methods which can be used to solve it:
- This device cannot find enough free resources that it can use. (code 12) is generally seen on Network Adapters, Display Adapters and Sound Card.
The method which is going to work for you heavily depends on the scenario within which the problem occurs and we will make sure to point that out in the method’s description. Good luck and we hope you will be able to solve the problem.
Solution 1: Crypto Miners with Multiple GPUs
Miners who have plenty of GPUs in their rig often run into these issues as systems are not used to such weird setups. They were ready to almost give up on mining until a user posted a solution which can be done easily after you access BIOS settings on your computer. Make sure you follow the steps below.
- Turn off your computer by going to the Start Menu >> Power Button >> Shut down.
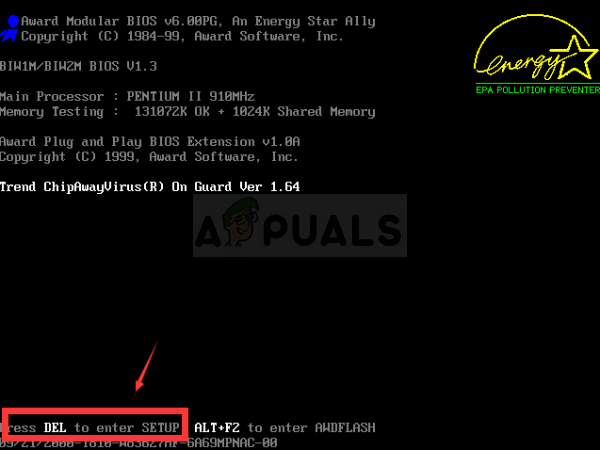
- Turn your PC on again by pressing the power button and try to enter BIOS settings by pressing the BIOS key while the system boots. The BIOS key is typically displayed on the boot screen, saying “Press ___ to enter Setup.” There are other ways the message may appear like. Common BIOS keys are F1, F2, Del, Esc and F10 so make sure you click it fast enough.
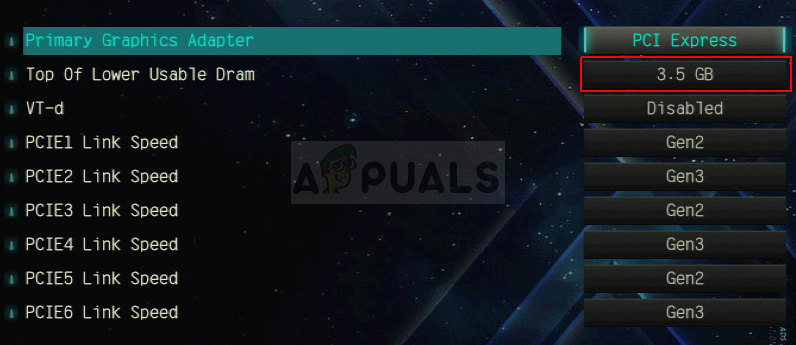
- The TOLUD (Top Of Lower Usable DRAM) option which you will need to change is located under various tabs in the BIOS utilities made by different manufacturers and these is no rule to where the setting should be located.
- It’s usually located under the Advanced tab or Memory management. No matter where it is, the name of the option is Top Of Lower Usable Dram.
- Once you locate the correct option, change it from Automatic or Disabled to 3.5GB.
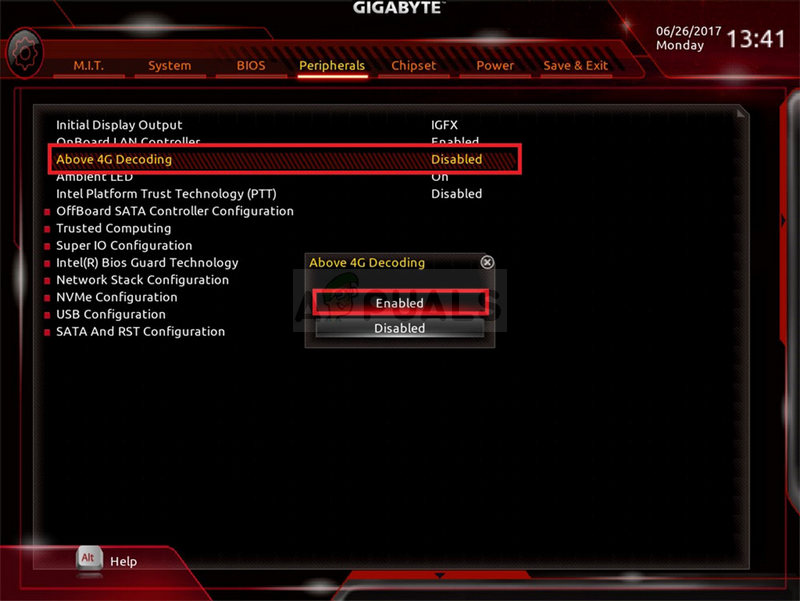
- The second options you should tweak is called Above 4G Decoding. This option is also located in different places under various configurations. Sometimes it’s right underneath the Peripherals tab. In other cases, you should check under the Boot tab or even the Advanced tab.
- Wherever you locate this option after browsing for a while, you should select it and change it to Enabled.
- Navigate to the Exit section and choose to Exit Saving Changes. This will proceed with the boot. Make sure you try see if the device is operating properly again.
Solution 2: Alternative Regedit Fix for Multiple GPU Setups
There is a registry fix which can fix the exact same issue for Bitcoin miners who are using several GPUs in their setup while also running Windows 10. It’s easy to add it and it should fix the problem immediately if you do it properly.
- Since you will need to add a key to the registry in order to follow through this solution, we highly advise you to check out this article we have prepared in order to backup your registry to prevent other problems which can occur.
- Open the Registry Editor utility by typing “regedit” in either the search bar window, the Start menu or the Run dialog box on your Windows PC. Navigate to the following key in Registry Editor by using the left pane navigation:
HKEY_LOCAL_MACHINE\SYSTEM\CurrentControlSet\Control\PnP\Pci
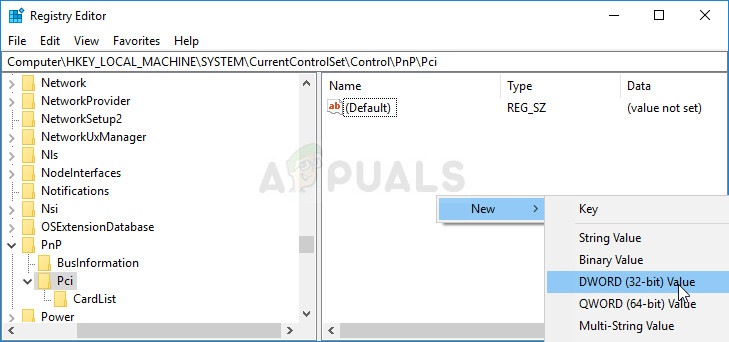
- Right-click on the blank right side of the Registry Editor screen with the Pci key being the last selected key in the address bar and choose New >> DWORD (32bit) value or QWORD (64bit) depending on the architecture of your Windows operating system. Right-click on the key you have just added and click on Rename.
- Set the name of the key to HackFlags. Right-click on it once more and choose the Modify option from the context menu. Under the value data, set it to 600 and change the Base option to Hexadecimal. Click on the OK button, restart the computer and check to see if the problem still persists.
Solution 3: Uninstall Motherboard Resource and Problematic Device Drivers
If you are a regular user and you notice that one of your devices is not working and reporting the code 12 error, you might succeed by deleting several drivers on your computer and by restarting your computer in order to replace them with working versions.
The usual culprit for this error is the display adapter but this will work for any device installed on your computer.
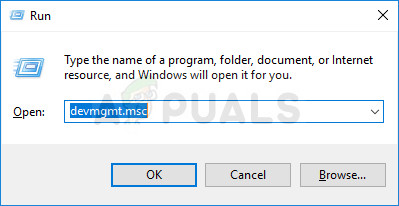
- Click on the Start menu button, type Device Manager with start menu open, and select it from the list of results. You can also use the Windows Key + R key combination in order to open the Run dialog box. Type in “devmgmt.msc” in the Run box and click OK or tap the Enter key in order to run it.
- Since we want to update the graphics card, expand the Display adapters category, right click on your video card and select the Uninstall Device option.
- Expand the System Devices category in Device Manager by clicking the arrow next to it, locate all Motherboard Resource devices and select Uninstall Device.
Note: If you can’t locate them, try with “PCI standard PCI-to-PCI bridge” or simply uninstall “PCI Bus”.
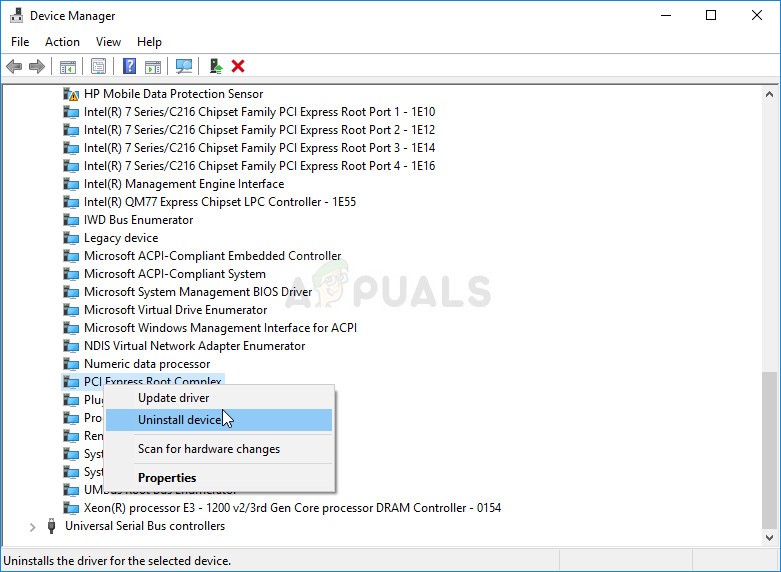
- Confirm any dialogues which may ask you to confirm your choice and wait for the process to finish.
- The system will probably freeze now so make sure you long press the power button in order to shut down your system completely. The next boot might take longer for your computer to locate and download proper new drivers. We advise you also install the latest updates for Windows OS to get the latest available drivers.
Solution 4: Update BIOS
There are users who have reported that they struggled with upgrading to a new operating system that much that the system didn’t recognize some of their devices at all. Some users struggled very much to make the PC recognize their external graphics card and, even when it did, they started seeing the code 12 on their PCI to PCI Bridge device. However, they managed to solve the problem by updating BIOS to the latest version.
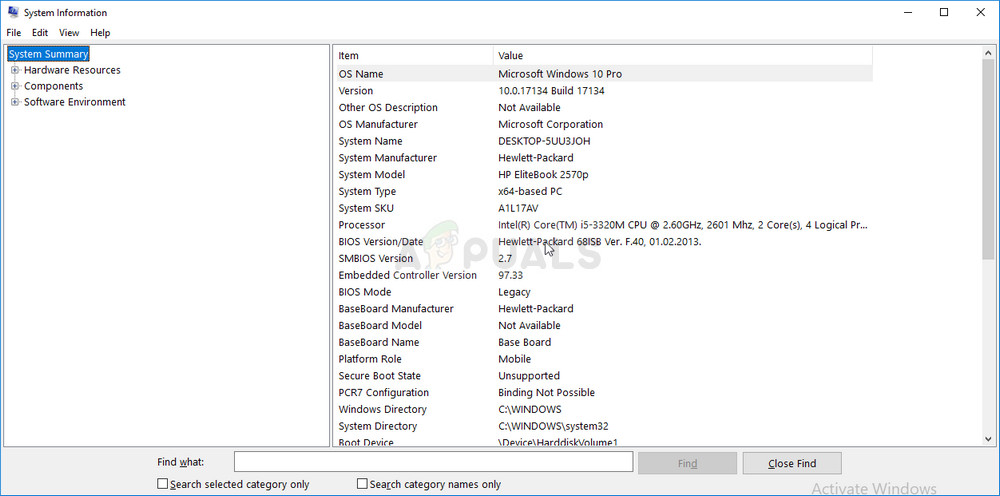
- Find out the current version of BIOS utility you have installed on your computer by typing “msinfo” in the Search bar or the Start menu.
- Locate the BIOS version data just under your Processor model and copy or rewrite anything to a text file on your computer or a piece of paper.
- Prepare your computer for the BIOS update. If it’s your laptop you are updating the BIOS for, make sure its battery is fully charged and plug it in the wall just in case.
- If you are updating a PC, it’s advisable to use an Uninterruptible Power Supply (UPS) to make sure your computer doesn’t shut down during the update because of a power outage.
- Follow the instructions we prepared for various desktop and laptop manufacturers such as Lenovo, Gateway, HP, Dell, and MSI.
Solution 5: Struggling with Network Drivers
If a network driver (wireless card or Ethernet driver) is causing the code 12 error in Device Manager and if you have noticed problems with your Internet connection, there exists a super easy fix which has worked for several users. First of all, make sure you are running up-to-date drivers.
- Click on the Start menu button, type Device Manager with start menu open, and select it from the list of results. You can also use the Windows Key + R key combination in order to open the Run dialog box. Type in “devmgmt.msc” in the Run box and click OK or tap the Enter key in order to run it.
- Since we want to disable one of your network adapters, expand the Network adapters category, right click on the device which is displaying the said issue and choose the Disable option.
- Wait for a while before right-clicking the device again and choosing the Enable option. You might be prompted to restart your computer so make sure you do so or restart it manually.
- Check to see if the error appears on your computer again.
Solution 6: Update Your Computer to the Latest Version of Windows
Microsoft was well aware of this problem and they released several updates which were supposed the fix the random occurrence of the problem which wasn’t caused by device conflicts. If you devices are indeed conflicting, you will need to use other methods.
Windows 10 users may notice that the updates are carried out almost automatically as Windows always checks for them. Still, if you think the process is broken, you can check for updates manually.
- Use the Windows Logo Key + I key combination to open Settings on your Windows PC. Alternatively, you can search for “Settings” in Start menu or the search bar or simply click the gear-like icon in the Start menu.
- Locate and click on the “Update & security” sub-section in the Settings app.
- Stay in the Windows Update tab and click on the Check for updates button under the Update status section in order to check whether there is a new build of Windows available.
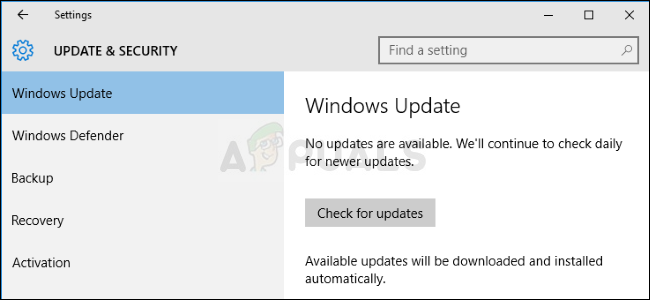
- If one is available, Windows should start with the download process immediately and the update should be installed as soon as you are available to do a restart.
If you are using another version of Windows, it should be important to state that the automatic updating process can be easily disabled and you may have done so unwillingly or willingly. Either way, a simple command may be able to install the latest updates on any version of Windows.
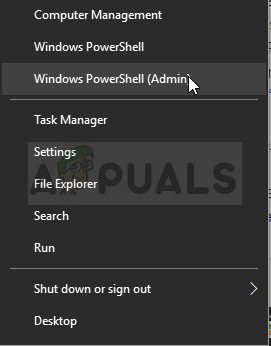
- Open the PowerShell utility by right-clicking the Start menu button and clicking on the Windows PowerShell (Admin) option at the context menu.
- If you see Command Prompt instead of PowerShell at that spot, you can also search for it in the Start menu or the search bar next to it. This time, make sure you right-click on the first result and choose Run as administrator.
- In the Powershell console, type in “cmd” and stay patient for Powershell to switch to the cmd-like window which might appear more natural to Command Prompt users.
- In the “cmd”-like console, type in the command shown below and make sure you click Enter afterwards:
wuauclt.exe /updatenow
- Let this command do its thing for at least an hour and check back to see if any updates were found and installed without issues. This method can be applied to all Windows operating systems, including Windows 10.
Solution 7: Delete the Driver File for PMCIA Card
PMCIA card is sometimes causing various problems on people’s computers and it appears to be the main culprit of the code 12 error for multiple devices in Device Manager which also stopped working in certain cases. Follow the steps below in order to do this if you have this card on your computer or laptop:
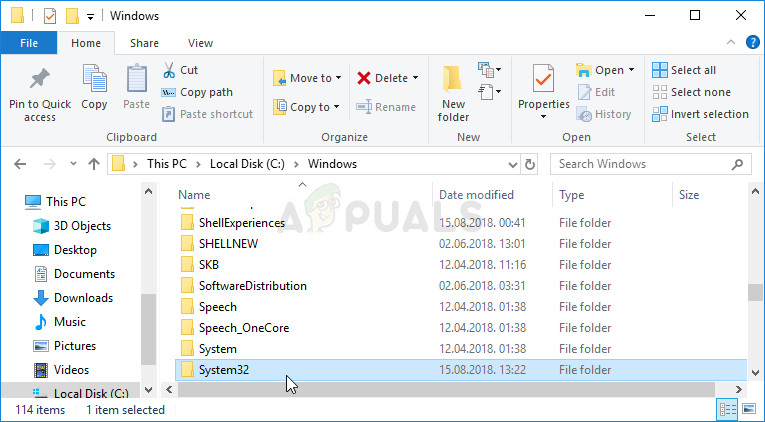
- Open File Explorer from taskbar or by opening any folder, and then navigate to the following location on your computer:
C:\WINDOWS\System32
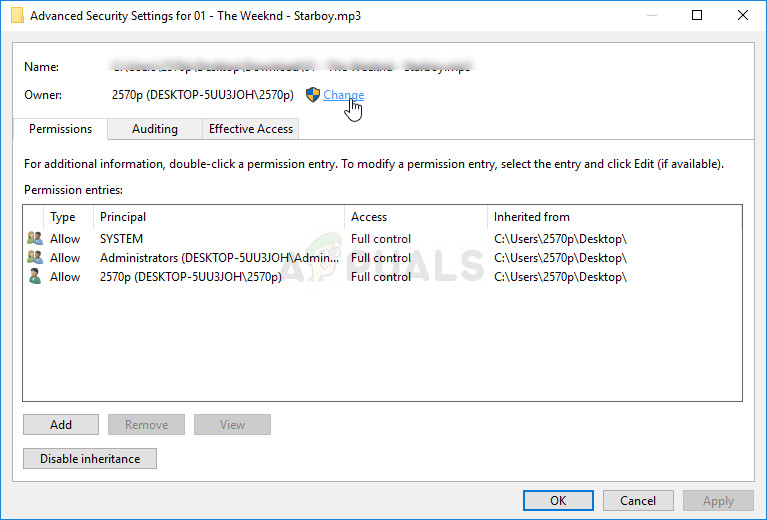
- Locate a file named pcmcia.sys, right-click the file, click Properties, and then click the Security tab. Click the Advanced button. The “Advanced Security Settings” window will appear. Here you need to change the Owner of the key.
- Click the Change link next to the “Owner:” label The Select User or Group window will appear.
- Select the user account via the Advanced button or just type your user account in the area which says ‘Enter the object name to select’ and click OK. Add your user account as the owner.
- Optionally, to change the owner of all subfolders and files inside the folder, select the check box “Replace owner on subcontainers and objects” in the “Advanced Security Settings” window. Click OK to change the ownership.
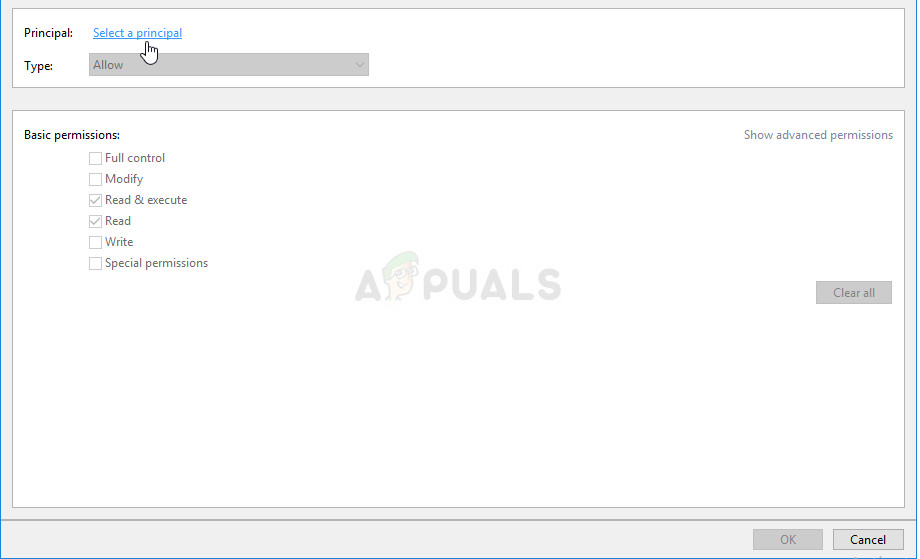
- Now you need to provide full access to the file or folder for your account. Right-click the file or folder again, click Properties, and then click the Security tab.
- Click the Add button. The “Permission Entry” window will appear on the screen. Click “Select a principal” and select your account. Set permissions to “Full control” and click OK.
- Now, exit all Properties windows, right-click the pcmcia.sys file in System32 again, and choose the Rename option from the context menu which will appear. Change its name to pmcia.old.sys.
- Restart your computer and check to see if the problem still appears with devices and code 12.


VAIO all in on, Solution 7: Delete the Driver File for PMCIA Card worked for me, but had to boot from Hiren’s boot CD to delete it. And location c:windowssystem32drivers on Windows 10.
Many thanks!