[FIX] Sharepoint not Showing Whole Word Document
Sharepoint is Microsoft’s solution to working together on the same files as a team. While this is great on its own, there are some issues that might plague the documents or the files that you are working on. One of these issues presents itself when you are trying to edit the document on the desktop application of MS Word. This happens when you download the document to your system and try to work on it via the desktop app.

As it turns out, the document may not load/display all of the pages that you are able to see or are present on the online version of the document. Meaning, you only see a portion of the total pages and not the whole document. This can happen due to a number of reasons now, such as incompatible versions and more. We shall look into the possible causes in more detail down below.
- Incompatible Versions — One of the first causes of the issue can be incompatible versions. This happens when you initially create and edit the document with a more updated version and then, later on, decide to edit it with an obsolete installation of the Word document. This causes version incompatibility and it has also been reported by one of the users facing the issue on a mac system. In such a case, updating the Word installation to the latest version available should resolve the issue.
- Track Changes — As it turns out, another potential cause of the issue can be the track changes features. The issue seems to be caused by the markup info that is stored by the said feature and as a result, you are not able to read the whole document. If this is applicable to you, you simply have to remove all of the markup info and you will be good to go.
Now that we are done with the potential causes of the said problem, let us get into the various fixes that you implement to resolve the issue. So, without further ado, let us get started.
Method 1: Change to .docx File
One of the ways that you can resolve the issue is by changing the extension of the document file. If the file having the issue is a .doc document, you should change the extension to .docx. Both of these extensions are used for Microsoft Word. The only difference being that the docx is more efficient than the doc extension as its successor. This is relatively easy to do, here’s how:
- First of all, make sure that you have the file extensions enabled. To do this, open up the Windows Explorer and then go to View.
- Under View, tick the File name extensions check box.

Changing Explorer View Settings - After that, locate the document having the issue.
- Then, right-click on the document and then choose Rename from the drop-down menu. Then, replace the .doc extension with .docx.
- On the pop-up prompt, just click Yes to implement the change.
- Check if that fixes the problem for you.
Method 2: Remove Markup Info
MS Word comes with a Track Changes feature that is very convenient when working in a team. It stores all the changes that have been made by different users so that you can pinpoint who made what change. As it turns out, if you have the Track Changes feature enabled, the issue could be caused due to the markup info stored. If this scenario applies to you, what you need to do is remove the markup info under the Review tab of the Word document file. To do this, follow the instructions below:
- Open up the Word Document file.
- Once the document has opened up, go to the Review tab.
- Under the Review tab, make sure that All Markup is selected from the drop-down menu.
- Now, you can either go through each comment/change one by one and choose to either Accept it or Reject it.

Removing Word Markup - Or, you can Accept or Reject all of the changes at once. To do this, click on the small drop-down icon at the bottom of either Accept or Reject option and then select Accept/Reject all changes and Stop Tracking option.
- See if that fixes the issue.
Method 3: Update Microsoft Word
As it turns out, version incompatibility can also cause the issue and prevent you from seeing the whole document. You have to make sure that the version that you originally created the document file is either the same or a lower version than the one you are editing the file on. This means that if you created the file on a higher version and then try to edit it on a lower version, you won’t be able to see the whole content of the file. This can often happen on macOS systems. To do this, follow the instructions below:
- First of all, open up any word document.
- Once the document has opened up, go to the File > Account menu.
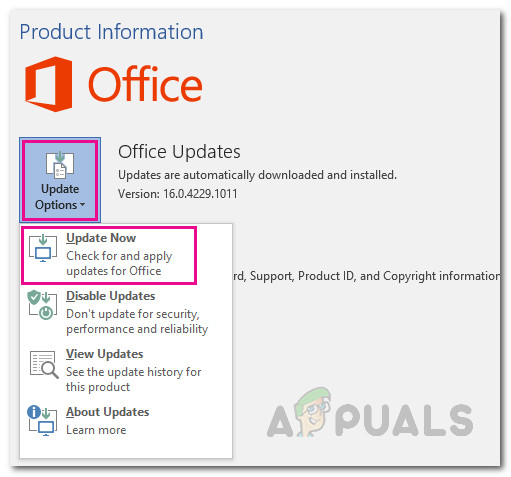
- There, under the Product Information heading, click on the Update options drop-down menu and then choose the Update Now option.

Updating MS Word - Once Word has updated, check to see if the issue has been resolved.
Method 4: Change User Account
One of the affected users mentioned that the issue was caused for them due to the user profile on their system. Changing the user account resolved the issue for them. Now, the exact cause of why this happened is not known, nonetheless, it is still something worth trying knowing that it resolved an issue for one of the users facing the same issue. If you have multiple user accounts on your system, you can try switching the user account to see if the issue persists for you.
In case you do not face the issue on a different user account, that means your own user account is causing the issue. In such a case, what you can do is backup all the important data on your user profile and then remove the profile. Once done, you can create a new account for yourself to see if the problem comes back again.


