Fix: S8 Battery Drains too Fast
Samsung’s Mobile devices are one of the most popular ones due to their futuristic approach and amazing customer support. Due to which almost 46% of all Android devices being used are from Samsung. The Galaxy S8 is the 8th introduction in Samsung’s Galaxy lineup and was their elite phone for 2017. The phone provides many promising features but quite recently there have been many reports of the Battery draining too fast on the phone.
What Causes the Battery to Drain Rapidly on Samsung Galaxy S8?
After receiving numerous reports of the battery drainage problem on the Galaxy S8 we decided to investigate the matter and formed a set of solutions which solved the problem for most of our users. Also, we looked into the reasons due to which this problem was occurring and listed them below.
- Battery Health: It is possible that due to unhealthy charging cycles or due to a voltage issue the battery installed inside your mobile has lost its health and has been damaged. A battery that is not healthy won’t provide significant battery timings and will drain faster than a normal battery..
- Charging Methods: It is recommended by Samsung to only use the official accessories provided in the box to charge the mobile phone. If other accessories are used they might not provide the phone a healthy charge and they might end up damaging the phone’s battery.
- Faulty Applications: In some cases, it is possible that a certain application on your mobile is malfunctioning, such applications use the data and other resources even in the background and as a result decrease the battery timings of the mobile.
- Outdated Software: It is also recommended that you update the phone’s software to the latest version provided by Samsung because software updates include many performance fixes, security updates and overall increase the user experience. Whereas outdated Android software might experience increased resource usage by certain applications resulting in decreased battery performance.
- Outdated Applications: If the third party applications that you have installed on your device have not been updated to the latest versions they might end up using more battery than usual due to increased resource usage. Developers usually provide many bug fixes and performance improvements in newer updates that enhance the user experience.
- Google Application: It was also seen that disabling Google and it’s related applications had a great effect on the battery and enhanced the battery timings. This is a bug with the Google application due to which it continues to use resources even in the background.
- Cache: All applications store cache on the device to decrease loading times and provide a smoother user experience. Over time this cache might get corrupted or cause excessive resource usage by being used in the background.
Now that you have a basic understanding of the nature of the issue we will move on towards the solutions. Make sure to implement these solutions in the specific order in which they are provided to avoid any conflicts.
Solution 1: Running In Safe Mode
In the safe mode, only the default applications can be used and all other applications are disabled. Therefore, unless the issue is with the hardware you will not experience fast battery drainage in the Safe mode. To run the device in the Safe mode:
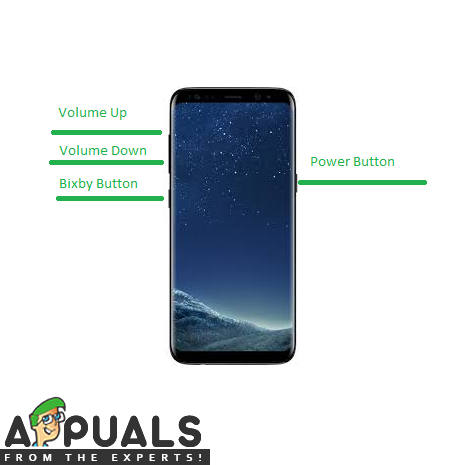
- Press and hold the Power button allocated on the right side of the device.
Button location on the S8 - When the power options open up, Press and hold on the “Power Off” button.
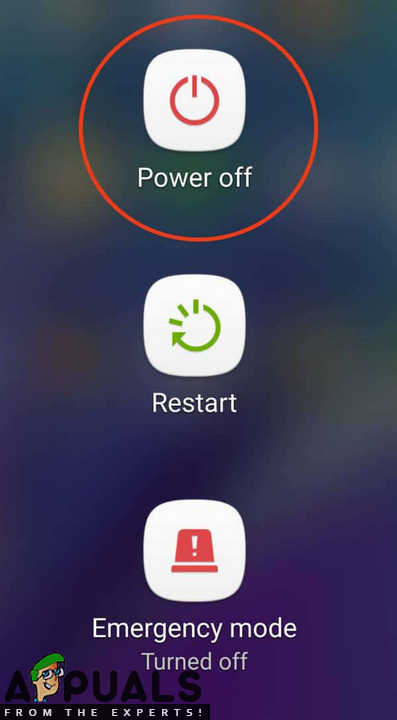
Taping and holding on the “Power Off” option - Tap on the “Safe Mode” option which prompts that the device will be restarted and launched in the safe mode.
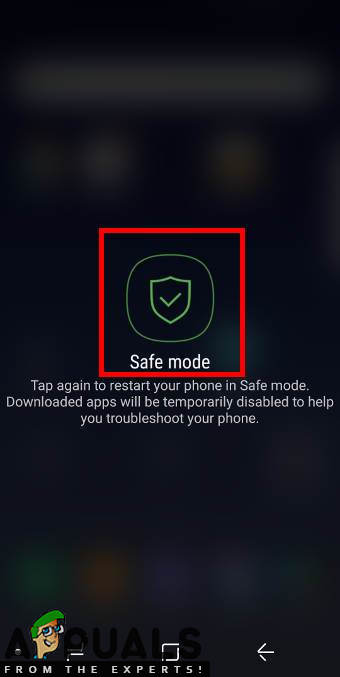
Tapping on the “Safe Mode” option to launch the device in the Safe Mode - After restarting the words “Safe Mode” can be seen on the lower left corner of the screen.
- Check to see if the battery drains at the same rate at which it did in the normal mode.
- If the battery timings improve and no excessive battery drainage is seen it is safe to say that the issue lies within the software.
- Press and hold the “Power” button again and tap on “Restart” to exit out of the Safe mode.
Solution 2: Isolating Faulty Applications
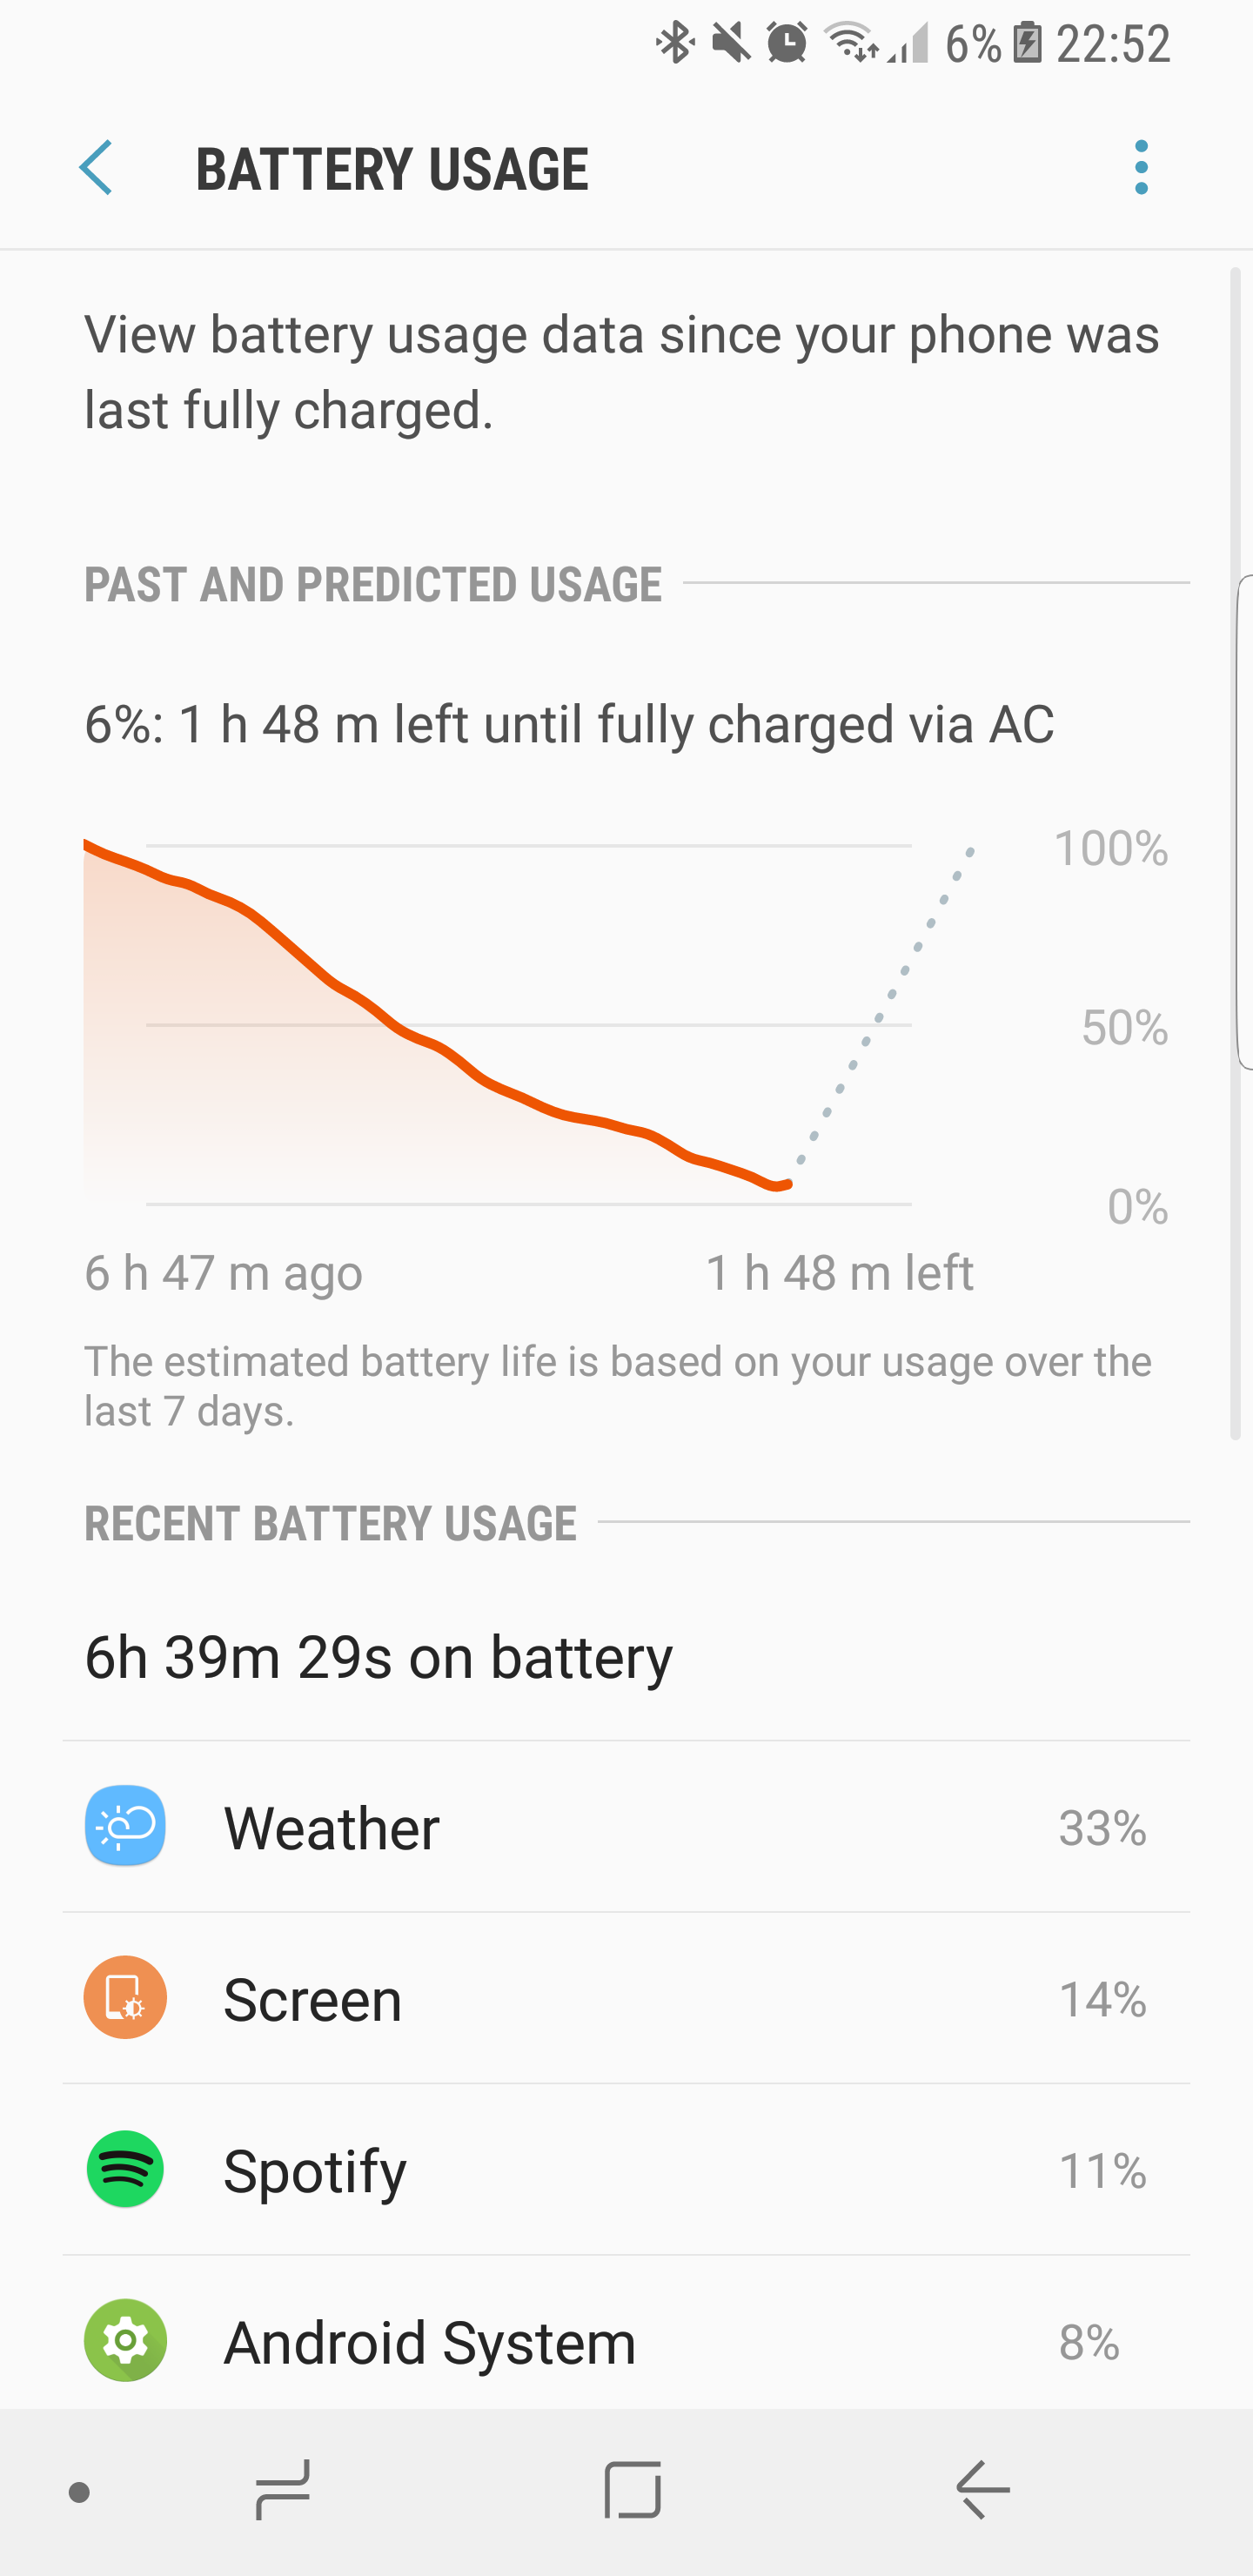
It is possible that a certain application might be running in the background and using up a lot of the phone’s resources due to which the battery drainage problem is observed. Therefore, in this step, we will be navigating to the battery statistics panel and isolate faulty applications. For that:
- Drag down the notifications panel and tap on the “Settings icon“.
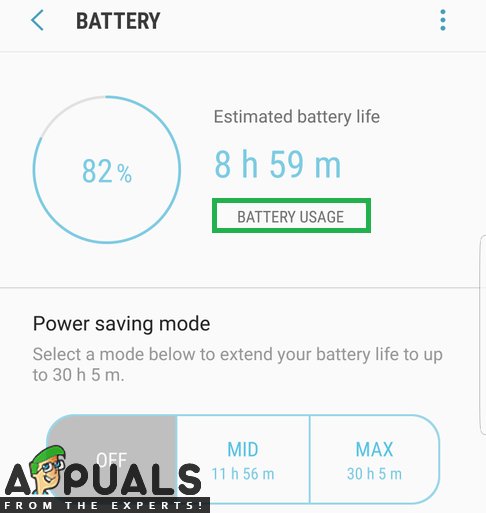
- Inside the settings, tap on the “Device Maintenance” option and then on the “Battery” option.
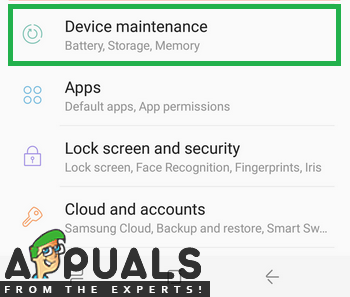
Clicking on the “Device Maintenance” option inside settings - Now Select the “Battery Usage” option and identify the application that is using the most battery while keeping in mind the amount of time you actually used it.
Opening the Battery Usage Statistics - Delete the application and check to see if the battery problem persists.
- Delete more applications that are using excessive battery if the problem still persists.
Solution 3: Checking for Software Updates
In the software updates, developers provide many bug fixes and performance improvements. Therefore, in this step, we will be checking to see if there are any Software updates available to the phone. For that:
- Drag down the notifications pane and tap on the “Settings icon“.
- Scroll down and click on the “Software Updates” option.
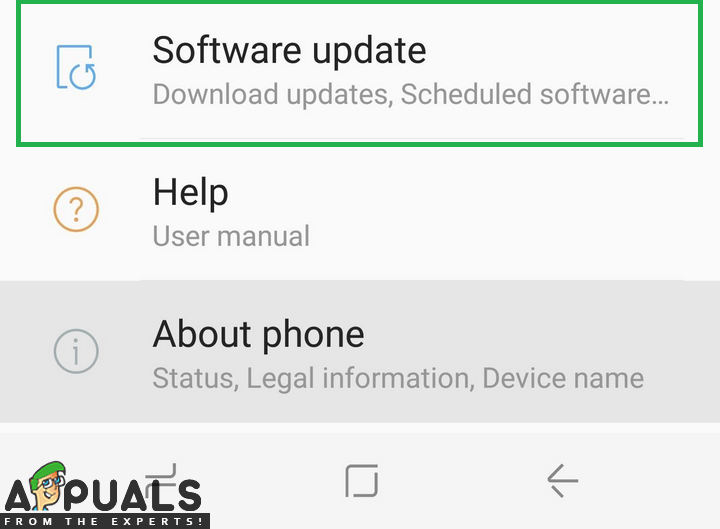
Scrolling down and clicking on the “Software updates” option - Select the “Check for Updates” option and wait for the checking process to finish.
- Tap on the “Download Updates Manually” option if updates are available.
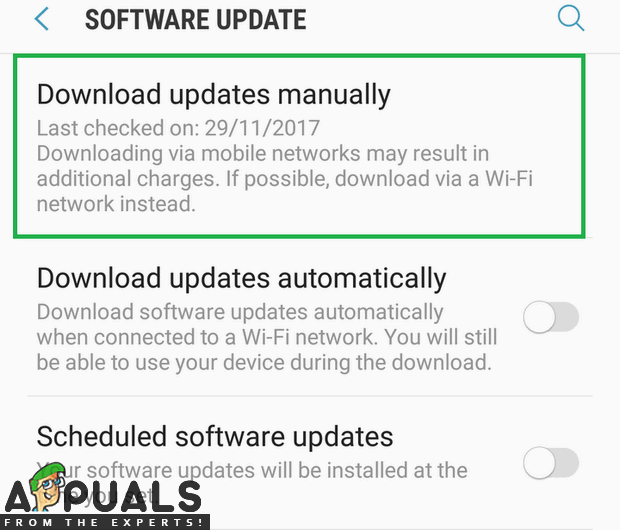
Clicking on the “Download Updates Manually” option - The updates will now automatically be downloaded and when the message prompts you to install them select “Yes“.
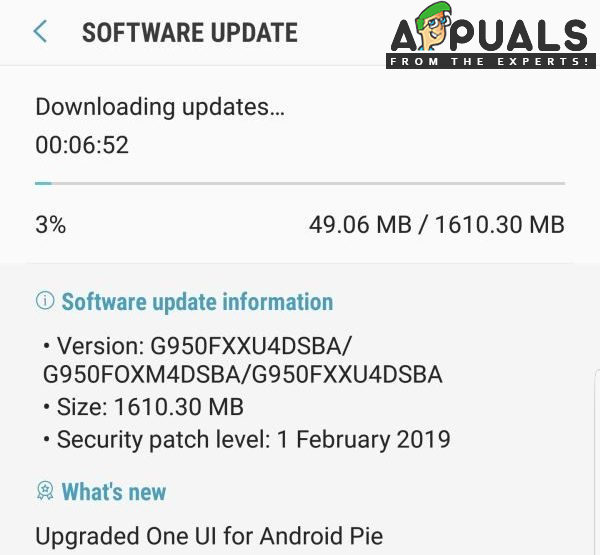
Updates will begin to be downloaded - The phone will now be restarted and updates will be installed, after which it will boot back up normally.
- Check to see if the battery drainage problems still exist.
Solution 4: Checking for Application Updates
It is also possible that the Applications installed on your device have not been updated to the latest version and are causing the excessive battery drainage problems. Therefore, in this step, we will be checking to see if any updates are available to the applications. For that:
- Tap on the Google Play Store icon and then on the “Menu” button in the top left corner.
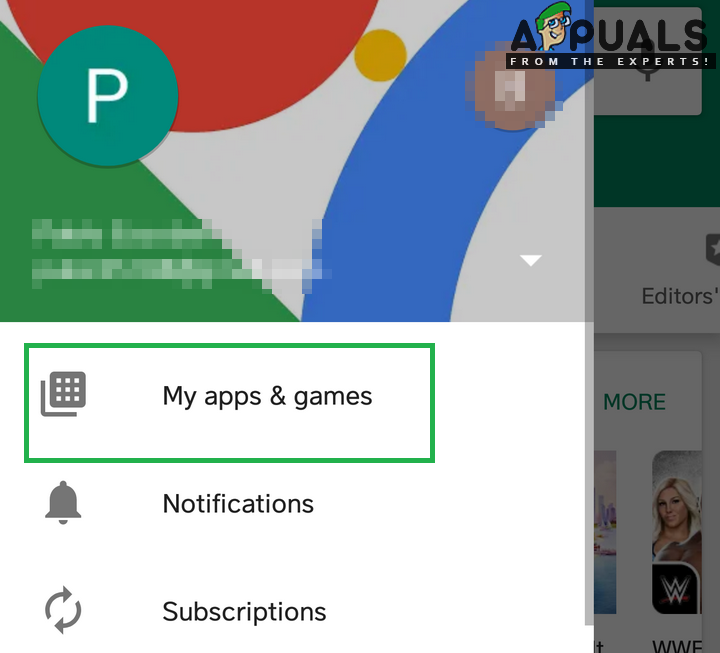
Opening the Google Play Store application - Inside the Menu, click on the “My Apps & Games” option.
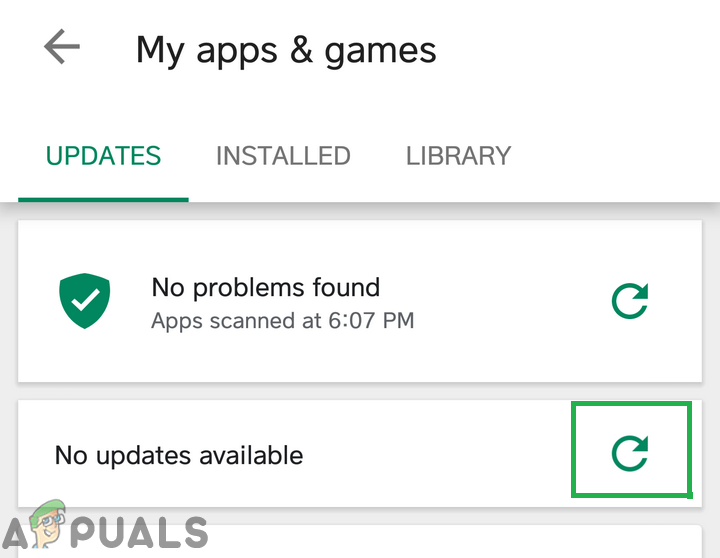
Clicking on the My Apps & Games option - Tap on the “Check for Updates” option or on the “refresh” icon if the checking process is already completed.
Clicking refresh in the Updates option - Click on the “Update All” if there are any updates available.
- Wait for it to download and install necessary updates to the application and check to see if the issue persists.
Solution 5: Deleting the Google Application
Sometimes, the Google application can malfunction and cause excessive resource usage which does not show up in the battery statistics because it is counted as a “System Application”. Therefore, in this step, we will be disabling it. For that:
- Tap on the Play store icon and then on the Menu button in the top left corner.
Clicking on the Menu button on the top left corner - Inside the Menu, click on the “My Apps & Games” option.
Clicking on the My Apps & Games option - Click on the “Installed” tab on the top and tap on the “Google” application.
- Click on the “Uninstall” button and then “Yes” on the message prompt.
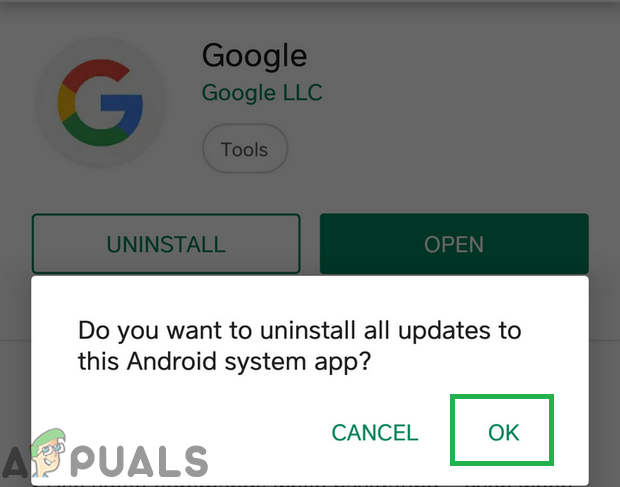
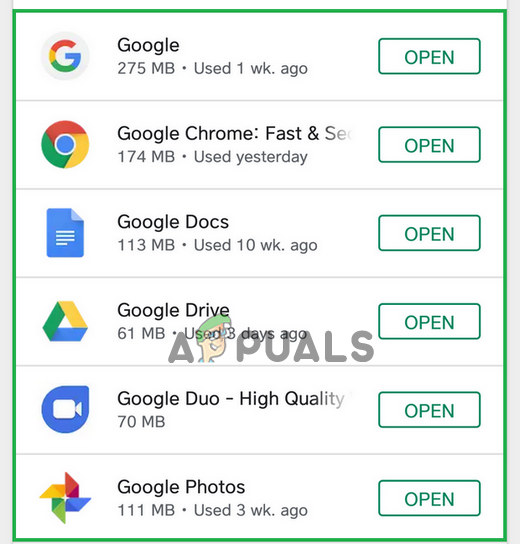
Clicking on Uninstall and then tapping on “OK” - In the same manner, repeat this process for all the Google Related applications.
Rest of the Google applications that need to be uninstalled - Restart the mobile and check to see if the issue persists.
Solution 6: Wiping Cache Partition
If the excessive cache has been stored on the device it can cause excessive resource usage and result in increased battery drainage. Therefore, in this step, we will be wiping the cache partition. For that:
- Press and hold the “power” button and tap on the “Switch off” option.
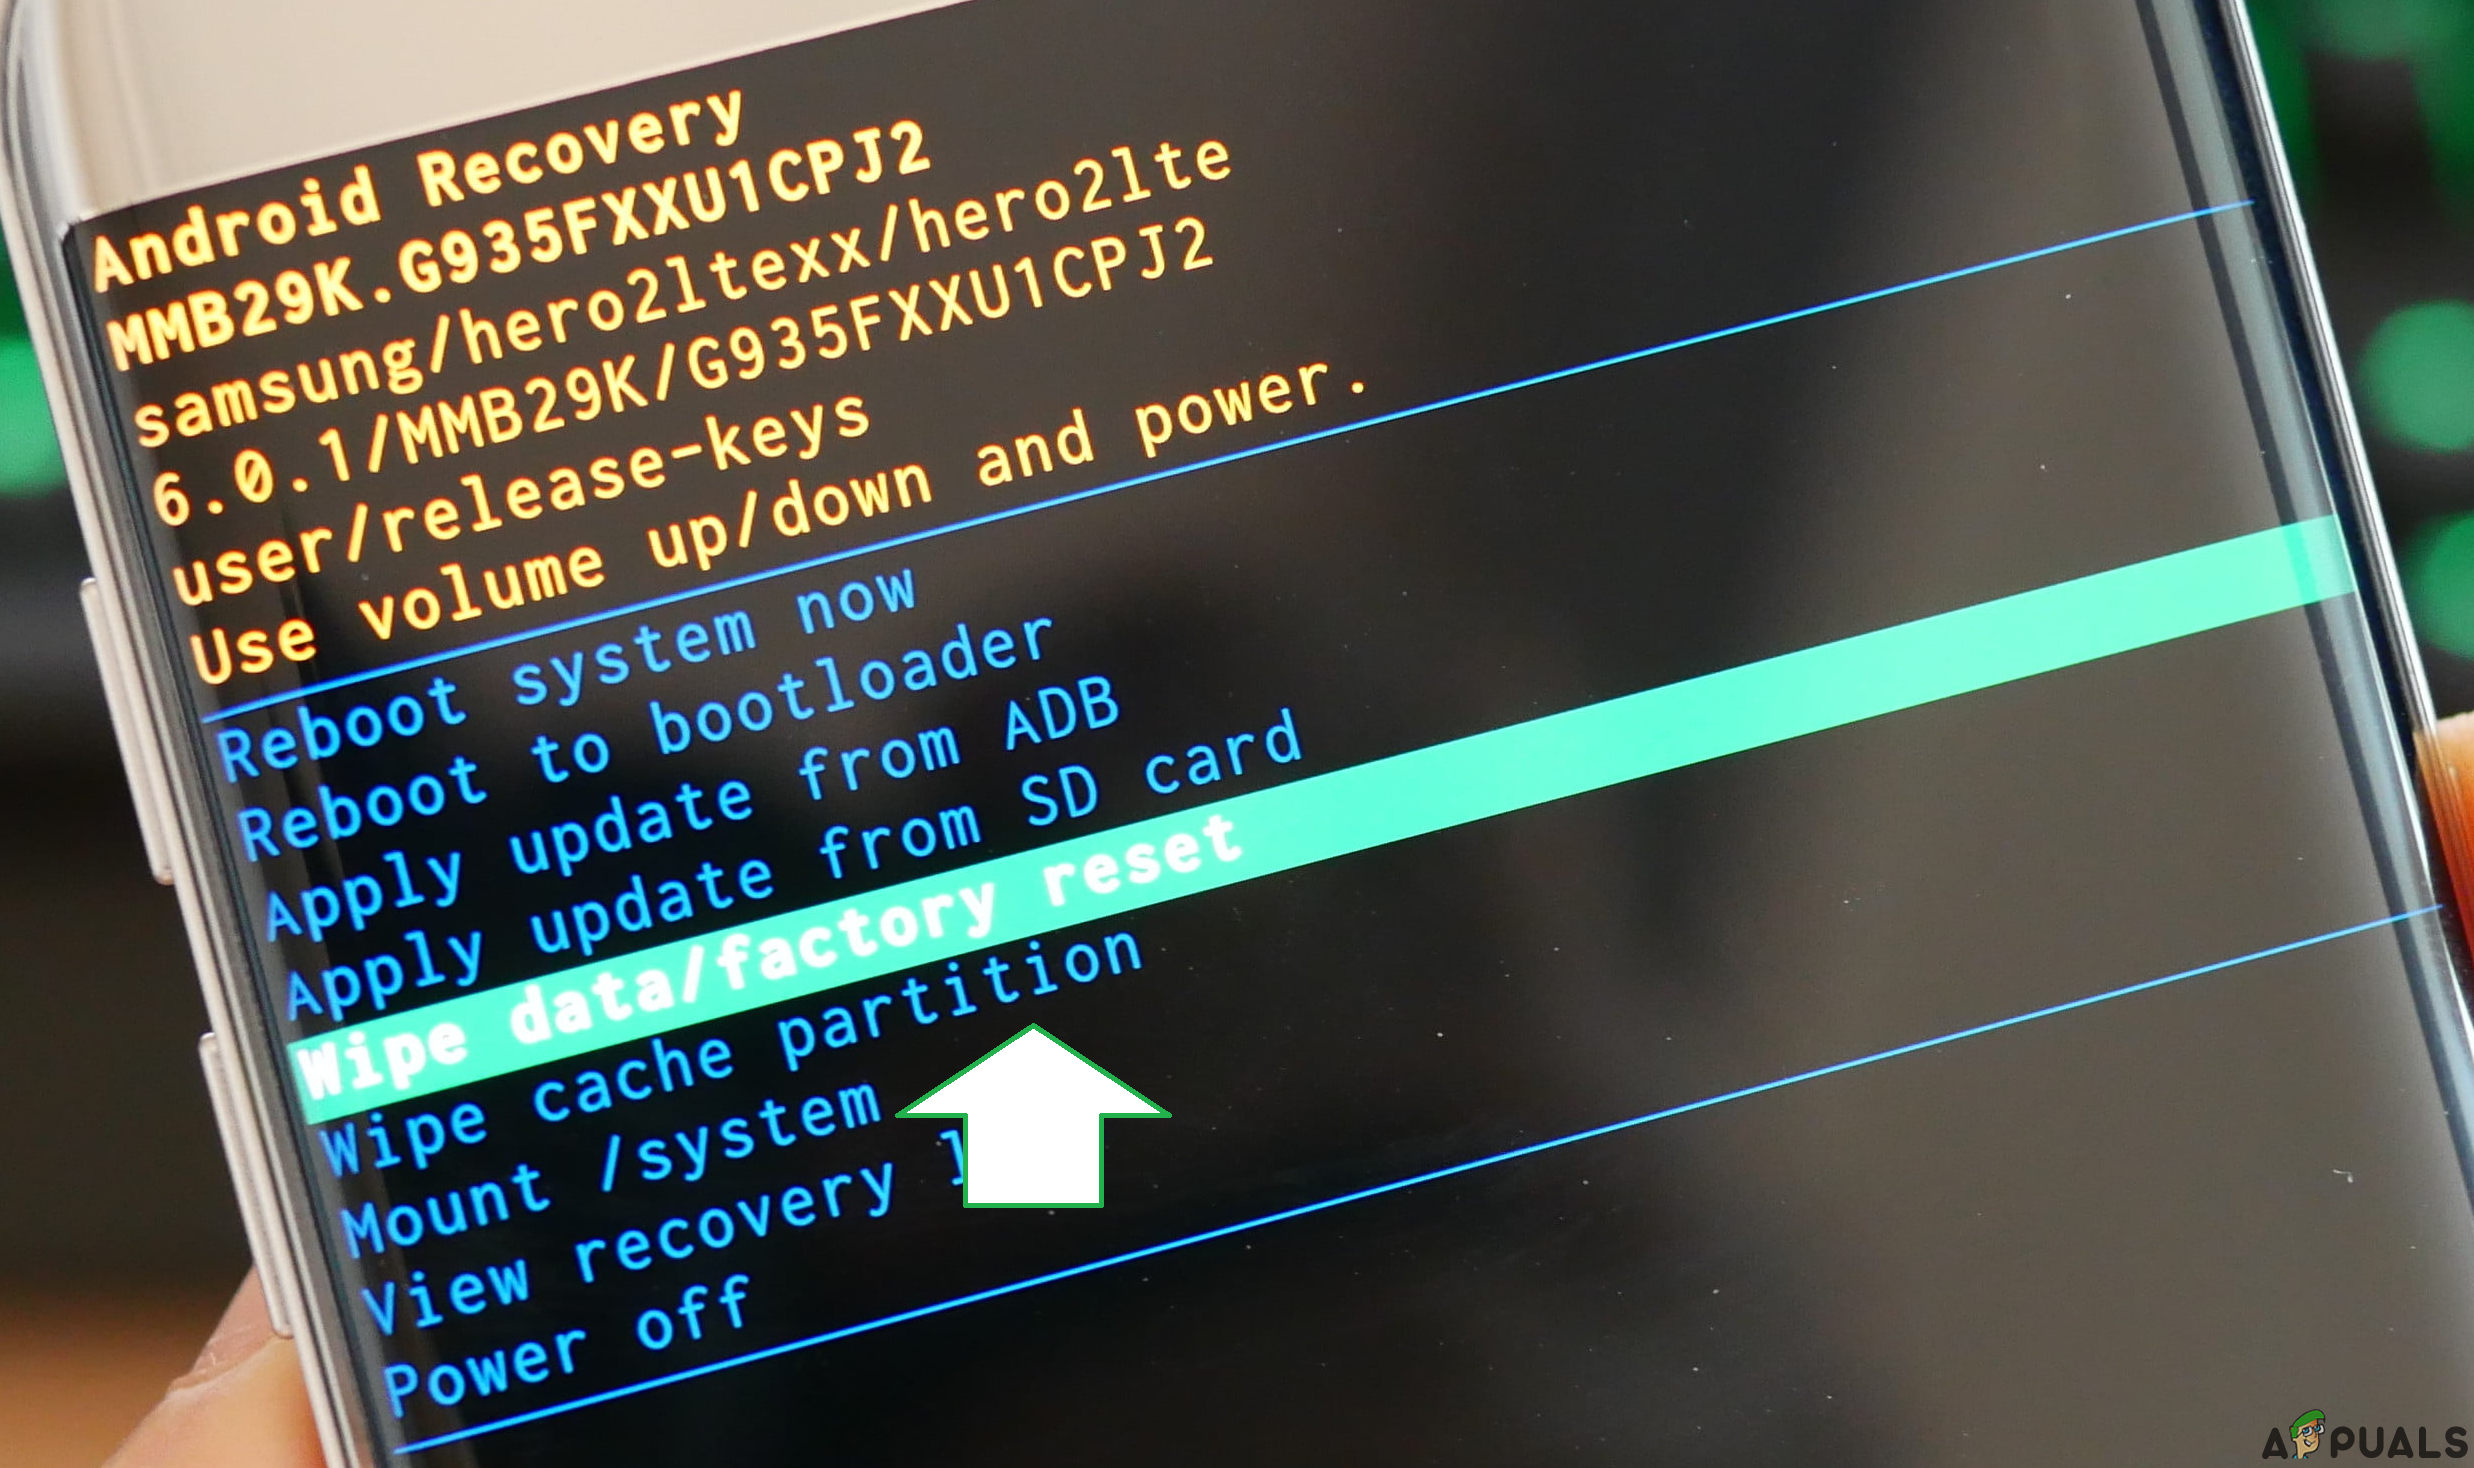
- When the device is completely turned off, Press and hold the “Volume Down” and the “Bixby” key. Then in the same instance also press and hold the “Power” button.
Button location on the S8 - When the green Android logo is shown, release all the keys. The device might display “Installing System Updates” for a while.
- Use the volume down key to highlight the “Wipe Cache Partition” options and when it is highlighted press the “Power” key to select it.
Navigating down to the “Wipe Cache Partition option” - After the wiping process is completed, highlight the “Reboot System Now” option by pressing the “Volume Down” key and press “power” button to select it.
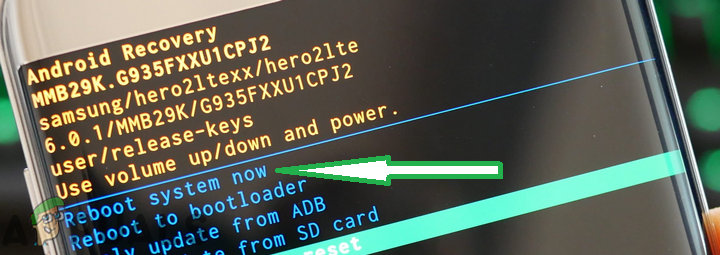
Highlighting the “Reboot System Now” option and pressing the power button - The phone will now be restarted normally, check to see if the issue persists.