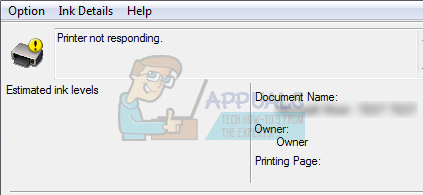
Fix: Printer Not Responding
The error “Printer not responding” usually arises the printer doesn’t respond to the requests send by your computer because of incorrect configurations, hardware faults, or some unresponsive services.
The error is a common one and occurs to users all the time. Sometimes, just restarting the printer fixes the problem while sometimes you have to completely reinstall the printer drivers. The error may have different solutions depending on the hardware configuration of each computer. We have listed down a number of different workarounds available. Start with the first one and work your way down.
Solution 1: Checking Hardware
Before we move on to troubleshooting, it is wise to perform all the hardware checks. Make sure that the printer is properly connected to your computer via a wired connection or through the wireless network. Try changing cables or resetting the wireless network to see if they make any difference
Restart your printer, router, and computer and let them power down completely. Remove the cables and keep them like this for a couple of minutes before plugging everything back in. Try printing something using another computer and see if printing is successful there. If it is, it means that there is a problem in your computer connecting to the printer. You can move on to the other solutions listed.
Solution 2: Restarting Spooler Service
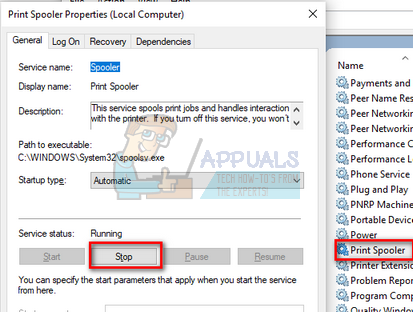
The spooler service is a software program which is responsible for managing all print jobs being sent to the computer printer. The print spooler service is usually visible to users and they can also cancel a print job which is being processed. It also allows them to manage jobs which are currently on the waitlist.
We can try restarting this service and check if this solves the problem.
- Press Windows + R to launch the Run application. Type “services.msc” in the dialogue box and press Enter.
- Locate the service “Print Spooler” present in the list of services. Double-click it to open its properties. Click the “Stop” button present underneath system status and press “Ok” to save changes.
- Since we have disabled the service, we can now focus on deleting printer files. Press Windows + E to launch the quick access and click on “This PC” present in the left navigation pane.
- Navigate to the following path:
C:\Windows\System32\spool\PRINTERS
![]()
Permission might be needed to access the following folder. If prompted, press Continue.
- Once in the folder, delete all the files in the PRINTERS folder and close the window.
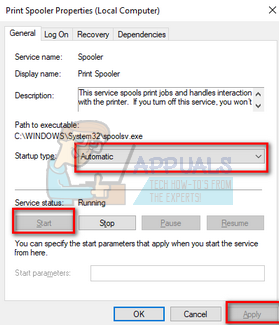
- Now navigate back to the Services tab and Start the “Printer Spooler” service. Also, remember to keep the startup type as “Automatic”.
- Restart your computer and check if the printer connects correctly.
Solution 3: Running the Printer Troubleshooter
It is worth a shot running the Printer Troubleshooter. Windows has an inbuilt collection of troubleshooters meant to troubleshoot problems in various categories. We can try running the printer troubleshooter and check if it detects any problems and fixes them.
- Press Windows + R, type “control panel” in the dialogue box and press Enter.
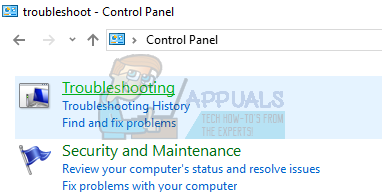
- Type “troubleshoot” in the search bar of the control panel at the top right side of the window.

- Select “Troubleshooting” heading from the list of results returned.
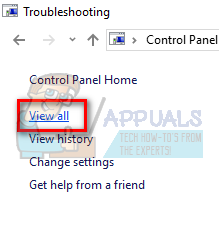
- Once in the troubleshooting menu, click “View all” present on the navigation pane at the left side of the window. Now Windows will populate all the troubleshooters available on your computer.
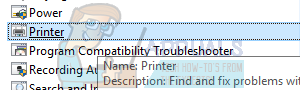
- Navigate through the options until you find “Printer”. Click it.
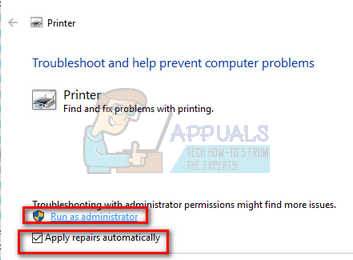
- Check both the options “Run as administrator” and “Apply repairs automatically”. These options will ensure that you find maximum problems and the repairs are applied fast as well.
- Follow the on-screen instructions and wait for the troubleshooting to complete.
Solution 4: Configuring to Correct Port
It is possible that your printer isn’t connected to the correct port on your computer hence it is going into an unresponsive state again and again. We can try configuring the printer ports using the control panel and see if it makes any difference. You can always revert the changes if this solution doesn’t work for you.
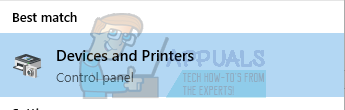
- Press Windows + S, type “devices and printers” and open the control panel application.
- Right-click on your printer and select “Printer properties”.
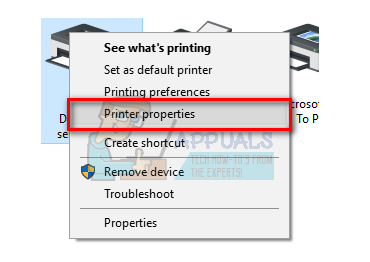
- Navigate to the ‘ports’ Navigate through the list of all the ports available and tick the checkbox where your printer is listed. In this case, “Brother DCP-1610W series” is listed in USB001. Make sure it is checked. After making the necessary changes reboot your computer and check if the problem got solved.

Solution 5: Updating Printer Drivers
If all the above solutions don’t work, we can try updating the printer drivers. You should navigate to the manufacturer’s website and download the latest printer drivers available. Make sure to download the exact drivers meant for your printer. You can look for the model number present on the front of your printer or in its box.
Note: There are few cases where a newer driver doesn’t work. In that case, download an older version of the driver and install it using the same method described below.
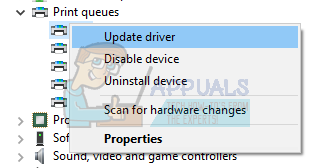
- Press Windows + R to launch the Run Type “devmgmt.msc” in the dialogue box and hit Enter. This will launch your computer’s device manager.
- Navigate through all the hardware, open the sub-menu “Print queues”, right click on your printer hardware and select “Update driver”.
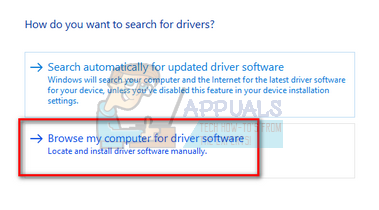
- Now Windows will pop a dialogue box asking you which way do you want to update your driver. Select the second option (Browse my computer for driver software) and proceed.
Select the driver file you downloaded using the browse button when it appears and update it accordingly.
- Restart your computer and check if the problem gets resolved.
Note: If you can’t update the drivers manually, you can also select the first option “Search automatically for updated driver software”. This option will make Windows search the web automatically and select the best driver out there.
thanks bruv. it helped really good https://media1.giphy.com/me…