Fix: mss32.dll is missing
If you are a hardcore gamer or even a casual gamer who plays a lot of different games then you must be familiar with this error. The mss-32.dll is missing error usually appears when you are trying to run a game but it can appear while using or starting other programs as well. There are a couple of variations of the error messages but the most commons ones you will see are mentioned below

The file mss32.dll is missing.
Mss32.dll Not Found
Cannot find [PATH]\mss32.dll
This application failed to start because mss32.dll was not found. Re-installing the application may fix this problem.
Cannot start [APPLICATION]. A required component is missing: mss32.dll. Please install [APPLICATION] again.
Since we know exactly what the error is i.e. a dll file is missing, it is very easy to track the things that might have caused this issue. The most common reason behind a missing dll file is the corruption. Sometimes, files get corrupt and become unusable or they start to misbehave. Another reason might simply be that the file is actually missing. A lot of times we accidentally delete certain files or folders. In some cases, the issue might be a virus or malware. There are some virus that infect and corrupt files of the targeted system.
Since there are a lot of things that can cause this issue, there are a lot of solutions to resolve the problem depending upon the culprit behind the error. So, go through each of the methods listed below and keep trying until your issue is resolved.
Tip
- Whenever we see an error like D3dx9_43.dll or any other dll missing we tend to download the single dll file from any 3rd party website. Although this solves the problem majority of the times but it isn’t safe. A lot of these files might contain a malware or something else that can compromise your system. A safer approach would be to use the official Microsoft website to download the package.
- You can also uninstall and reinstall the program that is causing the issue. There might be an issue in the installation as well which will be resolved after reinstalling the program. This will also resolve the issue because programs have all the required files within their installation.
Method 1: Update or Install DirectX
If you are seeing other dll missing errors as well then it’s in your best interest to install or update your DirectX to the latest version. Even if you are having issues with just a single dll file, updating your DirectX is still recommended.
Here are the steps for downloading and installing DirectX
- Go here to download the DirectX installer and run it. It is an offline installer. This will completely replace all the DirectX related files including the ones that are corrupt or missing. So this is a preferred option especially if the file is corrupted.
- Go here to install DirectX via the online installer. This will replace any missing files from your computer but it won’t be effective if your file is corrupt.
Once you have installed the DirectX, check whether the problem is solved or not.
Note: If this doesn’t solve the issue then make sure your Windows are updated. The latest version of DirectX are only available via the Windows Update and there is no standalone installer available for these. So, install all the Windows updates as well.
Method 2: Copy DLL File Yourself
If you are seeing the error on only one application then the issue might be solved by simply copying the mss32.dll file to the application’s folder. Follow the steps given below to locate and copy the mss32.dll file to the desired folder
- Press Windows key once
- Type mss32.dll in your Start Search bar
- If the file appears in the search results then simply right click the file and select open file location.
- Locate the file in the folder, right click and select Copy
- Now, go to the application’s folder. This should be the application that is giving the error.
- Hold CTRL and press V to paste the file inside that application’s folder
- If the system asks you to replace the file then click Yes
Once done, run the application and check if it resolves the issue.
Method 3: Restore from Recycle Bin
Sometimes, we accidentally delete a file and don’t even remember. You might have deleted a folder that had this file. So, recycle bin is worth checking. Simply follow the steps given below to chek the Recycle Bin and restore the dll file.
- Go to your Desktop and double click Recycle bin.
- Locate the missing ddl file in the Recycle bin.
- If you find the missing dll then simply right click the file and click Restore
Once done, check if this resolves your issue.
Method 4: Run SFC
SFC stands for System File Checker. This is basically Windows built-in tool for fixing any Windows related corrupt files. You can use this tool to fix any corrupt files that might be causing the issue.
We already have a detailed article that guides you through a step by step process of running the SFC and interpret its results. Click chkdsk loop and follow the instructions given in Method 1.
Once done, reboot your computer and check if the problem persists or not.
Method 5: Update Drivers
If you still haven’t solved the problem then try to update your drivers. This is a bit tricky because the drivers that you have to update are related to the application you are having issues with. Since the problem can be shown on any type of application, we cannot be sure of the drivers you need to update. Our advice is to actually update all the major drivers to make sure no stone is left unturned.
- You can visit and download the latest drivers from the manufacturer’s website. For example, if you are planning on updating the graphics drivers then you should visit the graphic card manufacturer’s website.
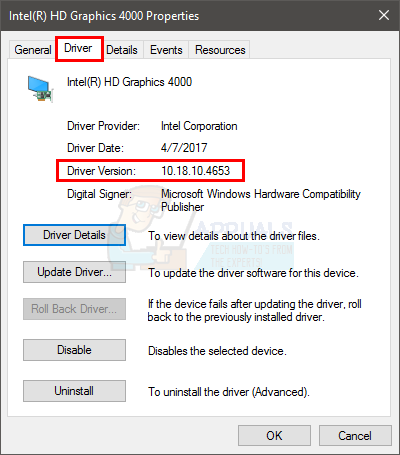
- Look for the latest version of your driver and check you have the latest version or not. Follow the steps below to check your driver version
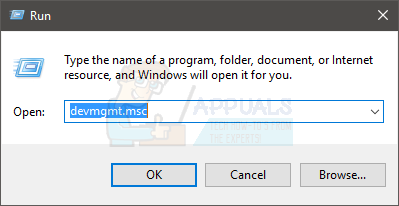
- Hold Windows key and press R
- Type devmgmt.msc and press Enter
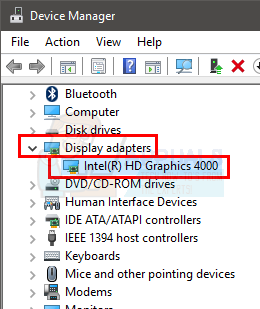
- Locate and double click Display Adapters (this is for graphic card example only)
- Double click your device
- Click the Driver You should be able to see the driver information and version in that tab
- If you don’t have the latest version then update your drivers by downloading the driver file from the website and running that file.
Once your drivers are updated, check whether the program still gives the error or not.
Method 6: Scan for Viruses
Since the problem can be caused by a virus or malware, it is advised to perform a system scan. Keep in mind that this needs to be a full deep scan and not a quick scan.
You can use whatever anti-virus application you want to scan your system. If you aren’t sure, we recommend Malwarebytes. Click remove malwares and follow the steps given in this article of ours to download and run Malwarebytes.
Method 7: Roll Back Updates
If you think the problem started after updating your driver or your Windows then try to roll back the updates. There is always an option to roll back to previous version. If you recently updated and started experiencing the issue then rolling back to the previous version is worth a try.
Roll Back Windows Updates
You can easily Roll back to a previous version of Windows by following the steps given below
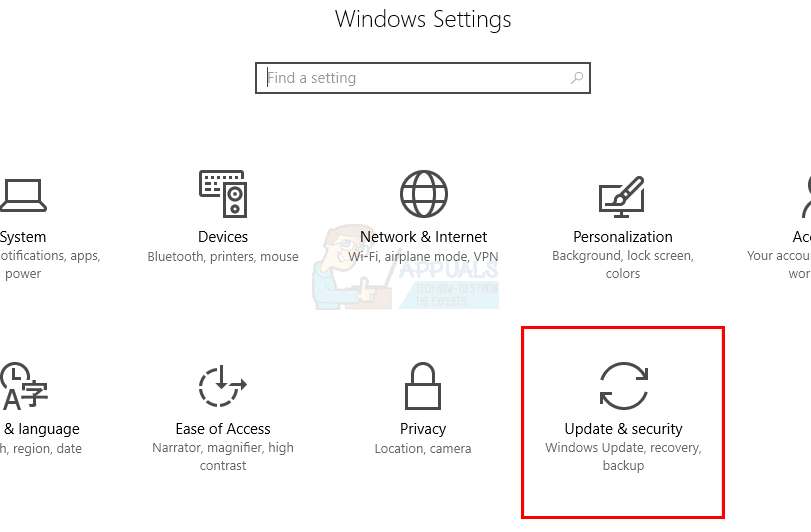
- Hold Windows key and press I
- Select Update & Security
- Select Recovery from the left pane
- Click Get Started from the section name Get back to an earlier build. Follow any additional on-screen instructions.
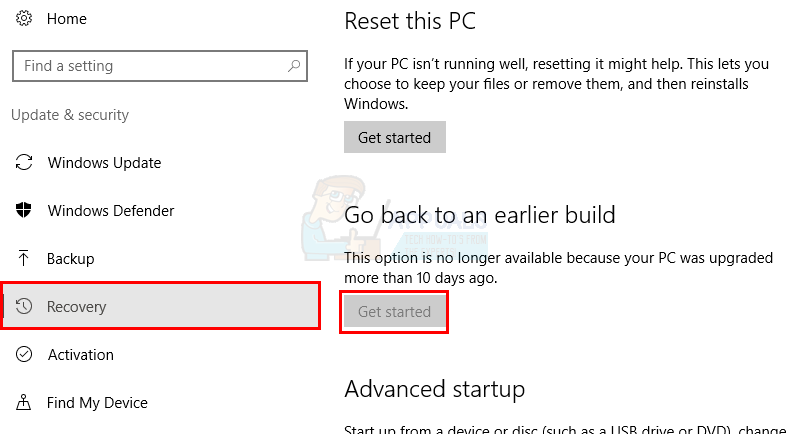
Once done, your Windows update should be uninstalled. Check if it has resolved the issue for you. If it has resolved the issue for you and you don’t want Windows to update again then follow the steps given below
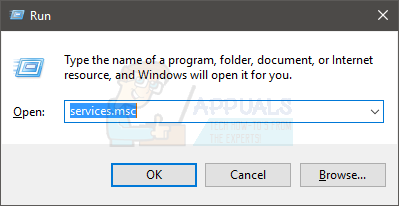
- Hold Windows key and press R
- Type services.msc and press Enter
- Locate Windows Update and double click it
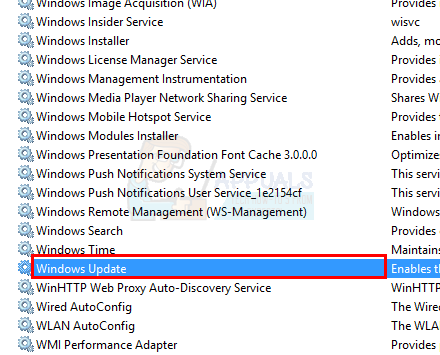
- Select Disabled from the drop down menu in Startup section

- Click Stop from the Service Status section if the Service Status is running
- Click Apply then select Ok
This should prevent any future Windows updates to install automatically. You can keep the Windows disabled until you hear about a newer update that doesn’t have the bug that caused this issue for you. Note: We do not recommend this because Windows updates are crucial for a system’s safety. You can enable the Windows updates by repeating the same steps given above and simply selecting the Automatic from the drop down menu in Start up type.
Roll Back Drivers
You can roll back to a previous version of driver as well. Follow the steps given below
- Hold Windows key and press R
- Type devmgmt.msc and press Enter

- Locate and double click Display Adapters (this is for graphic card example only)
- Double click your device

- Click the Driver tab
- Click Roll Back Driver… and follow the on-screen instructions. Note: If the button is greyed out then that means you can’t roll back to the previous version.

Once done, check if it resolves the issue or not.
Method 8: Perform a System Restore
If nothing else worked and you are aware of the time when the problem started happening then you can perform a system restore. System Restore is a recovery tool that comes preinstalled with the Windows. This tool is basically used to revert changes made to the operating system. So, if the problem started happening because of change you made then restoring to an earlier point will resolve this issue.
We already have a detailed article on how to do a System Restore. Click system restore and follow the steps given in this article.
Once done, check if it resolves the mss-32.dll file missing issue or not.