Fix: Stuck in CHKDSK Loop
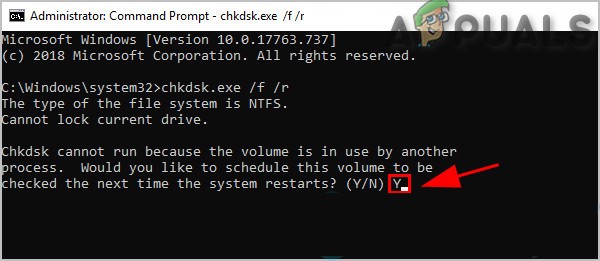
Windows comes with a disk check utility named Check Disk (chkdsk). This tool is used to check you’re the drive for any errors. The utility also fixes the issues that it finds automatically. In some cases, you might get stuck in a chkdsk loop. You won’t be able to use your Windows or you will only be able to use the Windows for a very short time. Whenever you turn on your computer, you will see the chkdsk running and performing a disk scan. The computer will reboot once the scan is done (which is how chkdsk usually works) or your system will restart in the middle of the chkdsk scan. Once your system reboots, it will run the chkdsk scan again and the cycle will continue. Some users might get a small window (a few seconds) before the chkdsk scan starts. In some cases, you might also see a BSOD once the scan finishes. This BSOD will force you to reboot the system and the chkdsk will run again.
The exact reason behind this SFC issue isn’t confirmed but it most likely is caused by a system file issue. In some cases, there might be a problem with the file system or Windows files might have been got corrupted. Rarely, it can also be caused by a security application like one of your antivirus applications. But, whatever is the reason, you don’t have to worry. There are plenty of ways to solve this issue. Go through each of the methods given below and keep trying until your problem resolves.
Note: But before moving on, disconnect all the devices that are not required, even disconnect Keyboard and Mouse (connect when required). If you are using more than one RAM, then switch to single RAM. If you are using more than one storage device, then only connect the storage device with the Windows OS. Do not forget to disconnect your RAID array.
Method 1: Run SFC in Safe Mode
Note: This method is for users who can get into Windows. If you can’t even get to Windows then go to method 2.
SFC stands for System File Checker. This is a Windows built-in tool for fixing any Windows related corrupt files. You can use this tool to fix any corrupt files that might be causing the issue. If the chkdsk loop is caused by the Windows corrupted file then this should resolve the issue.
Here are the steps for getting into Safe Mode and running SFC
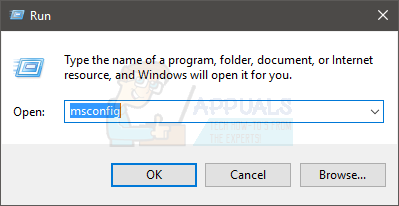
- Hold Windows key and press R
- Type msconfig and press Enter

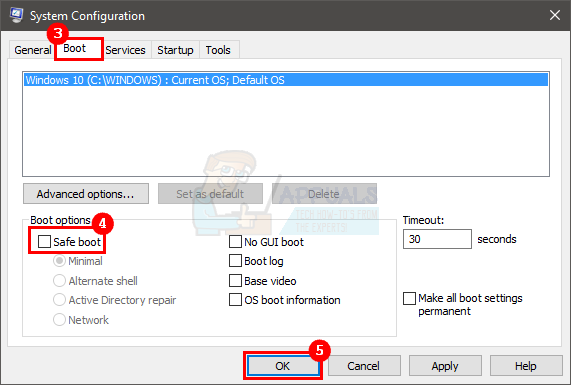
Run SFC Command - Select the Boot tab
- Check the option Safe Boot in the Boot options section
- Select the option Minimal under the Safe Boot option
- Click Ok
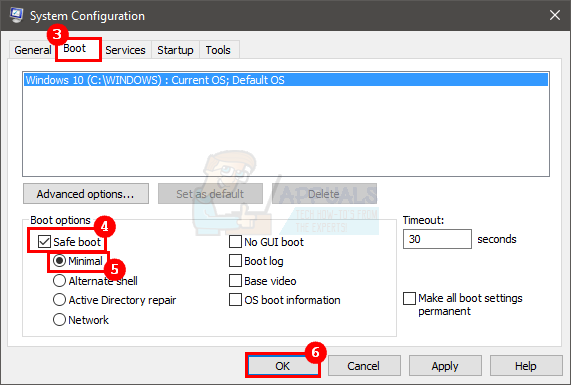
Select Safe Boot in System Configuration - Windows will ask you to restart. Click Restart
- When your computer restarts, you will be in Safe Mode.
- Press Windows key once
- Type command prompt in the Start Search
- Right-click the Command Prompt from the search results and select Run as administrator

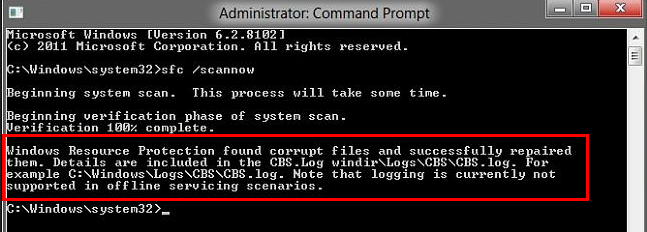
Run Command Prompt as Administrator - Type sfc /scannow and press Enter. There is a space after the “sfc” part. A lot of people miss that space. Note: If you see this error message Windows Resource Protection Could Not Start the Repair Service then that means the Windows Modules Installer service is either disabled or stopped. You should type net start trustedinstaller and press Enter and then retype sfc /scannow
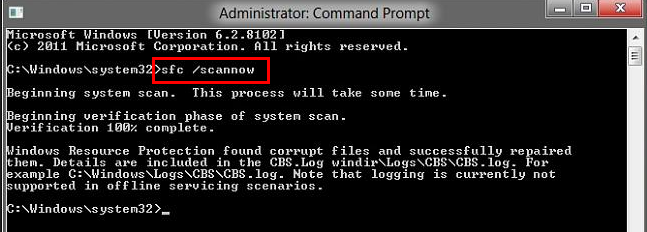
Run sfc /scannow Command - Now, wait for the scan to finish. It might take a while
- Once the scan is completed, SFC will show you the results as well.
- There are 4 types of results that you will get
-
-
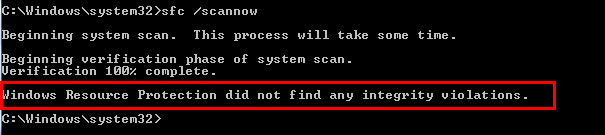
- Windows Resource Protection did not find any integrity violations. This means that everything is fine
-
-
-
- Windows Resource Protection found corrupt files and successfully repaired them. This means that there was a problem but now the issue is solved
-
-
-
- Windows Resource Protection could not perform the requested operation. This means that there was a problem in the process. Make sure you started the command prompt with administrator privileges or type net start trustedinstaller and press Enter in the command prompt.
- Windows Resource Protection found corrupt files but was unable to fix some of them. If you see this message then go here and analyze the log file created by SFC.
-
- Now that you are done with the scan, we will advise you to repeat step 4 (Type sfc /scannow and press Enter) 3 more times to ensure that everything is checked and fixed. Scanning 3-4 times is a good practice and it ensures best results
Once done, reboot your computer and check if the problem persists or not.
Note: Since you turned on the Safe Mode via the MSConfig, you will enter into the Safe Mode on every startup. Follow the steps given below to turn off the Safe Mode
- Hold Windows key and press R
- Type msconfig and press Enter
Run msconfig - Select the Boot tab
- Uncheck the option Safe Boot in the Boot options section
- Click Ok.
Uncheck Safe Boot in System configuration - Windows will ask you to restart. Click Restart
Method 2: Run SFC (For Users Who Can’t Get Into Windows)
Running SFC solves the problem but you won’t be able to follow the steps in method 1 if you can’t even get to the Windows. However, you can perform the SFC from the Windows 10 Installation USB or DVD.
Windows 10 Installation USB or DVD:
If you have a Windows 10 USB or DVD then you can get into the Advanced Startup Options menu pretty easily.
- Turn off your system
- Insert the Windows Installation Media Disc/Flash Drive
- Turn on the system
- Press any key when you see the message Press any key to boot from CD/DVD… Note: If you don’t see this message then you need to check the boot order from the BIOS menu. Reboot and go to your BIOS menu. Set the boot order in a way that your Installation Media is at the top. If your Installation media is a CD/DVD then move your CD/DVD drive to the top. If you have a Flash Drive then move that to the top of the boot order and then try again.
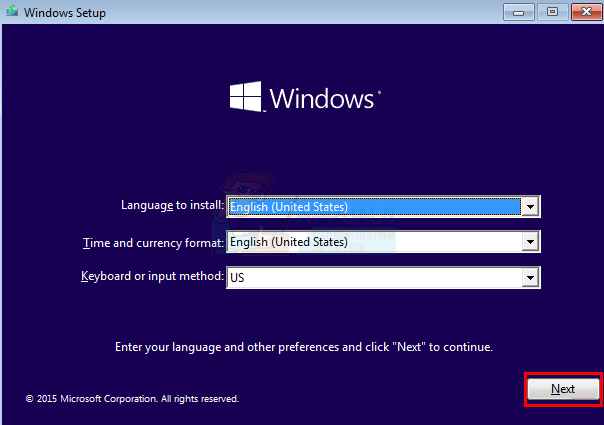
- Select your language and click Next
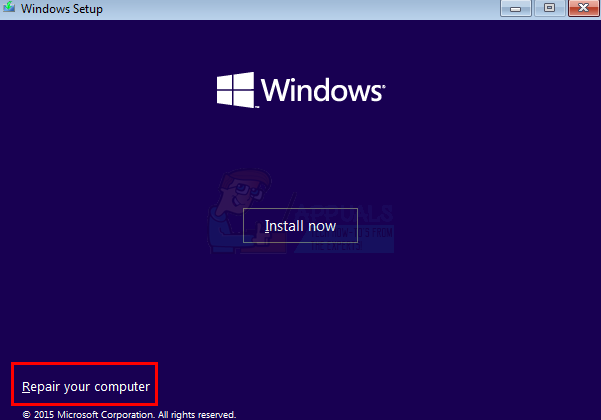
Select Your Language - Select Repair your computer.
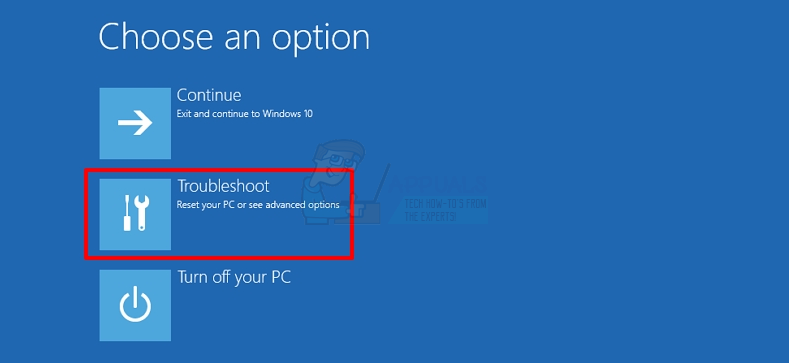
Select Repair Your Computer - This should get you to the Advanced Startup Options
- Click Troubleshoot.
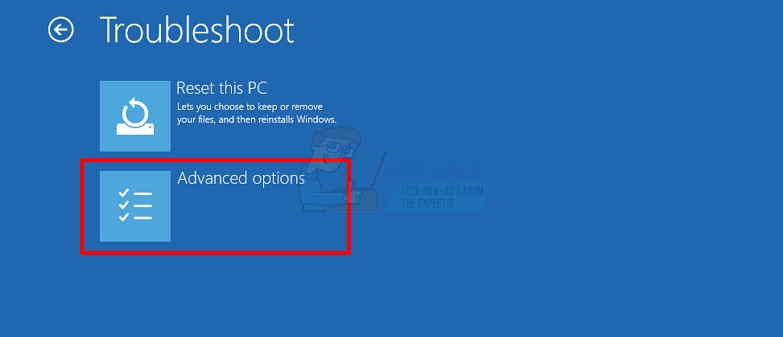
Choose Troubleshoot Option - Click Advanced Options.
Choose Advanced Options - Click Command Prompt
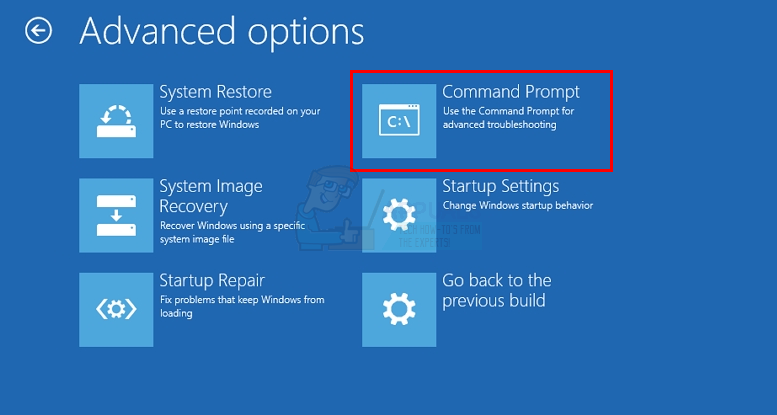
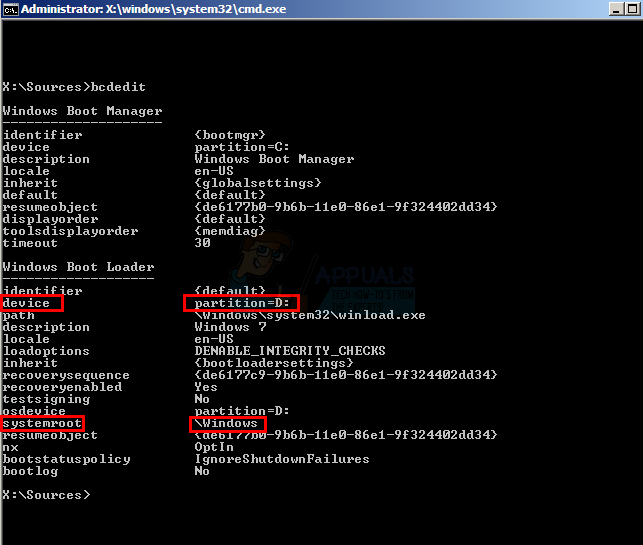
Select Command Prompt - You should have a command prompt now. Now you need to locate which drive is your Windows installation drive. Even if you are sure, type BCDEDIT and press Enter. This is just to be on the safe side. This command will show you which drive has your Windows installation.

Run BCDEDIT Command - Look under the device and systemroot in the Windows boot loader section. The systemroot should have the Windows mentioned while the device will show you the drive letter. If your Windows is installed in the C drive then there should be a D drive mentioned in the results. You might be worried about how is drive D when you selected and accessed drive C during your Windows usage. Do not worry about that, the BCDEDIT command gives the correct information. It’s just the way Windows work, even if the drive letter was C, Windows will recognize it as the D drive.
Check System Partition - Now that we know which drive has the Windows in it, it’s time to run the SFC.
- Type
sfc /scannow /offbootdir=<Windows_Drive_Letter>:\ /offwindir=<Windows_Drive_Letter>:\windows
and press Enter. Here, replace <Windows_Drive_Letter> with your drive later you found above. In our example, our line should look like this:
sfc /SCANNOW /OFFBOOTDIR=D:\ /OFFWINDIR=D:\windows.
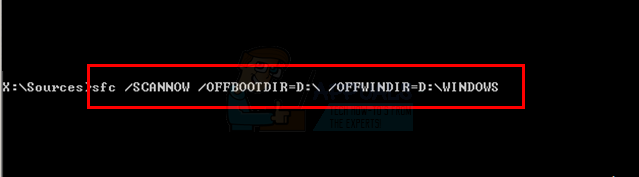
Run sfc /SCANNOW /OFFBOOTDIR=D:\ /OFFWINDIR=D:\windows Command - Now, wait for the SFC to scan and fix the files. Once done, you can close the command prompt and restart the system and check if the problem is solved or not. Note: Go to method 1 to see the details about the SFC results and what they mean.
Once you reboot, you will be able to get into the Windows if the SFC fixed the corrupted files.
Method 3: Perform Startup Repair
Startup Repair is a tool provided by Microsoft. This tool, as its name suggests, fixes the issues with the Startup. It the issues with the Startup are caused by a corrupt or problematic Windows file then the Startup Repair will resolve the issue.
We already have a detailed article on how to perform a Startup Repair on Windows 8, 8.1 and 10. Follow the instructions given in this article. Once your Startup Repair is completed, this chkdsk loop problem should be resolved as well.
If you are on Windows 7, have a good read of our article on How to Startup Repair in Windows 7 and follow the instructions given in this article. This is one of our articles as well so you will have a detailed step-by-step guide with screenshots to help you perform the Startup Repair.
Method 4: Reset chkdsk
Note: This is for users who can get to Windows and use it even for a brief time. If you can’t even get to Windows or you never get a chance to do anything on Windows then kindly skip this method.
Resetting chkdsk to its default values will most likely prevent the chkdsk from scheduling and, therefore, running at every startup. Here are the steps for resetting the chkdsk.
- Press Windows key once
- Type command prompt in the Start Search
- Right-click Command Prompt from the search results and select Run as administrator.

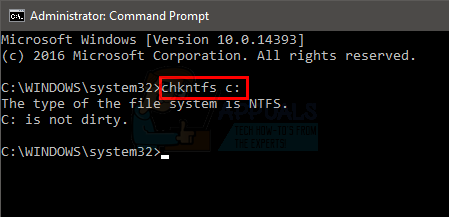
Run Command Prompt as Administrator - Now type chkntfs c: and press Enter. Replace c with the drive letter you want to check. This command will tell you whether a chkdsk is scheduled for this disk or not. You should probably perform this step for every drive you have and keep changing the c with the next drive letter.
- If there is no chkdsk scheduled then you will see a message saying the drive is not dirty.
Run chkntfs c: Command - You will see a message Chkdsk has been scheduled manually to run on the next reboot on volume <your drive letter>: if the chkdsk is scheduled to run.
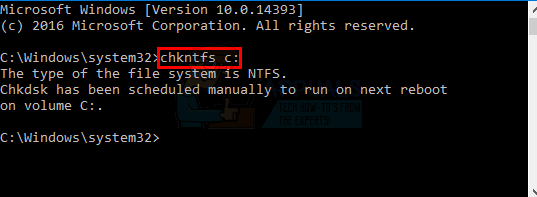
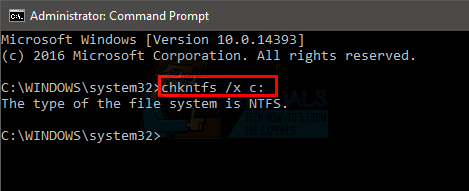
Chkdsk has been scheduled manually to run on the next reboot on volume - If you find that the chkdsk is scheduled for a drive then you can cancel the scheduled scan by typing chkntfs /x c: and press Enter. Replace c with the drive letter you want to check. Note: You won’t get a notification but just a message telling you that “The type of file system is NTFS“. If you see this message then you have successfully canceled the scheduling.
Close the command prompt once you are done and check if chkdsk runs on the next reboot.
Method 5: Reset chkdsk via Registry Editor
Note: This method is for users who can get into Windows.
You can reset the chkdsk and cancel any scheduled scans via the registry editor as well. Here are the steps for canceling the chkdsk scheduling via registry editor
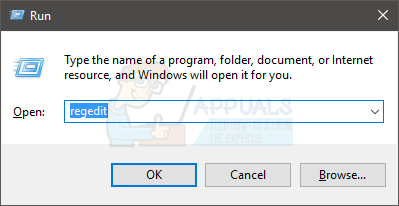
- Hold Windows key and press R
- Type Regedit and press Enter.
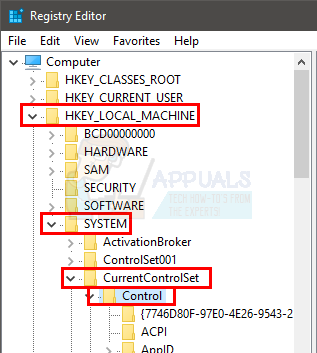
Run Regedit Command - Navigate to this path
HKEY_LOCAL_MACHINE\SYSTEM\CurrentControlSet\Control\Session Manager.
If you don’t know how to navigate to this path then follow the steps given below
- Locate and double click HKEY_LOCAL_MACHINE from the left pane
- Locate and double click SYSTEM from the left pane
- Locate and double click CurrentControlSet from the left pane
- Locate and double click Control from the left pane
- Locate and click Session Manager from the left pane.
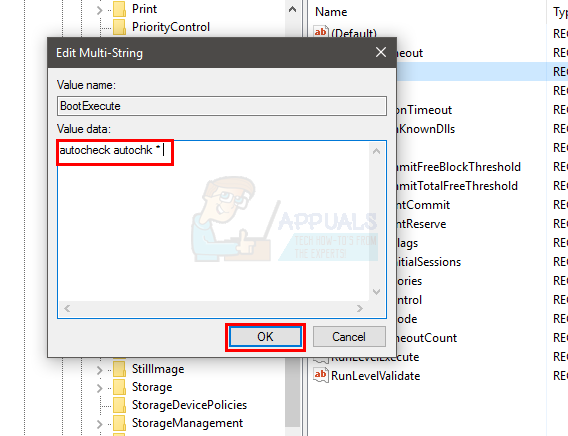
HKEY_LOCAL_MACHINE\SYSTEM\CurrentControlSet\Control\Session Manager. - Locate and double click the BootExecute entry from the right pane.

Open BootExecute - Type autocheck autochk * in the Value data section and click Ok
This should cancel any scheduled chkdsk scans and you should be good to go.
Method 6: Reinstall Windows and Backup Data
If nothing worked and you are continuously seeing the reboot and chkdsk scan then you have 2 options here. You can either try to do a clean install of the Windows which will resolve the issue if the issue was caused by a Windows or system file or you can back up the data and get a new HDD. If you don’t want to jump to buying a new HDD then at least back up your data and send your computer to a tech specialist.
Now, you must be wondering which option to pick if nothing resolves the loop problem. Well, it completely depends on your situation. If you are confident that your HDD cannot be damaged or you recently bought the HDD and you aren’t worried about losing any data from the HDD then trying to perform a clean install of the Windows will be your best bet. If the clean install doesn’t solve the issue then you can get your HDD checked for any issues. On the other hand, if you have an old HDD and you think it has spent more than enough time in the system or you dropped your computer or you are hearing a clicking noise from the system then it’s most likely the HDD issue. In this case, you should back up your data (if you can) and take your HDD to a tech specialist to confirm the damage. If you have any warranty then this would be a nice time to claim that warranty. But, don’t forget to back up your data before sending your computer for repairing.
So, if you have even the slightest of doubts or suspicion that your HDD might have an issue then back up your data and get your HDD checked by a specialist. Do not waste any time on reinstalling the Windows because your HDD might completely fail during this time.
Thank you so much! It solved my problem.