Fix: Destiny 2 failed to download configuration files
This notorious error message which often appears to users playing Destiny or Destiny 2 is usually accompanied with the error code Nightingale and the “Failed to Download Configuration Files” message is not allowing users to continue playing the game before something is done to get rid of the error.
Bungie’s official response to the problem consists of a generic fix to the problem which hasn’t helped anyone ever and they will also tell you that you might have malfunctioning hardware related to your Internet connection. That is why it’s best for you to follow the solutions presented below until one of them works for you and you are able to solve the problem.
Solution 1: Use a Wi-Fi Hotspot on Your PC or on Your Mobile Phone
If you are not using your home network to play Destiny or Destiny 2, it’s quite possible that the administrator of the network you are connecting to has blocked several ports used by Destiny to connect to its servers. If that is the case, you can avoid this issue by generating a hotspot on your computer in order to connect to it and avoid the restrictions.
Even if you are currently the owner of the network, something might be wrong with Bungie’s servers so you can use this workaround until they solve the issue on their own end.
For information on how to configure and start a hotspot on your PC which should have an Internet connection, read the article we have on the topic by clicking the following link.
Solution 2: Change the DNS to Correspond to Your Router
Custom Internet connection settings work for most users on their consoles but sometimes you need to step in and take things into your own hands. For example, various users have reported that they needed to manually change their DNS settings and change the DNS to correspond to the address which corresponds to their router.
First of all, you will need to find out which DNS address corresponds to your router by following the set of steps below:
- Click either on the Start menu or the Search button next to it and type in “cmd”. Right-click on the first result and select the Run as administrator option.
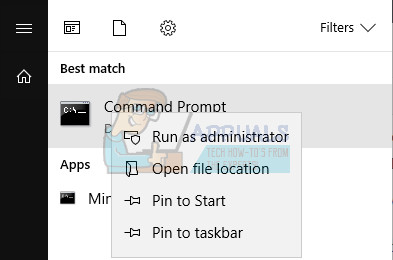
- Type in the following command in the Command Prompt window and made sure you type Enter in order to gain access to detailed information regarding your network:
ipconfig /all
- Locate the Internet connection you are currently using which should be named exactly the same as the adapter and locate the DNS Servers entry in the list.
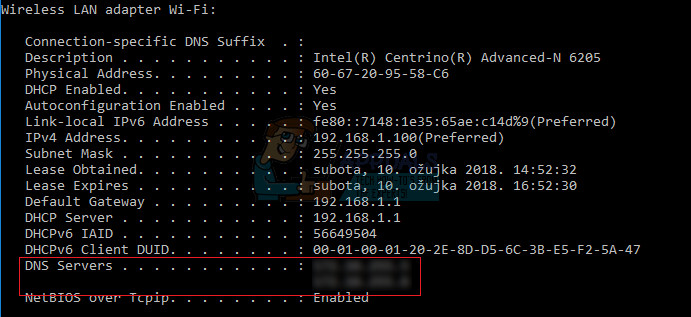
- Write down these two addresses as you will need them later while setting up your consoles.
Now that you have successfully located the DNS addresses, it’s time to setup your consoles correctly and use them in order to get rid of the Nightingale error code for good. The process is slightly different for PS4 and Xbox One users so please follow the information related to your console.
PlayStation 4 Users:
- Turn on your PS4 and navigate to Settings >> Network Set Up Internet Connection
- After that, Select the type of connection you are currently using to connect to the Internet (LAN Cable or Wi-Fi). If your PS3 is plugged in to the router, select LAN Cable and if you’re using a wireless connection, select Wi-Fi instead.
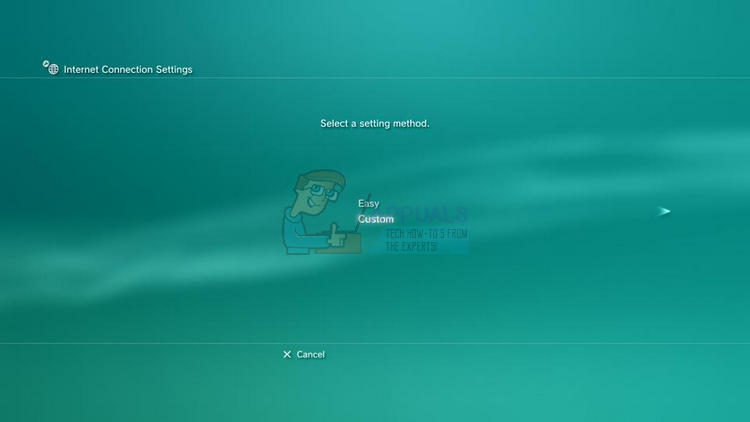
- The next screen should prompt you on “How do you want to set up the Internet connection”. Choose Custom.
- If you selected wireless, set up your connection as normal but you will also need to choose the wireless connection you are going to use in the future. If the network is password-protected, you will need to provide the key and it will display a padlock icon on the right side of the screen.
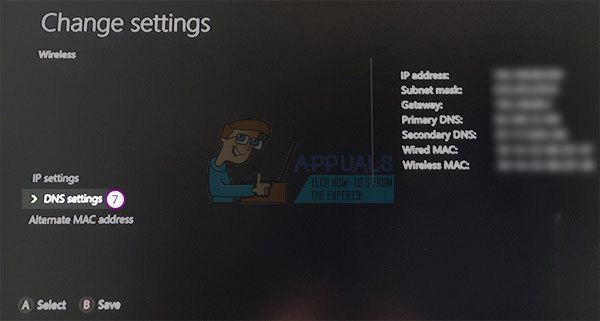
- Make sure you set your settings as following and make sure you enter the same addresses you located in the Command Prompt:
IP Address Setting: Automatic
DHCP Host name: Do Not Set
DNS Settings: Manual
Primary DNS: <the first address from cmd>
Secondary DNS: <the second address from cmd>
MTU Settings: Automatic
Proxy Server: Do Not Use
- Test your connection and check to see if the error code still appears.
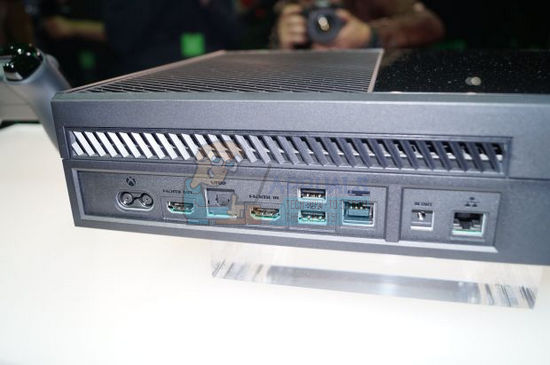
Xbox One Users:
- Go to the Xbox One Dashboard and press the Options button on the controller you are using.
- Navigate to Network >> Advanced Settings >> DNS Settings >> Manual.
- Enter the first address from Command Prompt for the Primary DNS and the second one for the Secondary DNS. Click Enter the both times to confirm and press the B button to save the changes
- Restart your Xbox One, restart Destiny, and check to see if the error code Cabbage still appears on your console.
Note: If your own DNS addresses won’t work properly, you can try the following one:
Primary DNS: 8.8.8.8
Secondary DNS: 8.8.4.4
or
Primary DNS: 208.67.220.220
Secondary DNS: 208.67.222.222
This are the Google DNS addresses (first pair) and Open DNS ones (second pair) which are free to use and which have also helped people deal with the error code.
Solution 3: Completely Restart Your Respective Console
A complete restart of the console is sometimes necessary since it clears the cache and resets certain processes which might have gone corrupt due to excessive use of the console.
- Press and hold the power button at the front of the Xbox console until it shuts down completely.
- Unplug the power brick from the back of the Xbox. Press and hold the power button on the Xbox several times to make sure there is no remaining power and this will actually clean the cache.
- Plug in the power brick and wait for the light located on the power brick to change its color from white to orange.
- Turn the Xbox back on as you would do normally and check to see if the Centipede error code still appears when you start Destiny or Destiny 2.
Alternative for Xbox One:
- Navigate to your Xbox One settings and click on Network >> Advanced Settings.
- Scroll down to Alternate Mac Address option and choose the Clear option which appears.
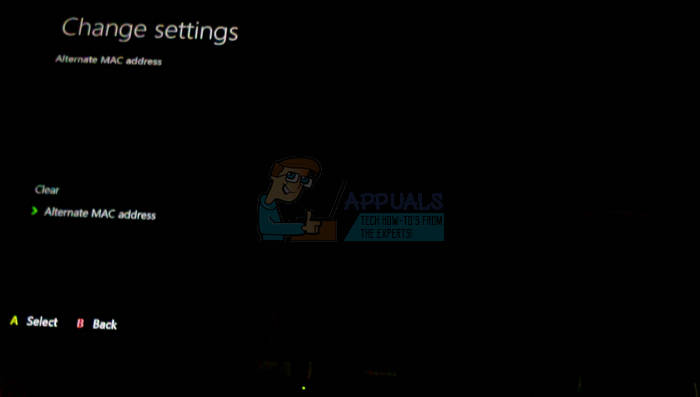
- You will be prompted with a choice to really do this as your console will be restarted. Respond affirmatively and your cache should now be cleared. Open Destiny or Destiny 2 after the console has restarted and check to see if the Centipede error code still appears.
If you are using a PlayStation 4 to play Destiny, make sure you follow the instructions below to hard reset your PlayStation 4 since PS4 does not possess an option to clear the cache:
- Completely turn off the PlayStation 4.
- Once the console is completely shut down, unplug the power cord from the back of the console.
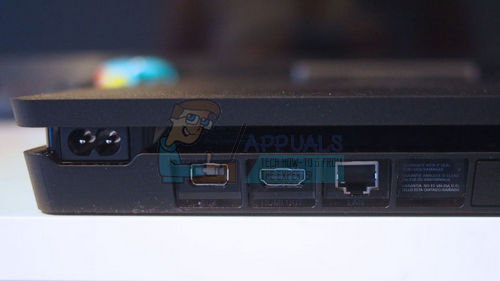
- Let the console stay unplugged for at least a couple of minutes.
- Plug the power cord back into the PS4 and turn it on the way you normally do.
Solution 4: Restore Licenses on PlayStation 4
This option will successfully restore the licenses of all games, add-ons, and DLCs you have under the possession of your PSN account so make sure you try this solution as it’s quite simply and it has actually helped quite a few users deal with their Destiny error codes, especially if you encountered the “Failed to Download Configuration Files” message.
- Turn on your PS4 and navigate to the Settings area.
- Click on PlayStation Network >> Account Management >> Restore License.
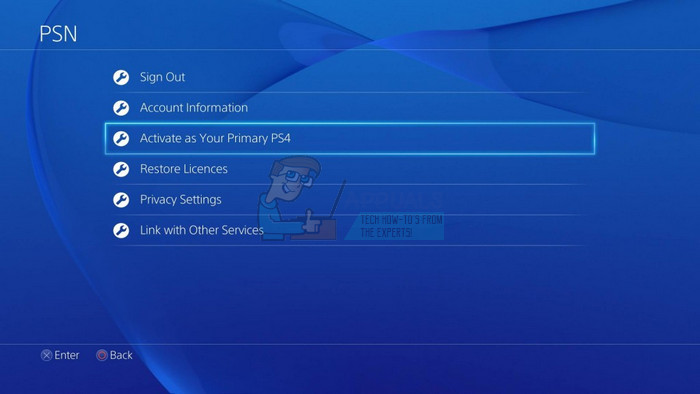
- Check to see if the error code Termite still appears while you enjoy Destiny 2.
where’s the pc adrees? you blurred it dude