How to Create a Wireless Hotspot On A Windows Computer
Wireless Hotpots comes handy when you have multiple devices that needs to be connected to the Internet. Most new devices such as smart phones and tablets do not have the Ethernet ports for wired connections to the router and the only mean they have to get to the internet is via WiFi or over cellular network if they are sim based tablets, where the data (internet) cost is super expensive since these devices tend to use large volumes of data. For whatever reason, if you’re not able to connect directly to the WiFi then you can use your Laptop or Desktop’s (Internal WiFi Adapter) to broadcast itself and allow devices to connect to it. Without a built-in or external WiFi Adapter this will not be possible. Most laptops already have one and most new (all in one desktops) have this too BUT the older desktops do not have a built-in adapter installed unless you’ve set one up yourself. For desktops and laptops too, you can buy a USB Wireless adapter which are cheaper (less than 5$ usually). They are mostly plug_and_play so insert them into any available USB port. If they don’t get installed successfully automatically, use the CD to install the drivers that came with the Wireless adapter.
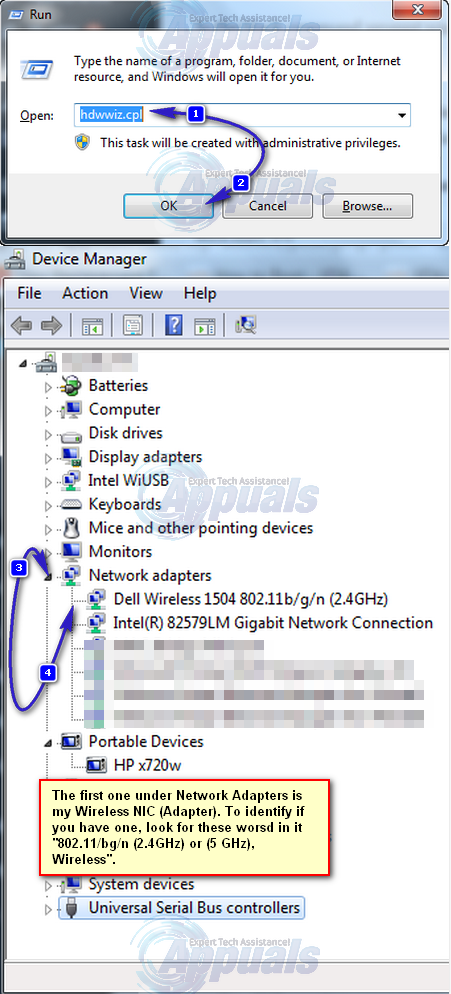
If you don’t know whether you have one or not, then check it now using the steps below:
Hold the Windows Key and Press R. Type hdwwiz.cpl and Click OK. Scroll down to the bottom and expand network adapters.
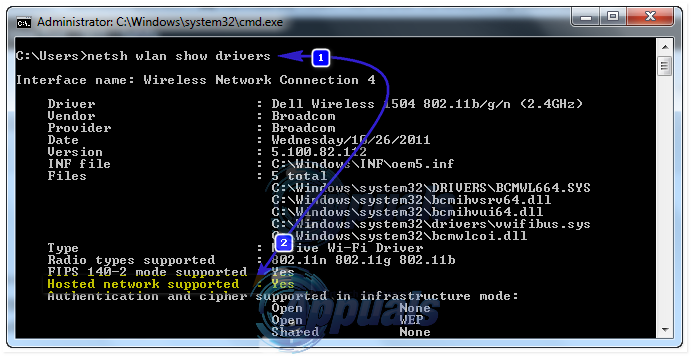
The next steps is to check if the drivers of your network interface card supports hosted networks or not. Press Windows key. Type cmd, right click on cmd and click on Run as Administrator. Click Yes if UAC warning appears. In the black command prompt window, type the following command and press Enter.
netsh wlan show drivers
If the entry against Hosted Network Supported is Yes, then your network card supports hosted networks. If it is no, then you won’t be able to create virtual hotspots.
Solution 1: Using Microsoft Virtual Wi-Fi Mini Port Adapter
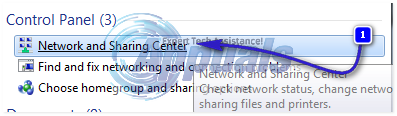
Microsoft Virtual Wi-Fi Mini Port Adapter is a feature added into Windows 7 and onwards. Using this feature, you can turn the physical network adapter that a computer has into two virtual network adapters. One will connect you to the internet, and the other will turn into a Wireless Access Point (Wi-Fi hotspot) for other Wi-Fi devices to connect with. Click Start button. Type Network and Sharing Center in the search box. And Click on it to open it.
Now Click on Change adapter settings in the left pane.

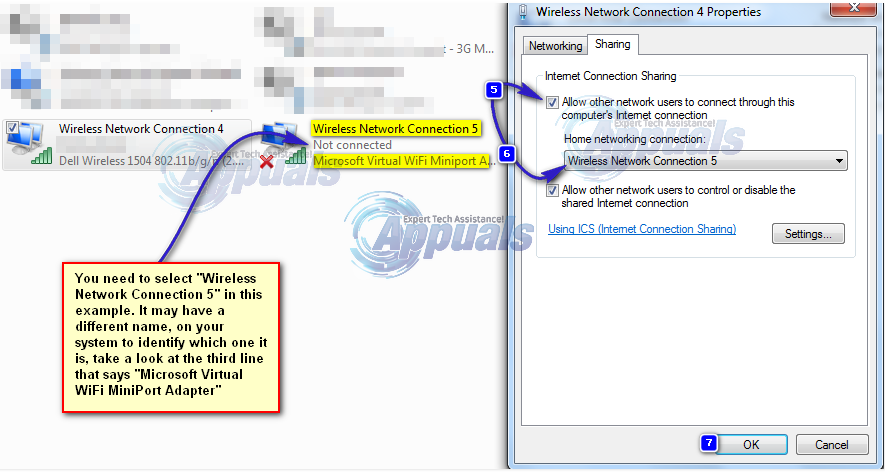
Now right click on the adapter you are using to connect with the internet (it will be the one without the RED CROSS) and click on Properties. In case you use Wi-Fi it will be similar to Wireless Network Connection and in case of wired internet access it will be similar to Local Area Connection.
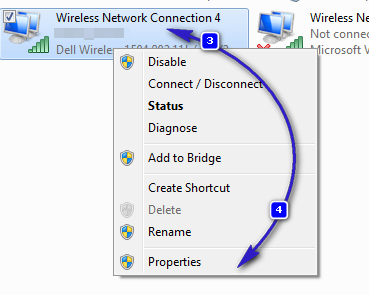
Go to the Sharing tab in the properties window, and check the box beside Allow other network users to connect through this computer’s internet connection. And if there is an option to select an adapter next to Home networking connection, select the adapter name for the Microsoft Virtual Wifi Mini port. Click on Settings. Check all the listed options and press OK for each to confirm. Press OK > OK. In my case it was Wireless Network Connection 5. If there is no such option, simply click OK to apply changes.
Again run cmd as Administrator.
To enable Wi-Fi hosting, type the following code in the black window and press Enter:
netsh wlan set hostednetwork mode=allow ssid=VirtualNetworkName key=Password
Replace VirtualNetworkName with the name you want for your Wi-Fi hotspot, and Password is its password.
Now type the following to start broadcasting your new Wi-Fi Hotspot:
netsh wlan start hostednetwork
You will get a message hostednetwork started.
To stop broadcasting your Wi-Fi hotspot, type:
netsh wlan stop hostednetwork

If this solution did not work or if it is complicated, then you can use the Virtual Router Plus method below.
Solution 2: Using Virtual Router Plus
It is a software which basically uses the same functions as mentioned above but provides a nice and simple interface with straight forward options.
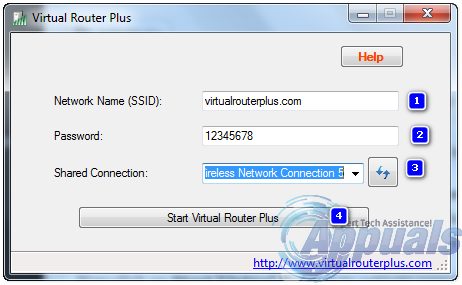
Download Virtual Router Plus from this link. It is a freeware which with 3 simple steps can get your Wi-Fi hotspot up and running.
Install and run the program.
Next to “Network Name (SSID):” type your new Wi-Fi Hotspot name.
Enter a secure password for Wi-Fi next to Password. Next to Shared Connection, choose your internet connection that you want share over your Wi-Fi. Choose Local Area Connection in case you want to share wired internet access, or choose Wireless Network Connection in case you are using Wi-Fi.
Now click on Start Virtual Router to activate your Wi-Fi hotspot. Your new Wi-Fi will start broadcasting. Enter the password given above for devices who want to connect to your Wi-Fi.
If you cannot start Virtual Router, make sure you have shared the adapter through the method mentioned in Solution 1. And if your device can’t find the Wi-Fi hotspot, or you are having some other connectivity issues, then click on Stop Virtual Router in Virtual Router Manager, and then on Start Virtual Router again.
Solution 3: Using Connectify’s Hotspot
Another software with high ratings. It is also free (with limited functionality) and easy to use.
- Download Connectify from this link.
- Install and run the program.
- On the ‘Settings Tab’ and under “Create a…” select Wi-Fi Hotspot.
- In the ‘Internet to Share’ dropdown select the adapter you wish to share. This adapter should have a working connection to the Internet.
- Under Hotspot Name, enter the unique name you want to give to your Wi-Fi hotspot and enter the password for it. The hotspot name is the network name that other devices will see and authenticate to using your unique hotspot password.
- Click the ‘Start Hotspot’ button to begin sharing your Internet connection with your Wi-Fi enabled devices.