Fix: APSDaemon.exe System Error
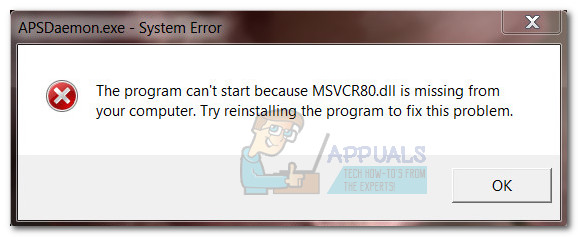
Some users have been reaching us with the APSDaemond.exe window containing the “The program can’t start because MSVCR80.dll is missing from your computer” error. Despite what the error message is stating, this particular problem has nothing to do with a missing DLL file and was likely triggered by a Windows update that interfered with some iTunes components. Even more, whenever this problem occurs, users report that they lose the ability to open Itunes as well as reinstall the program through normal channels.
If you’re currently struggling with the issue, the methods below might help. We have managed to identify a few potential fixes that have enabled other users in a similar situation to resolve the issue. Please follow each potential fix in order until you encounter a method that manages to solve the problem. Let’s begin.
Method 1: Set the Apple Mobile service to Automatic
As it turns out, some Windows update (we’re not sure which one) is facilitating some software conflicts that modifies the state of the Apple Mobile service from Automatic to Stop. Without the Apple Mobile service, iTunes will malfunction and refuse to reinstall.
Here’s a quick guide to reverting the Apple Mobile service behavior to the default in order to resolve the APSDaemon.exe – System Error issue:
- Press Windows key + R to open up a Run window. Type “services.msc” and hit Enter to open the Services window.

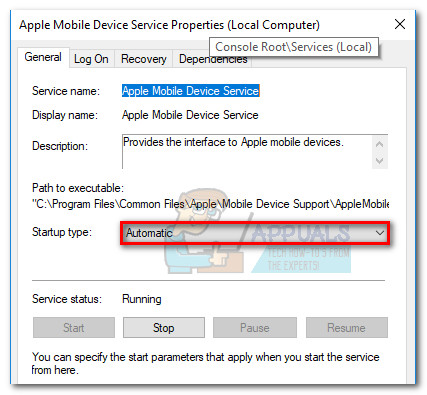
- Scroll down through the Services list and locate Apple Mobile. It’s either called Apple Mobile Device Service or Apple Mobile.
- Once you do, right-click on the Apple Mobile (or Apple Mobile Device Service) and choose Properties.

- In the properties of Apple Mobile, go to the General tab, access the drop-down menu associated with Startup type and set it to Automatic. Then, hit Apply to save your changes.
- Restart your computer and try opening iTunes, reinstalling it, or whatever you were prevented from doing before following these steps.
If the issue is still not resolved, move down to Method 2.
Method 2: Uninstalling via official documentation
If Method 1 was a bust, you might be experiencing some of those instances where you have to completely remove all iTunes and iTunes related software components before you’re able to reinstall iTunes.
Here’s a quick guide to uninstalling iTunes along with all its related components:
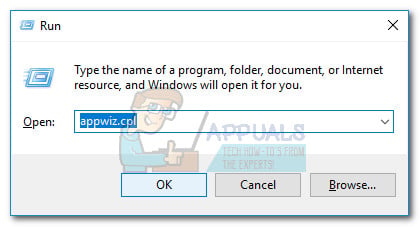
- Press Windows key + R to open up a Run window. Type “appwiz.cpl” and hit Enter to open Programs and Features.
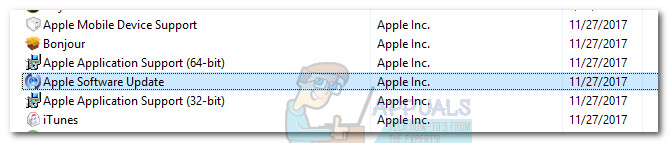
- In Programs and Features, click on the Publisher tab so you can easily view all of Apple’s software products. Right-click on each software signed by Apple and click Uninstall to remove it from your system.
- Once iTunes and all of the related components are removed, reboot your system.
- After your computer boots back up open another Run window (Windows key + R), type “%programfiles%” and hit Enter.
- Uninstalling iTunes and the related components should have removed all of the folders mentioned below. With this in mind, look for the following folders under Program Files and if they exist, delete them:
iTunes
Bonjour
iPod - Once you made sure the folders mentioned above are removed, open the Common Files folder (also located under Program Files) and then double-click the Apple folder. From there, delete the following folders if they still exist:
Mobile Device Support
Apple Application Support
CoreFP
 Note: If you can’t find the Apple folder here, open the Program Files (x86) folder.
 - Next, empty your Recycle Bin and reboot your computer once again.
- After your computer boots back up, you can begin reinstalling iTunes and all of the related components. You should have no issues doing so.
Method 3: Using a System Restore point
If the first two methods didn’t allow you to get rid of the APSDaemon.exe – System Error, using a System Restore point will enable you to reverse the changes inflicted by the Windows Update on iTunes.
Note: System Restore is a recovery tool that allows Windows users to reverse certain changes made to their OS. Think of it as an “undo” feature.
Here’s a quick guide to using a previous System Restore point to fix the APSDaemon.exe – System Error:
- Press Windows key + R to open Run command. Type “rstrui” and hit Enter to open System Restore. Press Windows key + R to open Run command. Type rstrui and hit Enter to open System Restore.
- Hit Next in the first window and then check the box next to Show more restore points. Select a restore point prior to when you started to experience problems with iTunes and click the Next button.

- Hit Finish and then click Yes at the next prompt to start the restore process. When the restore is complete, your PC will automatically restart. Once your OS is restored to a previous version, see you’re able to open iTunes or reinstall the software.