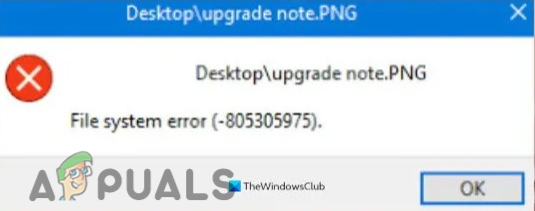
Fix File System Error (-805305975) in Windows 11/10
A user may encounter the File System error (-805305975) in window 10/11 that appears when opening a file with the wrong file format, especially when trying to open file types like photos, videos & music files.
The main reason for generating this error is;
- Wrong format of image: Every computer work on their own presets and preferences and use a different application. When you try to open a photo that does not match your system requirements, it generates an error. You can resolve this issue by resetting the photo app.
- Hard Drive Errors: Sometimes hard drives start to fail over time. There are chances of some physical damage when hard drives do not work properly. It is essential to check the hard drive’s functioning using the chkdsk
- Problem with Photo App: when you install the app there are chances of losing a few files. They cease the app to open images and generate errors. You can resolve this issue by reinstallation the app.
1. Check the Window Updates
First of all, go and check the windows latest updates. If there is any pending update, install them. And then restart your system. As we know windows update from time to time to introduce new features to your system. So, if you try to use an old version of windows, it may cause a file system error. Because some bugs are attached for a better experience. They affect the performance of the system. Here are the steps that will help you in updating the windows.
- Go on the Start menu and type Window Updates on the search bar.
- Click on the download & install for the required update.
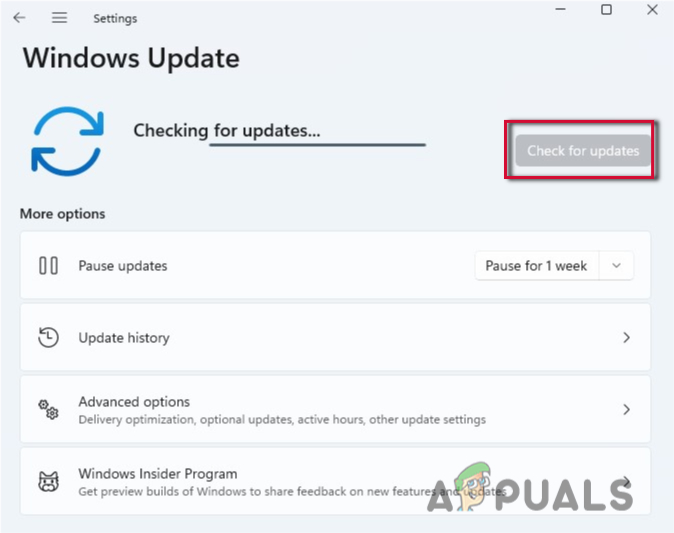
Check the Windows Updates - Wait for a while. After complete installation. Restart your system.
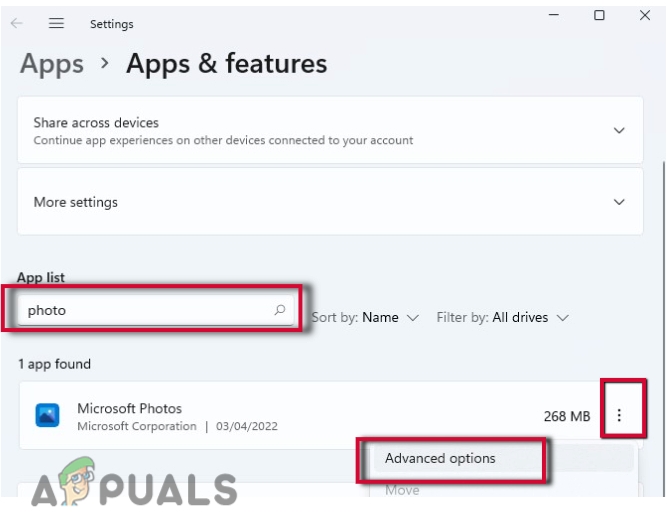
2. Reset the Photo App
If the above method does not work properly, try to reset the Photo App. As we know every computer has different settings and applications. They work on their preset sand preferences. But sometimes these preferences do not match the operation you want to perform. For instance, photos can conflict with some system modules. They generate an error on opening. Here, are a few steps that will help to fix the file system error (-805305975) in windows 10/11.
- Go on the start menu and search for the Apps and Features.
- Click on Apps and Features. Here you will find a search tab on the right side of the screen.
- Type Photos in it. The most suitable option is Microsoft Photos will appear.
- Press the three-dot icon and click on the Advance option.
Resetting the Photo App - Scroll down to the Reset option and chose Repair. (It won’t affect the app’s data). Now you can select the Reset option. But you will lose the data. So, before selecting the reset option, keep the backup of the photo, document, and files in an external media source.
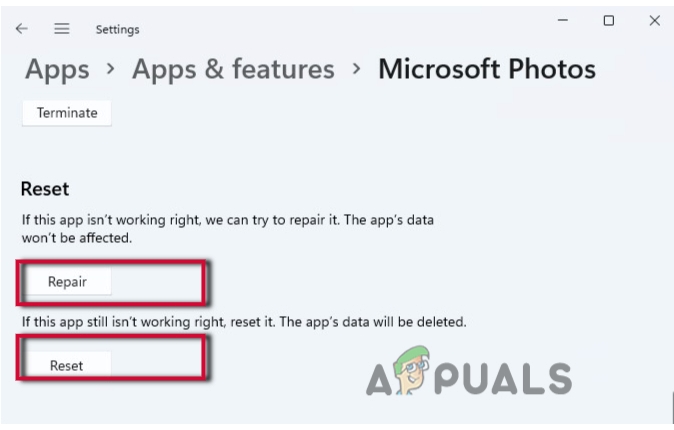
Repair and Reset the Photo app - Close the window and restart your system.
3. Fix file system error through SFC & DISM scan
If still, you are facing this issue, you can scan the system files by SFC and DISM scan. It usually works when you deal with corrupt files in your system. These corrupt files generate the error of (-805305975) on the opening of files. Scanning these files can repair them and fix the file system error (-805305975) in windows 10/11. So, the following steps will help you in the scanning process.
- Go on the start menu and type CMD on the search bar.
- Right-click on the command prompt and then select run as an administrator
- If you receive a user account control prompt then press
- Now in the elevated command line window type this command; SFC / scannow.
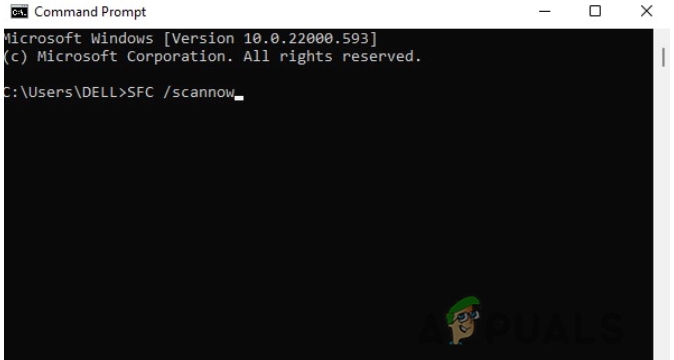
SFC scan of the System Files - Hit Enter from your keyboard to run this command. It will take some time. So, try to be patient.
If it doesn’t work go and chose to run the DISM scanning.
- Again open the command prompt and run it as administrator.
- Now type the following command. Press Enter
Dism /Online /Cleanup-Image /Check health
Dism /Online /Cleanup-Image /restorehealth
4. Run the system file checker or Remove the Hard Disk Error
When the above methods do not work then maybe the hard drive itself causes this issue. You can check the hard disk error by the following technique. Otherwise, it can also cause physical damage to your system. So, follow these steps;
- Go on the start menu and type CMD. Then right-click on the command prompt.
- Now select the option of Run as an Administrator.
- Command prompt window will open. Type the following command;
chkdsk / f c:
- Press Enter to run the command. They will demand the yes or No option to further proceed. Now press Y and again press Enter.
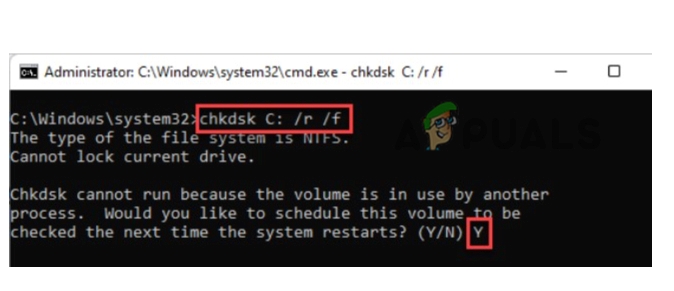
Check the Hard Disk Error - Restart your computer.
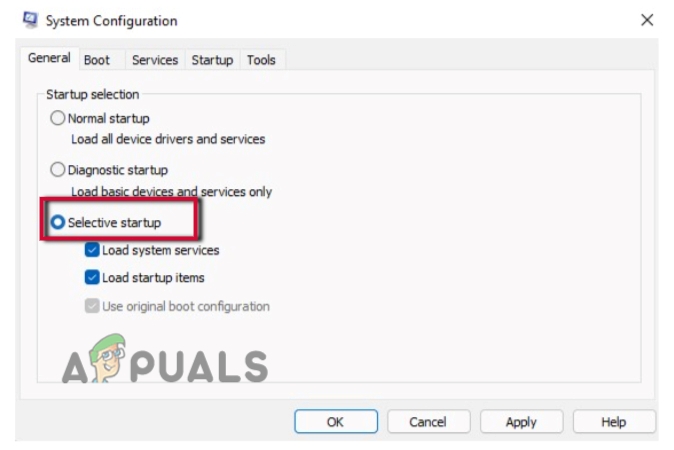
5. Repairing clean boot mode
Mostly third-party applications run in our system. These applications interfere with system processes and cause troubles like file system errors. Clean boot mode is highly effective if you want to detect the application which is causing trouble in your system. So, here are a few steps that will help you in repair in clean boot mode.
- First of all, press the window key + R from the keyboard.
- Type msconfig in the search tab of the Run window and then press OK.

Misconfigured Files - Now the system configuration window will open. So, go to the General
- Move towards the selective startup option and do check the load startup items.
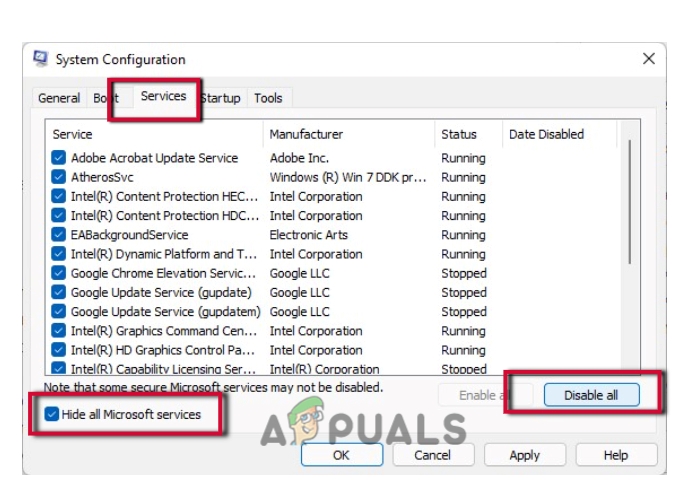
Clean Boot mode-1 - Similarly, go on Services from the menu bar of system configuration.
- Here, you will find the option of Hide all Microsoft services, just above the ok tab. Check its box.
- Now go to disable all options from the bottom of the screen. Click it to disable all the apps. These are third-party apps. As you have removed them, so they won’t interfere with your system.
Clean Boot mode-2 - Now go to the Startup option, just after the services from the menu bar.
- Click on the Open Task Manager Here you will find the list of all services which are set to autostart.
- Now select and right-click on each service one by one. Press disable to remove the unnecessary app to autostart.

Clean Boot mode-3 - So, come to the system configuration window after closing Task Manager.
- Click on Apply option and press Now restart your system.
6. Reinstallation of photo App
Still if resetting the app does not work, there are chances that some of its files are missing. You can install it again to recover the missing file. So, if you are still facing issues in opening the image file. You should try to reinstall the photo app. But before re-installation, uninstall the app.
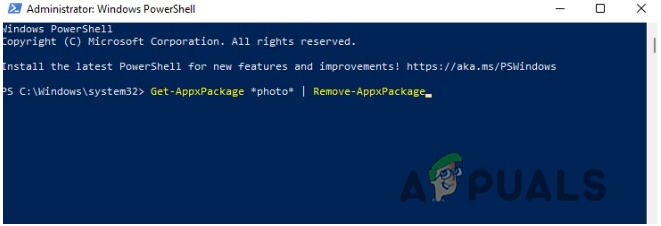
- Go on the Start menu and search for
- Right-click on PowerShell and select the option Run as an Administrator.
- Now type the following command on the PowerShell screen.
Get-AppxPackage *photo* | Remove-AppxPackage
Reinstallation of Photo App
Your app will be Uninstall. Now go on Microsoft Store and search for the Photo app and press the Get And then Press Reinstall Option.


