Fix: File Explorer on Windows 10 Slow
According to some Windows 10 users, the Explorer became extremely slow and very unstable at times. It takes a huge amount of time in copying or opening files. File Explorer is the main feature in the Windows operating system used for navigation. If it doesn’t work as expected, it causes a lot of problems. This problem can be traced back to a number of other aspects of Windows. We will try to help you guide through the process of fixing this problem.
Solution 1: Disabling Quick Access
Windows 10 introduced a Quick Access view in the file explorer. Whenever you open the file explorer, you will see a Quick Access item in your navigation pane (present at the left side). This contains all the recent files and folders accessed by you. Users reported that disabling the Quick Access solved their problem for them.
Quick Access is more like “Favorites” present at the earlier versions of Windows. This is very handy for people who open the same documents present at different directories again and again. But if you are experiencing a lot of lag or your file explorer gets stuck in be, when again and again, we can try disabling it completely and check if our problem got better in any way.
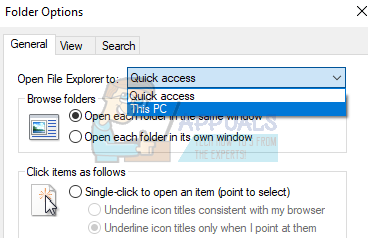
Firstly, we need to make the File Explorer open to “This PC” instead of Quick Access whenever you open it.
Whenever you open the file explorer, you will be redirected to the Quick Access view. If we going to disable the Quick Access from your system completely, we need to disable this feature too. The “This PC” is more of a traditional view of “My Computer” present in earlier versions of Windows. It displays all your drives along with the favorite folders (Images, Videos, and Pictures etc.).
- Open your File Explorer. Then click on File button present at the top left side of the screen (it will be colored blue).
- Once you have the File drop-down opened, click on Options.

- Now navigate to the General tab. Here you will see an option which says “Open File Explorer to:”
This will be by default set to Quick Access. Click it and change it to This PC.
- Click Apply to save changes and exit.
In the second step, we have to stop showing favorites or recent folders in the Quick Access.
The Quick Access list takes the place of the old Favorites list in the previous operating systems. It works in the same way but lets you view folders which you recently opened. We need to turn it off.
- Open your File Explorer. Then click on File button present at the top left side of the screen (it will be colored blue).
- Once you have the File drop-down opened, click on Options.
- Once the Options are opened, navigate to the General tab. Navigate to the bottom and you will see a heading named as Privacy. Uncheck both options i.e. Show recently used files in Quick access and Show frequently used folders in Quick access. Click apply, save changes and exit.

Now Quick Access will only display Favorite folders similar to the older versions of the operating system. Restart your system and check if your file explorer got any better.
Solution 2: Checking Event Log for errors with File Explorer
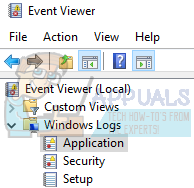
We can check the Event Log for errors which were registered with the File Explorer. The Event Log contains all errors that an application undergoes and can be used to pinpoint the problem which is causing the crash/stuck.
- Press Windows + R to launch the Run application. Type “eventvwr” and press Ok. This will launch your PC’s event viewer.
- Now click on Windows log present in the left side of the navigation pane. Now click on Application. This will view all the errors and messages regarding applications installed on your computer (including File Explorer).
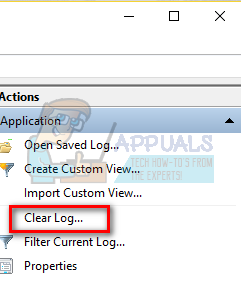
- Now you can search for critical errors regarding the File Explorer. If you don’t, you can click on the Clear Log present at the right side of the screen so all the log is cleared. Then launch the File Explorer again and wait for it to crash. The log will be recorded. Navigate back to the event viewer and check for problems.
- Most of the time the application is just conflicting with other programs, for example, one user reported that he was having a conflict with DTShellHlp.exe
After tracking the exe file down, we found Daemon tools to be the culprit. It was linked with File Explorer and was causing the problems. Uninstall the application which is giving the problem and restart your computer.
Solution 3: Changing “Optimize this folder for”
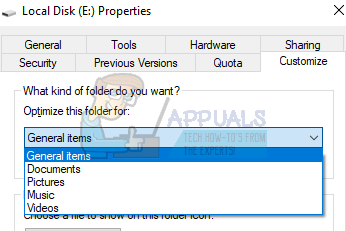
If you are experiencing problems on a specific folder, we can try optimizing it for the items contained in the folder. When we optimize a folder for a specific file format, it automatically prioritizes in opening/copying etc that file format.
- Navigate to the folder where are experiencing the problem. Right click on the empty space and select Properties.
- Once in the properties, navigate to the Customize tab. Here you will see a tab named as “Optimize this folder for”. Click it for the drop-down. Now select the file format.
- After selecting, click Apply, save changes and exit.
A restart might be necessary for the changes to take place. Restart your computer and check if the lagging got fixed.
https://www.tenforums.com/general-support/7009-file-explorer-extremely-slow-unstable-2.html
Solution 4: Enabling Cortana (if it is disabled)
Many users reported that enabling Cortana solved their problem. Cortana is preinstalled in the Windows operating system and is integrated with your system completely. We can try enabling it and checking if our problem gets fixed.
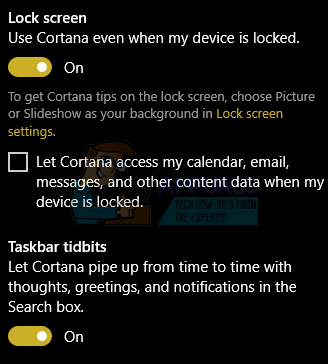
- Press Windows + S and write “Cortana settings”. Click on the first result which comes forward.

- Now when the settings come forward, make sure that all the boxes are checked as “On”. Once you have made all the changes, exit.
- Restart your computer and check if the file explorer got fixed.
Solution 5: Turn off indexing
An indexed file is a computer file with an index that allows easy random access to any record given its key. The key is made in such a way that it uniquely identifies the record. Windows has a feature to index folders and files for faster access. By default, most of the major folders are selected and Windows is also constantly updating the indexing in the background.
This causes a lot of CPU usage and keeps your file explorer busy. Hence the case with the slow performance. We can try turning off indexing and checking if it helps our cause. There are two options for you to disable indexing. We can selectively disable indexing for some specific folders or you can completely disable indexing.
We can go with disabling selective indexing if you don’t want to completely disable the process due to any reason.
- Press Windows + S to launch your computer’s search bar in the start menu. Type “indexing” in the dialogue box and select the first record which comes in the result.

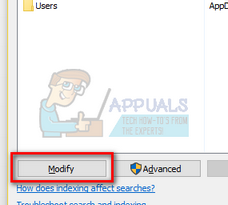
- Once the indexing options are opened, you will see a list of all indexed locations in front of you. If Windows is indexing the locations where the file explorer is becoming extremely slow, we can try disabling the indexing there. At the bottom left side of the screen, there will be a “Modify” button present. Click it.
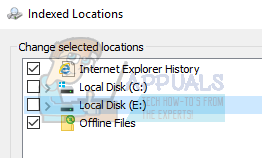
- Now uncheck the locations where you don’t want the indexing to take place. Save changes and exit.
- Restart your computer completely and check if the file explorer got any better
If you want to completely disable indexing, you can stop it from the list of services. Through this, the entire indexing process will be stopped.
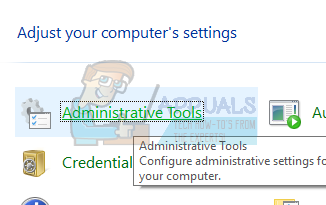
- Press Windows + S button for the start menu’s search to come up. Type “administrative tools” in the dialogue box and hit enter. Click on the first result which pops up.

You can also access these tools by pressing Windows + R to launch the Run application. Type control panel in the dialogue box and hit enter. Once in the control panel click on Administrative Tools to open it. It will be the first option in the panel.
- Now a list of tools will be displayed in front of you. Search for the tool named as “services” and open it.
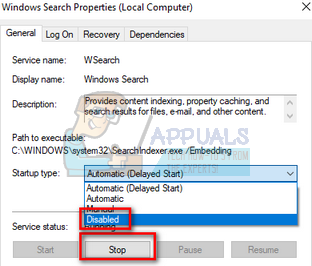
- Now browse through the list of services until you find the one named as “Windows search”. Click to open it.

- Now stop the service by clicking on “Stop” present under the tab of Service status. Now select Startup type as “Disabled”. Click on Apply to save changes and exit.
- It may be necessary to restart your computer for the changes to take place. Check if your file explorer got any faster.
Solution 6: Disabling OneDrive
OneDrive is a file-hosting service run by Microsoft. It allows users to store files/folders and personal data like Windows settings too. Files can be synced automatically on your PC and can be accessed anywhere with an internet connection.
There are also OneDrive clients available in android and iOS platforms for increased ease of access for the users. It comes preinstalled in the new Windows and your account is automatically activated and synced in the computer.
Although OneDrive is an excellent tool if you work with a lot of documents and need the portability to access them anywhere with an internet connection. However, many users reported that OneDrive was causing a delay in their file explorer and disabling it helped the slow speed go away. Like we mentioned before, OneDrive is preinstalled in every latest Windows. It cannot be uninstalled in every device, but we can try disabling it and check if it helps our cause.
- Press Windows + R button to launch the Run application. Type “control panel” and hit Enter.
- Once in the control panel, click on “Uninstall a program” found under the title of Programs and Features.
- Now Windows will list all the installed programs in front of you. Navigate through them until you find OneDrive. Right click it and select Uninstall.

- Once it is uninstalled, restart your computer and check if this fixed the slow file explorer.
If you don’t find OneDrive listed in your programs list, we can try disabling it.
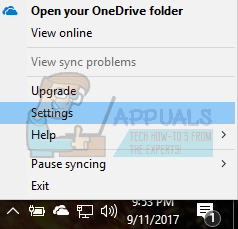
- If your OneDrive is enabled, you will be able to see an OneDrive icon present on your taskbar at the top right side of the screen. Right click it and select Settings.
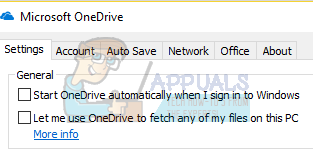
- Navigate to the Settings tab. Uncheck every box present under the subheading of General.
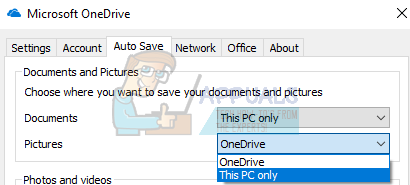
- Now navigate to the Auto Save tab. Here under the subheading of Documents and Pictures, select “This PC only” option against the category of pictures and documents.
- Now navigate to the Account tab and click on Choose folders present at the bottom of the window.

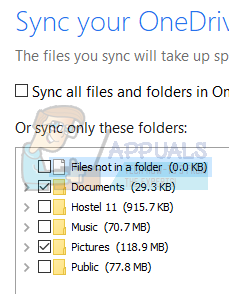
- A new window will pop up containing a list of the folders synced with OneDrive. Now uncheck all the boxes representing folders. Now save changes to the settings and exit.
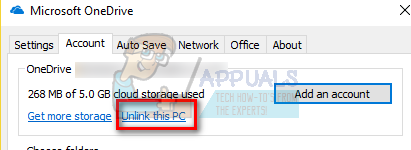
- Now open your OneDrive settings again and navigate to the Account tab present at the top.
- Click on Unlink this PC present under the subheading of OneDrive. Save changes and exit the settings.
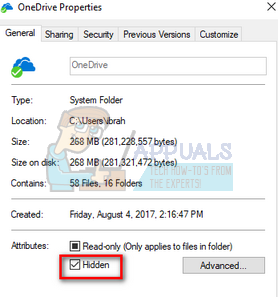
- Now open your file explorer, right click on OneDrive icon present at the left navigation pane and click on Properties.
- On the General tab, check the box of “Hidden” present under the subheading of Attributes. Click Ok to save changes and exit. This will hide OneDrive from your file explorer.
- Now right click on the OneDrive icon present at the bottom right side of the screen and click on Exit. This will exit OneDrive.
Now restart your computer and check if the file explorer got fixed.
Note: If your file explorer doesn’t get fixed even after following all these methods, it’s likely that you either haven’t updated to the latest windows or your windows isn’t installed properly.