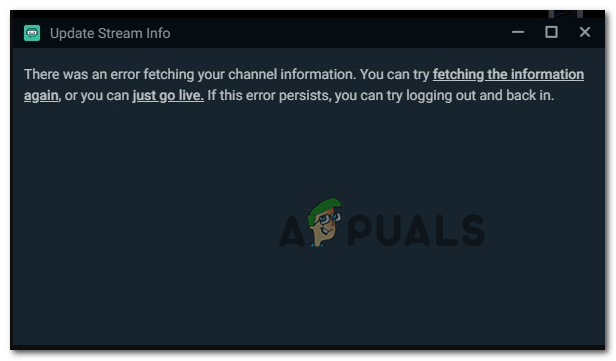
How To Fix ‘Error Fetching Your Channel Information’ in StreamLabs
The error fetching your channel information occurs in Streamlabs OBS for users attempting to stream content on Twitch. This problem is not OS exclusive as it’s reported to occur on Windows 7, Windows 8.1, and Windows 10.
After investigating this particular issue, it turns out that there are multiple scenarios that will cause this behavior with StreamLabs. Here’s a shortlist of potential culprits that might cause this problem:
- Sign in issue – Some users that were also encountering this issue have reported that they’ve managed to fix this issue by accessing their Twitch account from a browser and disallowing the StreamLab OBS connection.
- Corrupted Twitch cookie – Another reason that might cause this error is a corrupted Twitch cookie that ends up interfering with StreamLabs. To resolve the issue in this case you’ll need to clear every Twitch cookie from your default browser.
- Stream language glitch – As it turns out, this problem can also occur due to a well known StreamLab bug having to do with the default language. In this case, you should be able to resolve the problem by changing the Streaming language to something different before changing it back to the correct one.
- Missing Visual C++ Redist 2017 package – One very recent Windows version, you can expect to see this error if your OS installation doesn’t include the Visual C++ Redist 2017 interaction. You can fix this problem by installing it manually via the official channels.
- Leftover obs-plugin files – If you previously installed a StreamLab plugin, leftover files might end up causing streaming issues now that the main plugin is removed. To fix this problem, you’ll need to delete the frontend-tools.dll from the installation folder.
- The stream is not bonded to an IP – Sometimes you’ll see this error due to the fact that the streaming attempt is not using your machine IP. This happens if you leave the default choice instead of picking the correct IP from the Network menu. You can resolve this issue by selecting the correct IP manually.
- Missing .NET Framework 4.72. – While this .NET framework is an integral part of Windows 10, you need to install it manually on Windows 7 and Windows 8.1 in order to facilitate SteamLabs the correct infrastructure to run correctly.
- Missing admin access – If you don’t allow admin access to the StreamLab installer, it might be unable to copy over certain files. To make sure that doesn’t happen, you can reinstall it and force the installer to open with admin access.
Method 1: Signing out & back into StreamLabs
If you haven’t tried this yet, you should start this troubleshooting attempt by signing out of the problematic account in StreamLabs before signing back in.
Several affected users that where also troubleshooting the same error message have reported that the issue was finally resolved after they’ve signed out & then right-back in into the affected Twitch account from the StreamLabs application.
If you’re not sure how to do this, follow the instructions below:
Note: This operation is not done from the StreamLabs application. You need to do it directly from the Twitch account.
- Open your default browser, visit Twitch.tv and sign in with the same account you currently have linked in StreamLabs. On the Twitch.tv site, click on the Log In button (top-right corner of the screen.
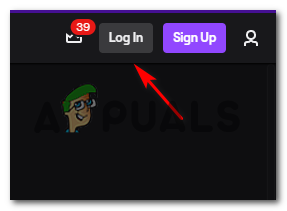
Logging out & in of your Twitch account - Once you are successfully logged in, click on your account icon (top-right section), then click on Settings from the newly appeared context menu.
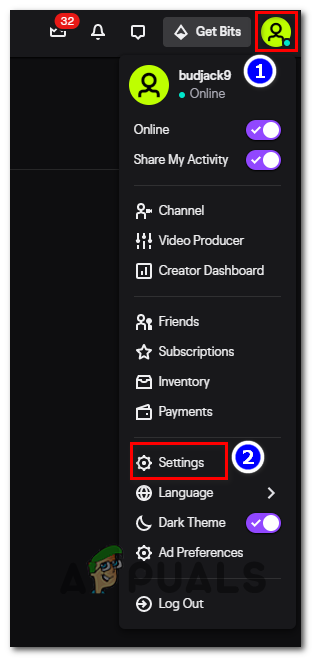
Accessing the Settings menu of Twitch - Once you’re inside the Settings menu, click access the Connections menu, then scroll down to the Other Connections section and click the Disconnect button related to StreamLabs.
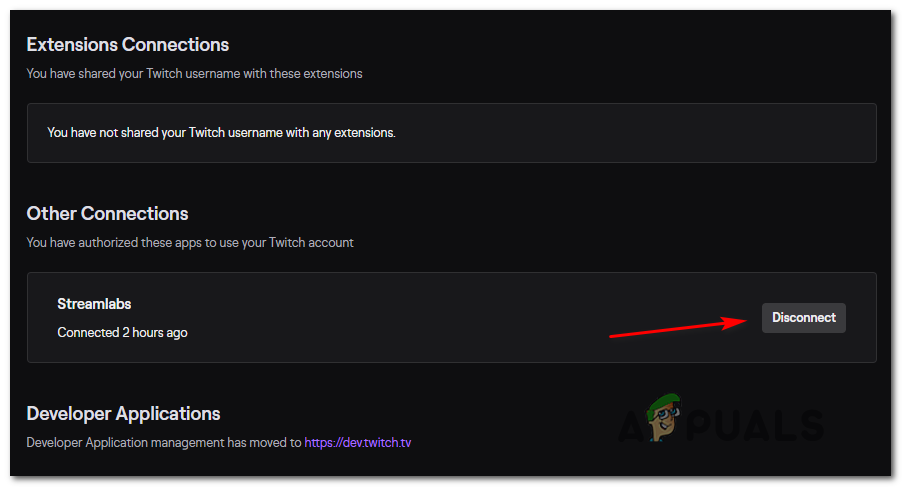
Disconnecting Twitch from SteamLabs - Once the StreamLabs connection is terminated, return to the StreamLabs and connect your Twitch account once again to see if the problem is now resolved.
If you are still seeing the same fetching your channel information error when attempting to go live, move down to the next potential fix below.
Method 2: Clearing every Twitch cookie
According to a lot of affected users, you might expect to see this error code due to a Twitch cookie issue. Even though you are using StreamLabs OBS, the app still relies on your browser for certain interactions, so a corrupted cookie might be responsible for the ‘fetching your channel information’ error.
If this scenario is applicable, you should be able to fix this problem in 2 different ways:
- You can either go specifically after Twitch cookies and delete them solely
- You can clear the entire cookie folder from your browser.
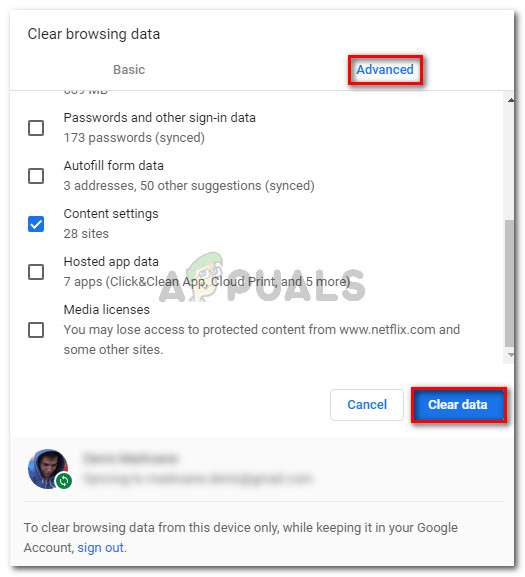
If you want to go for the focused approach, here’s how to clean the specific Twitch cookies from your browser. When you’re inside the cleanup window, use the search function to find and delete every Twitch cookie.
On the other hand, if you want to go for a full cleanup, follow these instructions on cleaning the cache & the cookies from your browser.
In case you already cleared the cookies and you’re still dealing with the same error code, move down to the next potential fix below.
Method 3: Changing the Streaming Language
Although this might seem like a weird fix, some users that were also dealing with the error fetching your channel information have managed to resolve the problem entirely by reselecting a different language, then changing it back again to the previous value.
We haven’t been able to find an official explanation from the developers, but affected users suspect that this behavior resulted from a StreamLabs glitch.
If you want to attempt this potential workaround, follow the instructions below to temporarily change the Streaming language from the StreamLabs application:
- Open the StreamLabs account and login with the Twitch account that you’re encountering issues with.
- Once you have successfully signed in, go ahead and click on Settings (gear icon located in the bottom-left corner of the screen).

Accessing the Settings menu of StreamLabs - From the Settings menu of StreamLabs, select the General tab from the left-hand column, then move over to the right section and use the drop-down menu under Language to change it to something different.
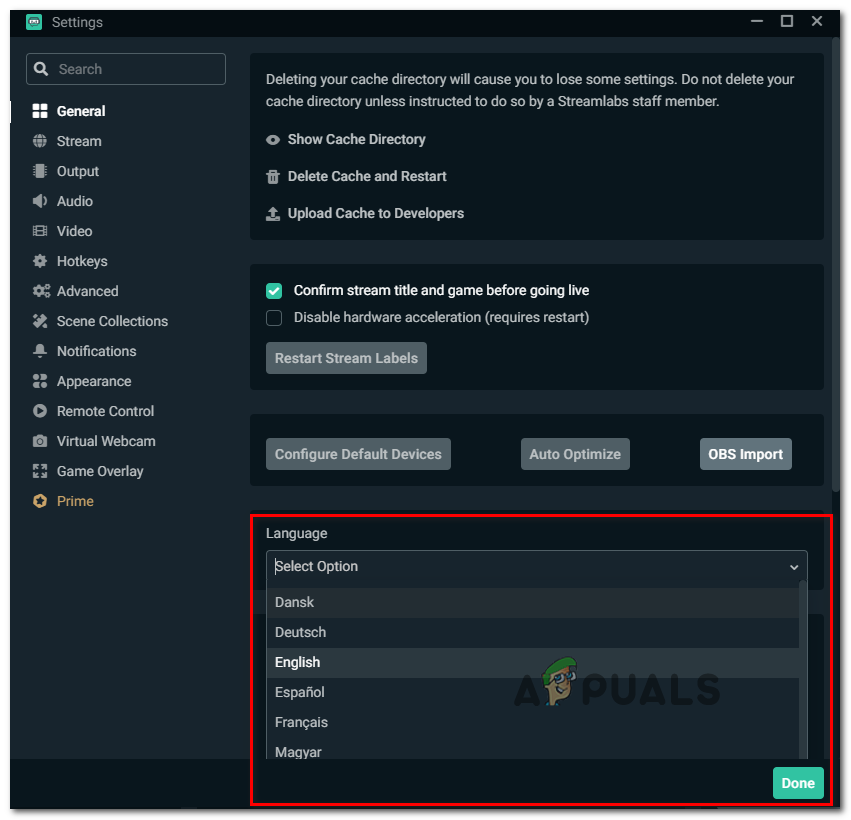
Changing the default language in StreamLabs - Hit Done to save the changes, then close the StreamLabs app before starting it again.
- At the next application startup, open the Settings screen again and change the language back to what it was previously.
- Initiate another streaming attempt and see if you managed to get rid of the fetching your channel information error.
If the problem is still not resolved, move down to the next potential fix below.
Method 4: Installing Visual C++ Redist 2017
According to some affected users, you might also expect to see this error in instances where the computer where the StreamLabs OBS application is installed is missing a critical C++ Redist needed to facilitate gameplay streaming.
Several users that were previously encountering the same problem have confirmed that they managed to fix this problem by downloading and installing a compatible version of the Visual C++ 2017 package.
If you’re unsure on how to do this, follow the instructions below to install the correct version of the Visual C++ Redist 2017 x64 package:
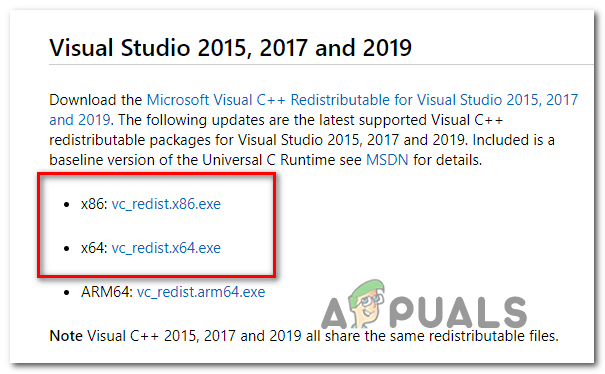
- Open your browser and visit the official MIcrosoft.com download page of the Visual C++ Redist 2017 download pack.
- Once you’re on the correct page, scroll down to the Visual Studio 2015, 2017, and 2019 section and click on vc_redist.x86.exe if your Windows version is on 32-bit or vc_redist.x64.exe if your Windows version is on 64 bit.
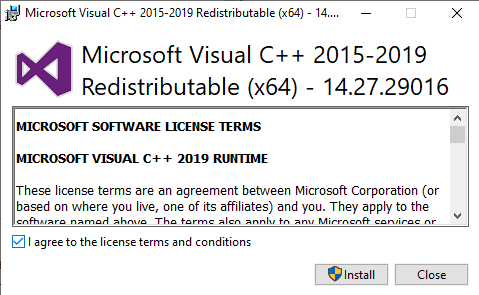
Downloading the correct VC version - Once the download is complete, double-click on the .exe installer, click Install, then follow the on-screen prompts to install the missing Visual C++ Redist package.
installing the missing redist packages - Once the installation is complete, restart your computer if you’re not prompted to do so automatically and see if the error is resolved once the next startup is complete.
In case you still end up with the fetching your channel information error when you try to use StreamLabs to stream on Twitch, move down to the next potential fix below.
Method 5: Deleting the frontend-tools.dll file
As it turns out, this problem can also occur due to some type of corrupted files left behind in the obs-plugins folder of Streamlabs OBS. In most cases, this problem will start occurring after the user attempts to uninstall a plugin for StreamLabs.
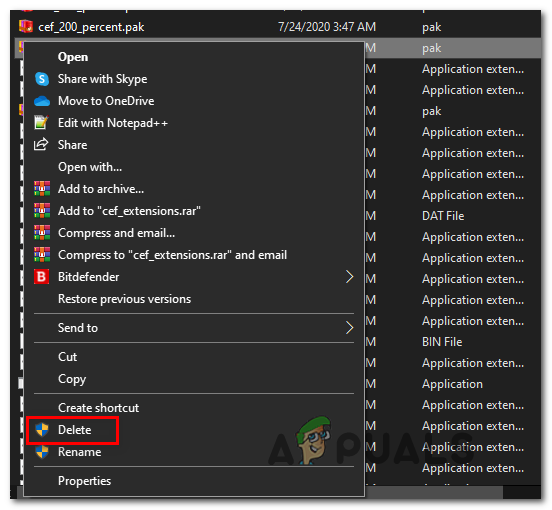
If this scenario is applicable, you should be able to fix the problem by navigating to the location where StreamLabs stores the plugin files and deleting the frontend-tools.dll.
This workaround is confirmed to be effective by several users that managed to resolve the error. Follow the instructions below to clear it:
- Open File Explorer and navigate to the following location:
C:\Program Files\Streamlabs OBS\resources\app\node_modules\obs-studio-node\distribute\obs-plugins\
Note: If you installed StreamLabs in a custom location, navigate there instead.
- Once you arrive at the correct location, right-click on the frontend-tools.ddl and choose Delete from the newly appeared context menu.
Deleting the frontend-tools.dll - After you deleted the correct .ddl, restart your computer then launch StreamLabs once again and see if the problem is now fixed.
Note: You might get a warning about ‘scene corruption’, but don’t worry as it will go away the next time you open the app.
Method 6: Binding StreamLabs to an IP
As it turns out, this problem can originate from a TCP or IP issue. If your streaming attempts are constantly denied by the fetching your channel information error or a different error message (like ‘Invalid Path or Connection URL‘ error), one thing you can try to do is to bind the streaming attempt to your machine IP.
This operation will require that you know your IP so you can bind it in the StreamLab application.
If you want to enforce this potential fix, start following the instructions below:
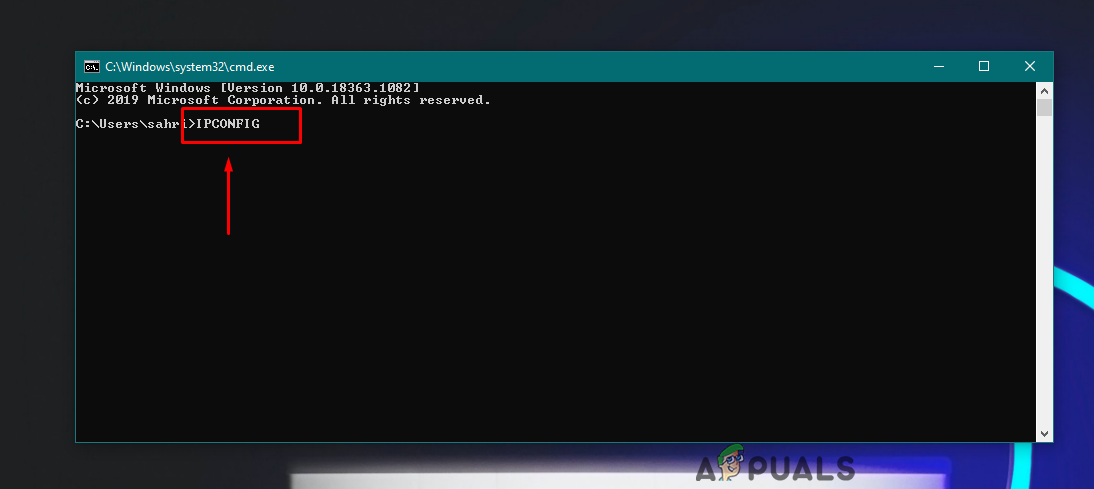
- Press Windows key + R to open up a Run dialog box. Next, type ‘cmd’ inside the text box and press Ctrl + Shift + Enter to open up an elevated Command Prompt.

Running the Command Prompt Note: When you see the UAC (User Account Prompt), click Yes to grant admin access.
- Once you’re inside the elevated CMD prompt, type ‘ipconfig’ and hit Enter to get an overview of your network.
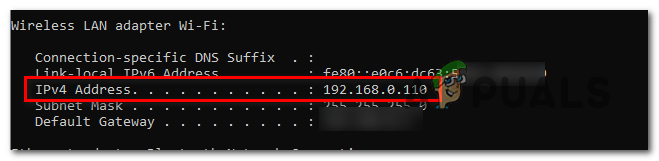
Running the ‘ipconfig’ command - From the returned list, scroll down to the network that you’re currently using and take and copy the IPV4 Address (we’ll need it a little later)
Fetching the IPV4 address - Now that you have successfully found out your IP address, open the StreamLabs application, and click on the Settings icon (bottom-left section of the screen).
Accessing the Settings menu of StreamLabs - Once you’re inside the Settings menu, click on Advanced from the vertical menu on the left, they move over to the right section and scroll all the way down to the Network section.
- Next, expand on the drop-down menu and choose the IP that you previously discovered at step 3 before saving the changes.
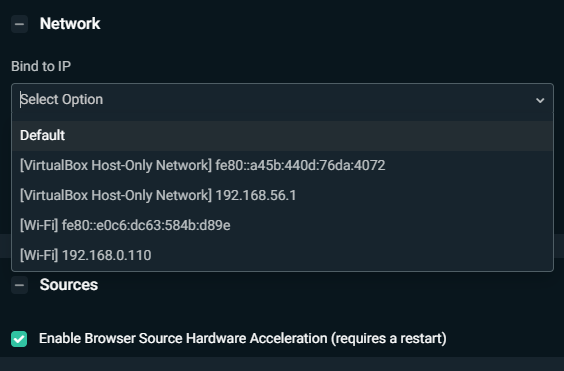
Selecting the correct IP address - Attempt to stream once again from StreamLabs and see if the operation is successful this time.
If the same problem is still occurring, move down to the next method below.
Method 7: Download .NET Framework 4.7.2 (Windows 7/8 ONLY)
If you’re encountering this problem on Windows 7 or on Windows 8.1, keep in mind that there’s an additional requirement that you need to fulfill before you’ll be able to stream content from the StreamLabs application.
Since the installation of .NET Framework 4.7.2 is not handled by the WU component (like on Windows 10), you will need to install it manually using the official channels.
Some users that where also encountering this error message in StreamLabs on Windows 7 and Windows 8 have confirmed that the problem was fixed once the missing .NET framework was installed.
Here’s a quick step-by-step guide on how to install the missing .NET framework on your computer:
- Open your default browser and navigate to the official download page of the .NET Framework 4.7.2.
- Once you arrive to the correct location, scroll down to the Runtime section and click on Download .NET Framework 4.7.2 Runtime.

Downloading the Runtime version of the .NET framework - Once the download is complete, open the installer and follow the on-screen prompts to complete the installation of the missing .NET Framework, then restart your computer.
- After your computer boots back up, open StreamLabs and see if the problem is resolved by attempting to go live once again.
If the same problem is still occurring, move down to the next potential fix below.
Method 8: Reinstalling StreamLabs with admin access
If none of the fixes above have worked for you, one last thing you can try is to reinstall the StreamLab application and ensure that you allow the installed admin rights. This might be effective since the installer might have trouble copying over some files in case it has no admin rights.
If you think this scenario might applicable, follow the instructions below to reinstall the StreamLabs apps with admin rights:
- Press Windows key + R to open up a Run dialog box. Next, type ‘appwiz.cpl’ inside the text box and press Enter to open up the Programs and Features menu.

Type appwiz.cpl and Press Enter to Open Installed Programs List - Once you’re inside the Programs and Features menu, scroll down through the list of installed applications and locate StreamLabs OBS. When you see it, right-click on it and choose Uninstall from the context menu.
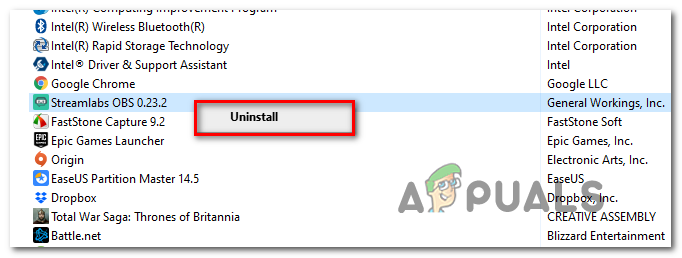
Uninstalling the StreamLabs OBS application - Follow the uninstallation instructions to get rid of the app, then restart your computer.
- Once the next startup is complete, visit the official download page of StreamLabs and initiate the installation.
- After the download is complete, don’t open it conventionally. Instead, navigate to the location where it was downloaded, right-click on it and choose Run as Administrator.
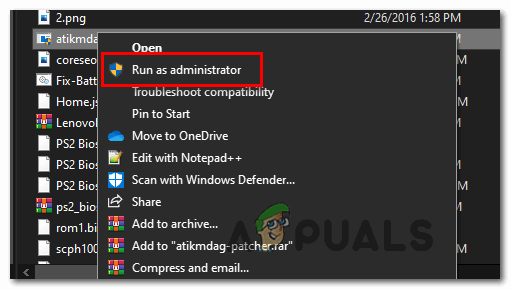
Running installer as administrator - After the installation is complete, open StreamLabs, sign in with your Twitch account once again and see if the error is now resolved.


