How to Fix “Connecting to CSGO Network” Error on CS:GO?
The Connecting to CSGO Network is a connection error that occurs when there is a problem with the internet and the servers. When it comes to the internet problem, it can be from the Internet Service Provider or the computer settings that may be set incorrectly by the users.

There are multiple causes of Connecting to the CSGO Network error, we have listed most of them below:-
- Poor Network Connection- Generally, an unstable connection triggers this issue. The error often occurs when the internet is unresponsive or inconsistent.
- Data Execution Prevention is Turned Off- Data Execution Prevention is a security feature. If the feature is disabled, then you may encounter a connection error. The affected users enabled Data Execution Prevention, and it fixed their errors.
- Corrupted Game Files- Another culprit of this issue is having corrupted files caused by any third-party software or antivirus that prevents you from playing CSGO.
- Incorrect Network Settings or DNS Server- Incorrect Settings or wrong DNS servers are also culprits for this issue because they can slow down the network speed or even stop the internet from working.
- Turned On VPN- If you don’t know, steam does not support any kind of VPN. The primary reason behind this is that VPN slows down the network connection, increasing the lag in games and providing a bad gaming experience that can affect the users. So make sure you are not using aby VPN.
1. Enable Data Execution Prevention
Data Execution Prevention is a Microsoft utility that helps prevent malicious data from Windows. If the feature is enabled, all data will automatically execute by default. According to the affected users, the error can be fixed by enabling Data Execution Prevention.
- To enable Data Execution Prevention, press the Windows + I keys to open the Settings
- Once the settings load up, navigate to System
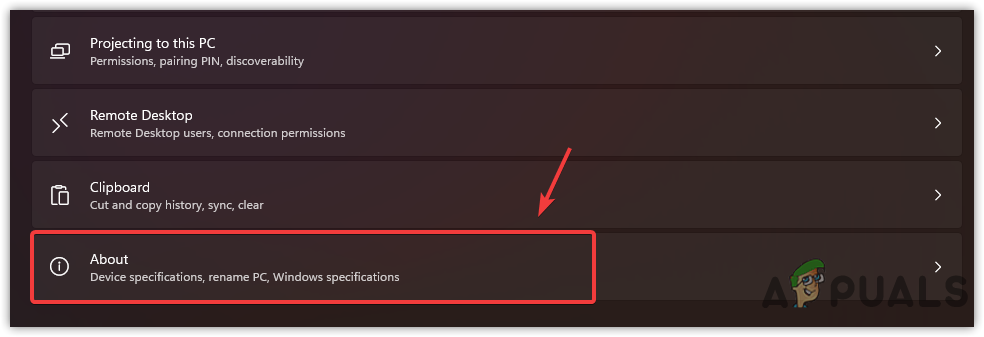
- Scroll down to the bottom and navigate to About
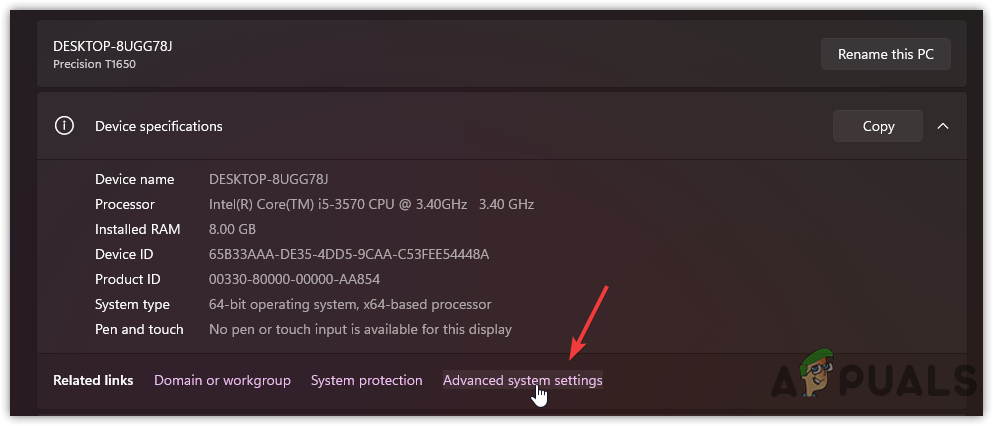
Navigating to About - Click Advanced Settings and a short Window will come up
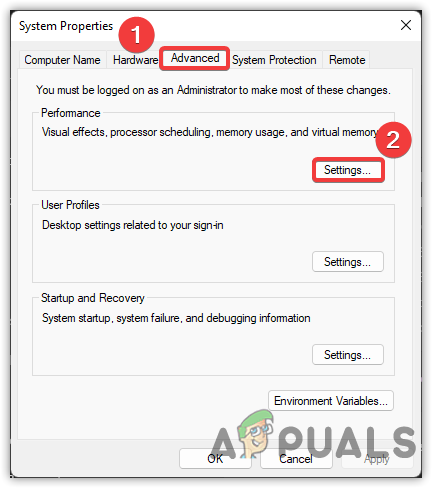
Click Advanced Settings - Go to Advanced and click Settings under Performace
Adjusting Performance - Select Data Execution Prevention from the top bar
- Select Turn on DEP for All Programs and Services Except those I select
- Click Apply and Press OK
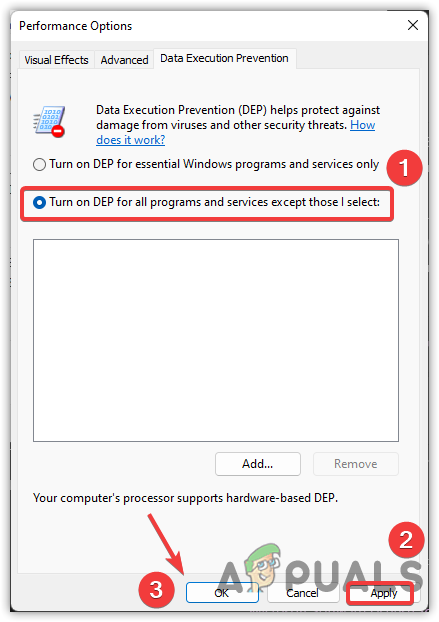
Enable Data Execution Prevention
2. Check the CSGO Server Status
In most cases, the error appears when there is a problem from the server side. You may not be alone in confronting this issue, as CSGO has achieved a significant new audience since the last update was released, and due to this, the servers may not be stable as the massive amount of players is connecting at the same time. Therefore, you need to check the server status. If the servers are not down, then proceed to the next solution.
3. Check Network or Restart Modem/Router
If the servers are stable, the issue can occur due to a bad network connection or incorrect network settings. It is recommended to check your network connection through a browser. If the network speed is more than 2 to 5 Mbps, then restart your Modem/Router. That should fix this issue.
4. Disable 3rd Party Antivirus or Windows Defender
If the issue is still there, then the other thing you can do is disable the Antivirus temporarily. Although we don’t recommend disabling Antivirus, it can fix the connectivity issue if the antivirus or even Windows defender is interfering and blocking some ports that need to be contacted with the server through your network. Below are the steps to disable Windows Defender:-
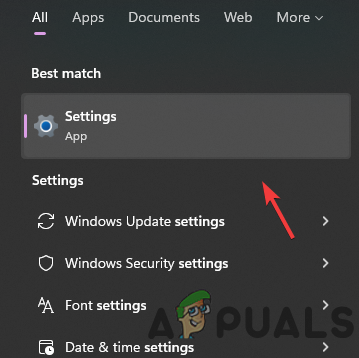
- Click Start Menu and type Settings
- Open Settings and navigate to Privacy & Security. For Windows 10 navigate to Update & Security
Open Settings - Click Windows Security to view more options
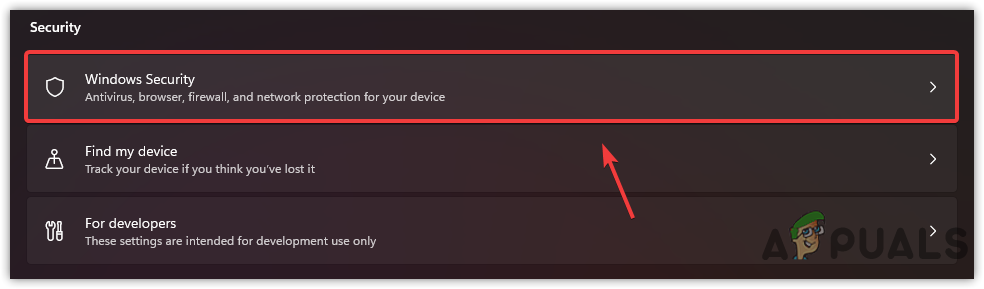
Navigating to Windows Security - Click Open Windows Security
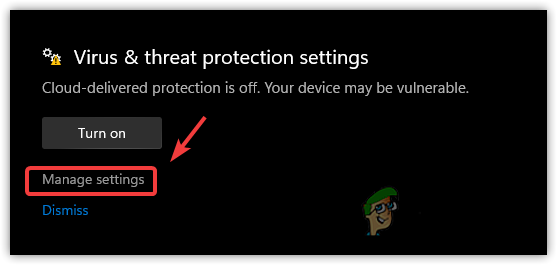
- Click on Virus & Threat Protection
- Scroll down to Virus & Threat Protection Settings and click Manage Settings
Click Manage Settings - Turn Off the Real-Time Protection and launch CS: GO to check if the error is resolved.
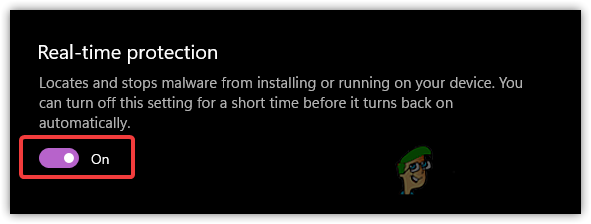
Turn Off Real-Time Protection
5. Do Port Forwarding
Port Forwarding is a process of saying to the router that I need this port to unblock or open on this machine. Typically when it comes to gaming, some ports are not opened for the users because some ports exist behind the firewall or NAT Router. In simple words, it is a way to redirect the communication request from one address to another.
Follow the steps to do port forwarding:-
- First, you need to know the default gateway address and IP address before proceeding
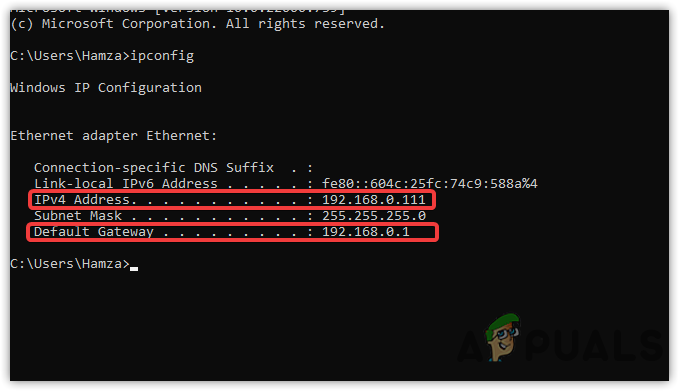
- Open the terminal by typing CMD in the search bar
- Once the terminal is opened, type ipconfig and press enter
- Note down the Default Gateway and IPv4 Address
Finding IP Address - Open the reliable Browser and put the default gateway address that you copied and hit Enter
- Now login to your router by typing the credentials
Note: If you don’t know the username or password, try to admin in the username and admin in the password. If that does not work, ask from Internet Service Provider. - Once you entered, find the option Port Forwarding or similar to it
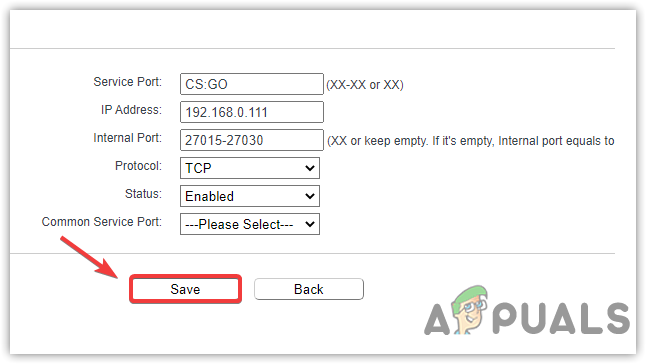
- Click Add New and type the name of your port in the Service Port box

Adding Port Forwarding - Enter the IP address that you copied earlier from the Command Prompt
- Insert the one Port Number from the below and enter it in the Internal Port box
TCP: 27015-27030, 27036-27037
UDP: 4380, 27000-27031, 27036
- Make sure to select the Protocol mentioned above before the port number
- Choose Enabled from the Status Menu
- Click Save to enable the port
Set Port Forwarding - Once done, launch the CSGO and check if the issue persists. If it is then repeat the same process with the other port number.
6. Try Using Google DNS
Google DNS is recommended if you are a gamer as it provides better security and reliable services, which helps to prevent malware attacks and either improves the gaming performance. Additionally, it can decrease the loading time while browsing the internet.
- To use a google DNS, open Settings and navigate to Network & Internet
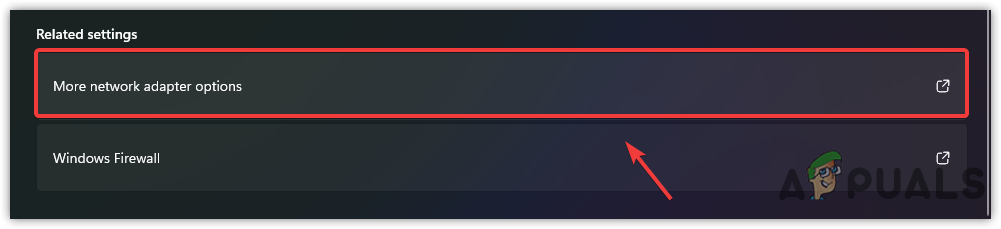
- Go to Advanced Network Settings
- Click More Network Adapter Options
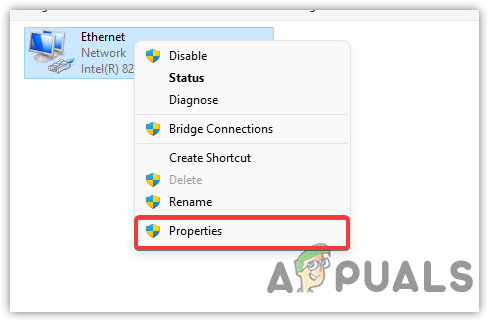
Click More Network Adapter Options - Right-click on your connections and select Properties
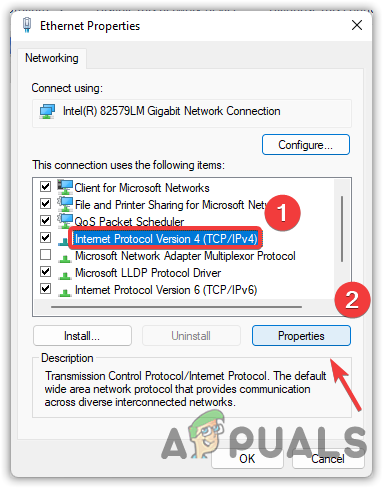
Click Properties - Select Internet Protocol Version 4 (TCP/IPv4) and click Properties
Internet Protocol Version 4 (TCP IPv4) - On the bottom, click the radio button named Use the Following DNS Addresses
- Now insert the following address as mentioned below
8.8.8.8
8.8.4.4
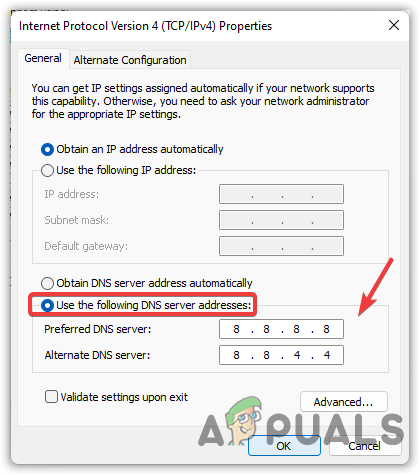
Applying Google DNS - Once done, press OK for the changes to take effect.
7. Reset Network Settings
Corrupted network adapters can be the sole reason for Connecting to CSGO Network. Try resetting the Network settings, which will reinstall the network adapters and reset the network settings you applied.
- To reset network settings, go to settings by pressing Windows + I keys simultaneously
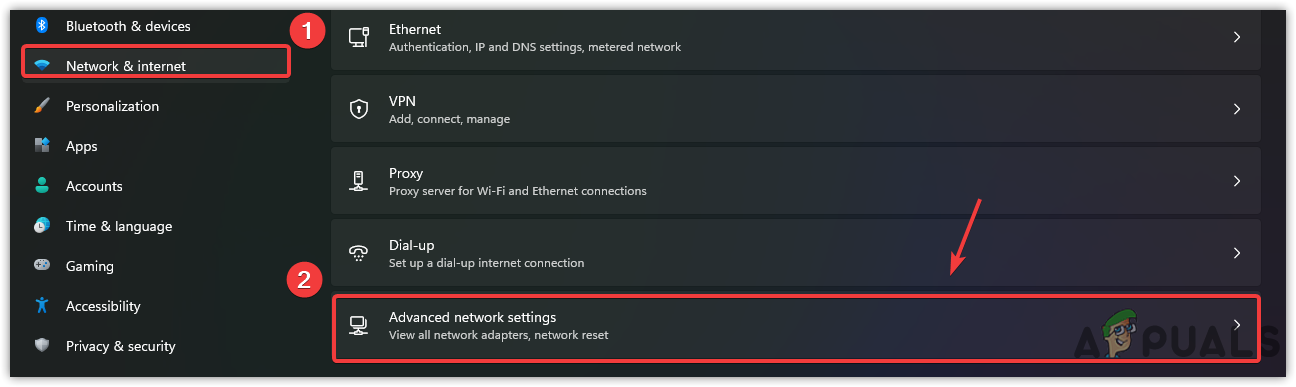
- Navigate to Network & Internet
- Click Advanced Network Settings and then click Network Reset
Navigating To Advanced Network Settings - Click on Reset Now
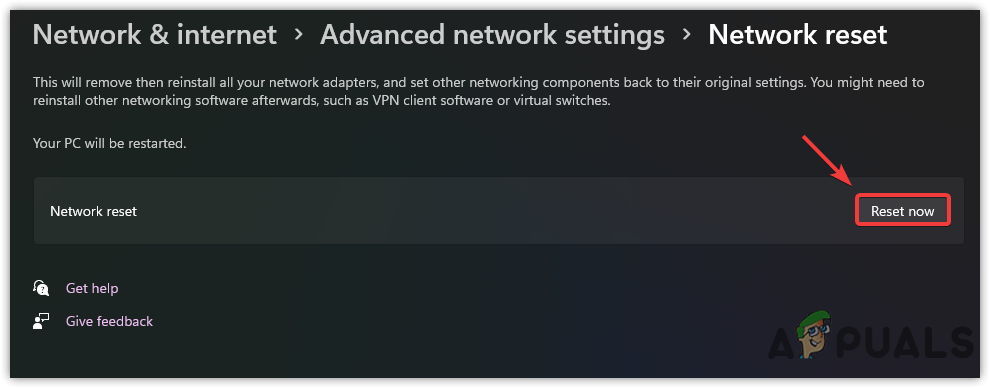
Resetting Network Settings - This will restart your computer and reinstall all the network adapters
- Once done, open CS: GO and check if the error persists.
8. Disable Proxy Server
If you are using any proxy server to increase the network performance or for other reasons, then disable it temporarily as it can be a problem.
- To disable the proxy server, go to Settings by pressing the Windows + I keys at the same time
- Go to Network & Internet and click on Proxy

Navigating Proxy Settings - Click Set up under Manual Proxy Setup
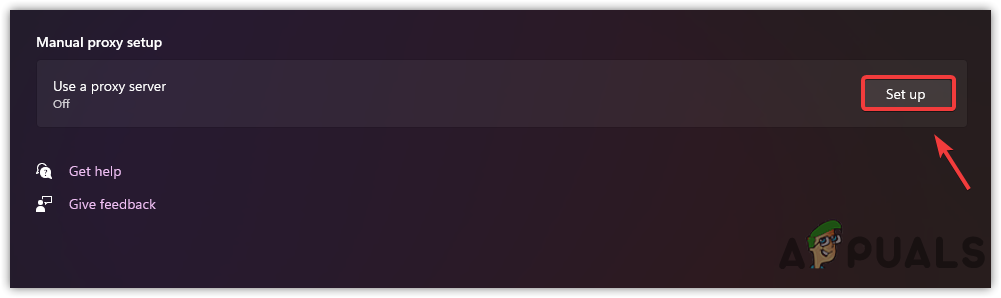
Click Set Up - Now turn off the proxy by toggling off the button named Use a Proxy Server
- Click Save to apply the changes
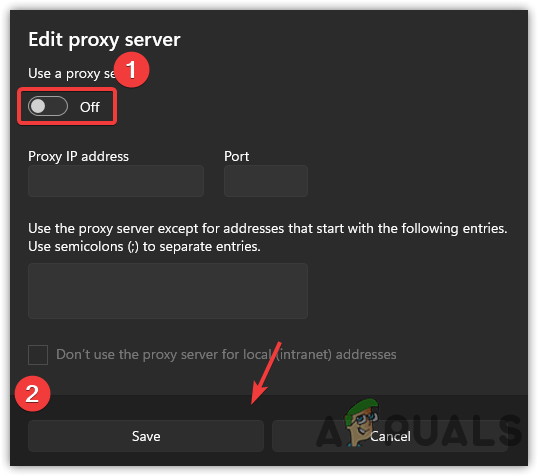
Disable Proxy Server - Once done, open CS: GO and check if the error is fixed.
9. Make Sure the Steam is Active in the background
Another possible reason that can bring this issue is steam not working and crashing in the background. Sometimes when we play steam games, you may see steam crashes, which can cause Connecting to CSGO Network error. So make sure the steam is running in the background while playing CSGO.
10. Verify Your Game Files
If all else fails, you may need to verify the game files, which will replace the corrupted files with the actual ones. This method may take up to 10 minutes to complete the verification of the files.
- To verify the game files, open steam and go to the Library
- Right-click on the CS: GO and select Properties from the listed options
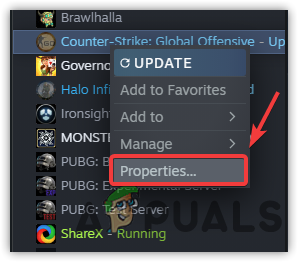
Open Game Properties - Click Local Files from the left pane
- Click Verify Integrity Of Game Files to start the verification process
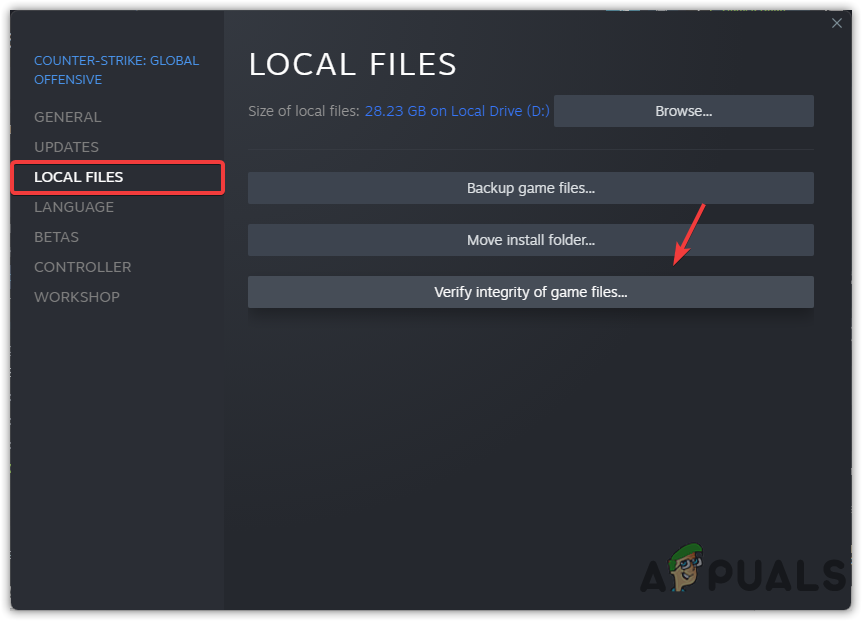
Verifying CSGO Game Files - Once done, check if the error persists.
Above, we have compiled all the possible scenarios that can fix Connecting to CSGO Network. If the error is not resolved after applying all the methods, you may need to contact ISP (Internet Service Provider).


