How to Fix Error Code ‘DISM Error 1910’
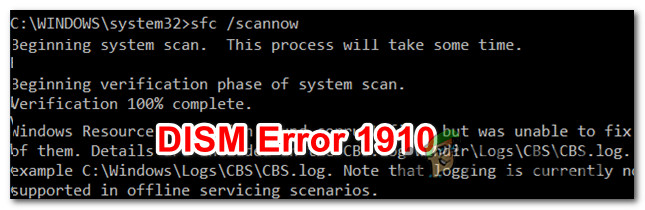
Some Windows users are encountering the 1910 error code when running a DISM (Deployment Image Servicing and Management) scan. This issue doesn’t appear at the end of this operation, but it’s rather found in the logs file left behind by the scan. This problem is confirmed to occur on Windows 7, Windows 8.1, and Windows 10.
After investigating this particular thoroughly, it turns out that there are several different scenarios that might end up producing this error code. Here’s a shortlist of potential culprits:
- DISM Inconsistency – According to some affected users, this issue might occur if there’s a problem with your DISM utility or DISM Host Process using High CPU. In case some type of system file corruption is affecting the DISM utility, running an SFC scan might allow you to repair it.
- Software conflict – If the problem occurs after the installation of a new Windows update, after you updated a driver or after you installed a 3rd party program, using System Restore might allow you to return your system to a previous point in time where this problem was not occurring.
- System file corruption – Under certain circumstances, you might notice this issue is caused by some type of corruption that’s affecting some of your OS files. In this case, resetting every Windows component with a procedure like a repair install and clean install might allow you to fix the problem.
Now that you know every potential culprit, here’s a list of methods that other affected users have successfully used to fix the error 1910 with DISM:
Method 1: Running an SFC Scan
If you end up seeing this error while performing a DISM scan, you might be able to fix the corrupted dependency by scanning your system files using System File Checker (SFC). Some affected users have confirmed that running this type of scan allowed them to fix every instance of a corrupted system file – After doing this, the DISM scan didn’t return the same 1910 error.
In case you haven’t tried this yet, follow the instructions below to run an SFC scan and resolve the 1910 DISM error:
- Press Windows key + R to open up a Run dialog box. Next, type ‘cmd’ inside the text box, then press Ctrl + Shift + Enter to open up an elevated Command Prompt. When you see the UAC (User Account Control) prompt, click Yes to grant admin access.
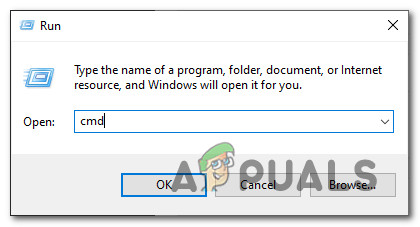
Opening an elevated CMD prompt - Once you’re inside the elevated command prompt, type the following command to initiate an SFC scan:
sfc /scannow
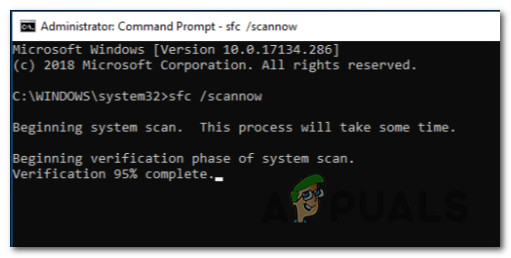
Running a System File Checker Scan - Once you have initiated this operation, wait patiently until the SFC scan is complete. Closing off this window or interrupting the process before it’s complete might cause logical inconsistencies that should create additional errors with your system.
- After the operation is complete, you can safely close the elevated command prompt and restart your computer.
- Initiate another DISM scan and are if the end result is the same DISM 1910 error.
In case the same problem is still occurring, move down to the next potential fix below.
Method 2: Using System Restore
If this problem only started occurring after your system has undergone a change (a new app installation, a new Windows Update, a new driver installation, etc.), you should be able to fix the problem using the System Restore utility to return your computer back to a state in which this type of problem was not occurring.
In most cases, this issue is actually caused by some type of inconsistency brought about by a new Windows Update.
However, keep in mind that using a System Restore snapshot will essentially return your computer to a previous state in time. This means that every installed application, driver, and Windows update will be reverted.
If you understand how the System Restore utility works and you want to move forward with this procedure, follow the instructions below to initiate a System Restore procedure.
In case you find a viable system restore the snapshot and you use it successfully, restart your computer and see if the DISM issue is fixed.
In case you aren’t able to find a viable system restore point, move down to the next method below.
Method 3: Performing a Repair Install / Clean Install
If none of the potential fixes above have worked for you, one last thing you can do is to go ahead and refresh every OS component in order to ensure that there are not corrupted system files that might produce this error with DISM.
When it comes to doing this, the most elegant solution is to go for a repair install. However, keep in mind that in order to go for a repair install (in-place repair), you’ll need to insert a compatible installation media.
This process is a little tedious but will allow you to complete the operation without losing data present on the OS drive. This means that you’ll be able to keep your personal data, games, applications, and even some user preferences.
Note: If you don’t have a compatible installation media, you can create one from scratch. Here’s how to do this on Windows 7 and Windows 10.
Additionally, you can also consider going for a clean install – This is an easier procedure that can be initiated directly from the GUI menu of Windows 10 without the need to insert a compatible installation media. However, the main disadvantage is that unless you back up your data in advance, you’ll lose every bit of personal data that’s currently being stored on the Windows partition.


