How to Fix ‘Error Code 83’ in Steam
Some Windows users are encountering the error code 83 when they try to launch a game via Steam. While some are seeing this error only with certain games, others are unable to launch any game via Steam. This problem is confirmed to occur on Windows 7, Windows 8.1, and Windows 10.
After investigating this particular issue, it turns out that there are several different causes that might cause this particular error code. Here’s a shortlist of culprits that might be responsible:
- Outdated Windows Build – If you’re encountering this problem on Windows 10, chances are your Windows installation is missing a key infrastructure update that’s required by Steam for security reasons. In this case, you’ll be able to fix the problem by using Windows Update to install every pending update until you bring your build-up to date.
- Corrupted / Missing game files – As it turns out, this problem can also occur due to an integrity inconsistency affecting the game that you’re launching through Steam. In this case, you should be able to fix the problem by forcing an integrity check on the game via Steam’s menu.
- Executable or port is blocked by firewall / AV – As a lot of affected users have reported, this problem can very well appear due to interference caused by an overprotective firewall or AV that’s blocking the connection due to a false positive. In this case, you can fix the problem by establishing an exception rule or by uninstalling the overprotective client.
Method 1: Installing every Pending Windows Update
Although this is an unlikely culprit, there are a lot of users that have managed to fix this issue by installing every pending Windows Update. This is typically reported to be effective in instances where the PC is missing a key infrastructure update that Steam needs in order to run in a stable manner.
If you encounter the 83 error code with every game that you attempt to launch, you should be able to fix the problem by installing every pending WIndows update following the official channels.
In case you think this scenario might be applicable, follow the instructions below to open the Windows Update component and use it to install every pending update until you bring your Windows build up to date:
- Open up a Run dialog box by pressing Windows key + R. Next, type “ms-settings:windowsupdate” inside the text box and press Enter to open up the Windows Update tab of the Settings app.

Opening the Windows Update screen Note: If you’re using Windows 7 or Windows 8.1, use the ‘wuapp’ command instead.
- Once you’re inside the Windows Update screen, move over to the right-hand pane and click on Check for Updates. Next, follow the on-screen instructions to install every pending update.
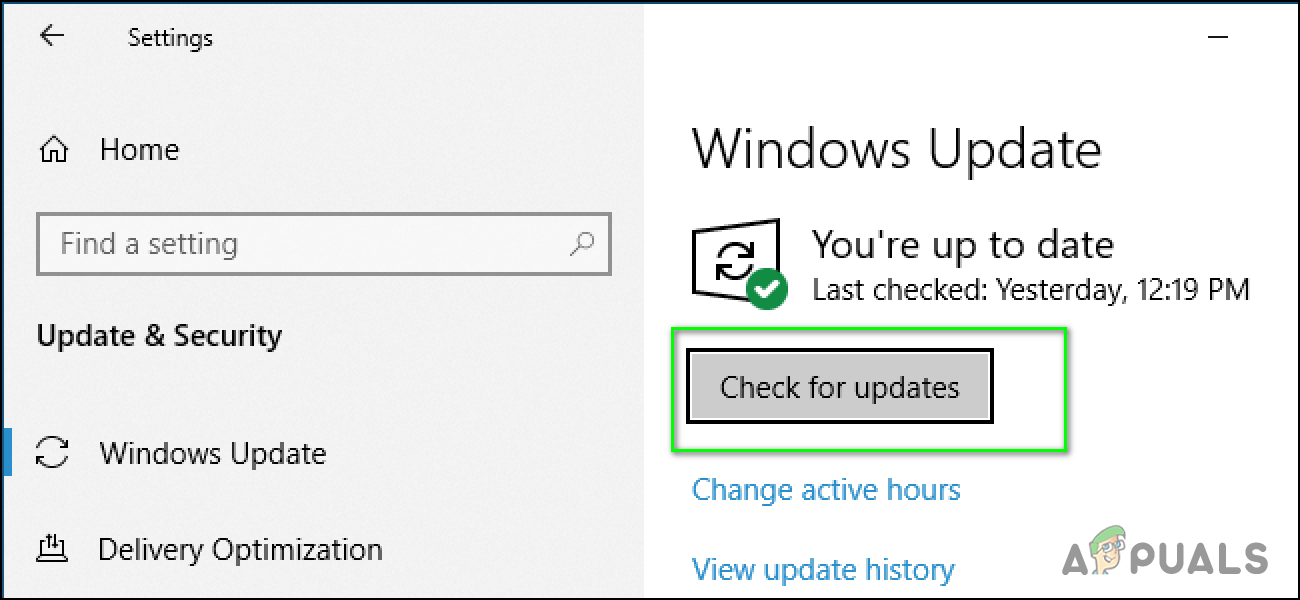
Check for Windows Updates Note: If there are a lot of pending updates to handle, the WU component will prompt you to restart before you get the chance to install every pending update. If this happens, restart when instructed, but make sure to return to the same Windows Update screen at the next startup and complete the download & installation of the remaining updates.
- Once you manage to installed very pending WIndows update, do one final restart and see if the problem is fixed once the next startup is complete.
In case you still end up encountering the same 83 error code when trying to launch games via Steam, move down to the next potential fix below.
Method 2: Checking the game’s Integrity on Steam
If installing every pending update didn’t work or you already had the latest Windows build, you should start considering the fact that this problem is actually caused by a game inconsistency (this is even more likely if you’re only encountering the 83 error code with one game).
Several affected users that we’re encountering the same error code have reported that the problem was finally fixed after they performed an integrity check from the built-in Steam menu. If you haven’t tried this yet, follow the instructions below:
- Open your Steam menu and select the Library tab from the menu on the left-hand side.
- With the Library tab selected, go ahead and scroll down through the library items and right-click on the entry associated with the game that’s causing the 83 error.
- Next, from the newly appeared context menu, choose Properties.
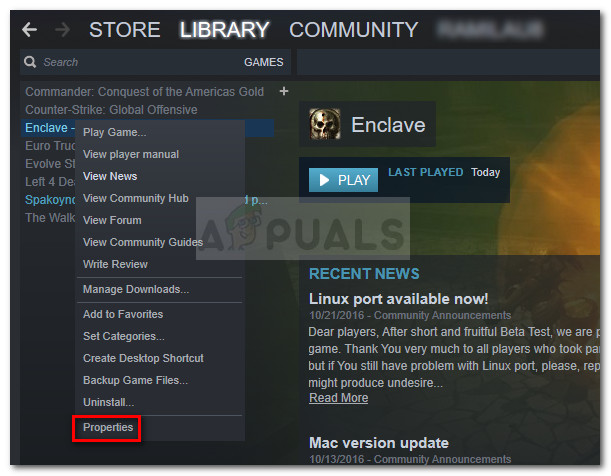
Inside the Library: Right-click on the game and choose Properties - From the Properties menu, select the Local Files tab, then click on Verify Integrity of the Game Files.
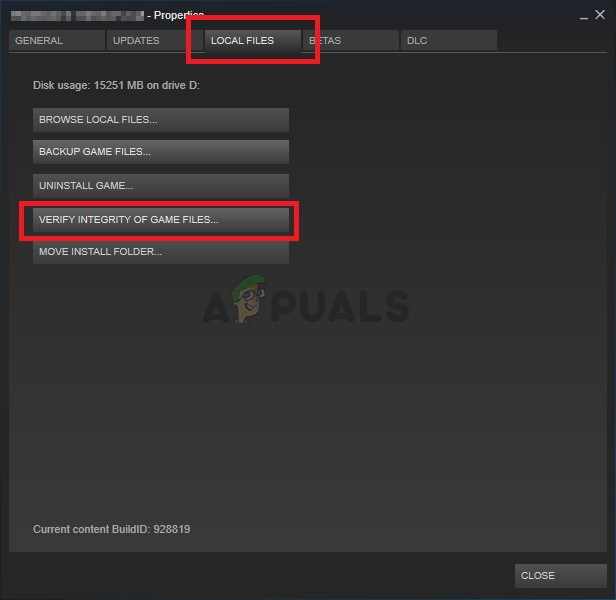
Verifying the integrity of game files - At the confirmation prompt, confirm the operation and wait for it to complete. Once the integrity check procedure is successfully performed, launch the game once again and see if the 83 error code has been successfully resolved.
If the same problem is still occurring, move down to the next potential fix below.
Method 3: Whitelisting game’s Executable from your AV
If you previously established that the problem is not being caused by a missing Windows Update and you’ve ensured that the game integrity is intact, you should start looking for a culprit that might be interfering with the start of the game.
According to several users, this problem is can be caused by a security app (Firewall or Antivirus) that might be stopping the game from launching due to a false positive.
This problem is reported to occur with both 3rd party AV and Firewalls but there are also some reports of this issue occurring with the default security suite (Windows Firewall and Windows Defender).
Fortunately, you can fix this problem easily by establishing a whitelisting rule in your AV / Firewall excepting both the main game executable and the Steam launcher from being blocked. This method has been confirmed to be effective by a lot of affected users.
Note: Keep in mind that if you’re using a 3rd party firewall or Antivirus, the instructions for whitelisting the executables will be different depending on the suite you’re using. In this case, search for specific instructions on doing so online.
But if you’re using the native antivirus protection suite (Windows Defender and Windows Firewall), you can follow the instructions below to fix the 83 error code by establishing an exception rule in Windows Defender and Firewall by whitelisting both the game launcher (Steam) and the game’s executable.
Here is a step by step guide on how to do this:
- Press Windows key + R to open up a Run dialog box. Next, type ‘control firewall.cpl‘ and press Enter to open up the Windows Firewall window.
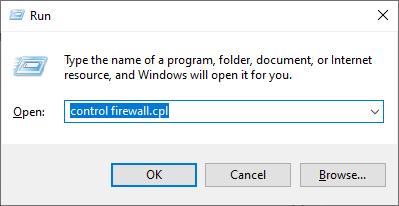
Accessing the Windows Defender Firewall - Once you’re inside the main menu of Windows Defender Firewall, access the menu on the left to click on Allow an app or feature through Windows Defender firewall.
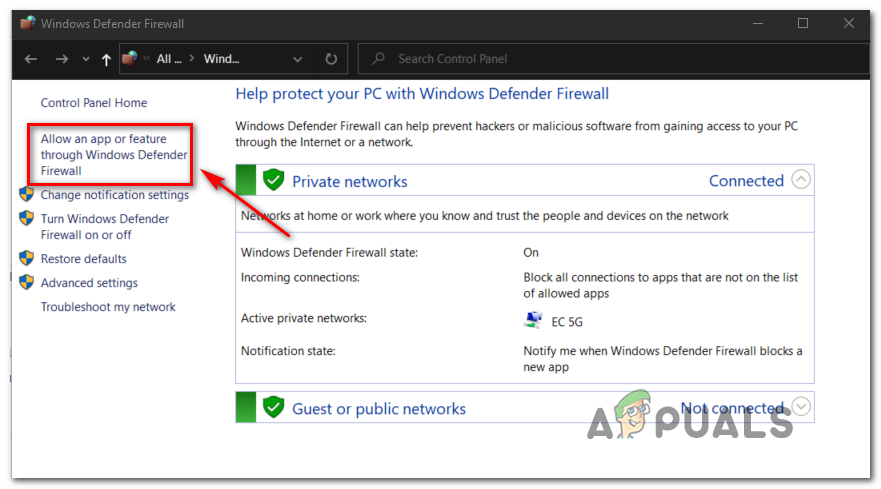
Allowing an app or feature through Windows Defender - Once you’re inside the Allowed Apps menu, go ahead and click on Change settings button, then click on Yes at the User Account Control prompt.
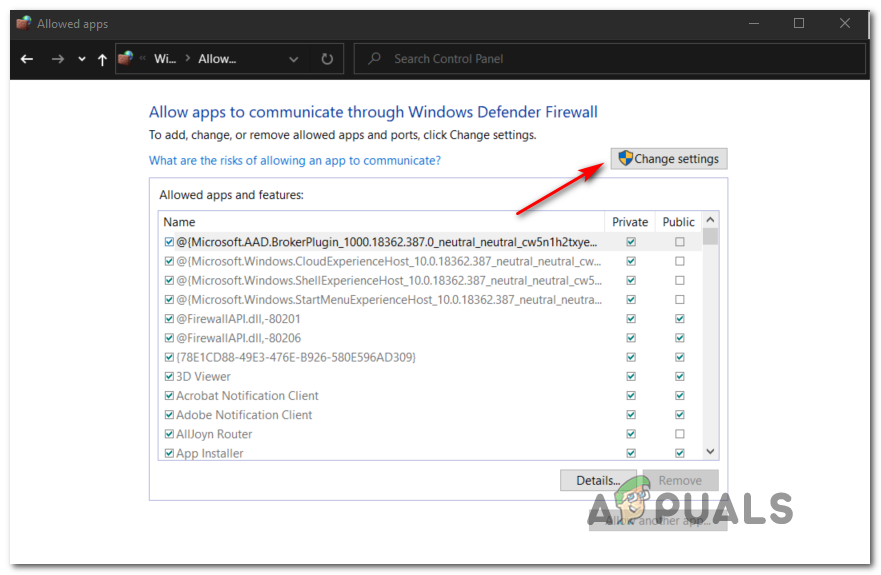
Changing the Settings of the Allowed Items in Windows Firewall - Once the list finally becomes editable, go under it and click on Allow another app, then click on Browser and navigate to the location where the game is installed.
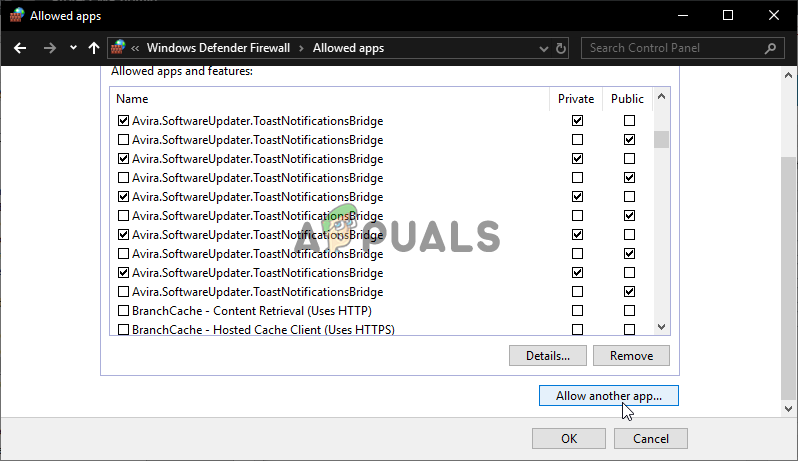
Allow another app Note: By default, every Steam game is installed on C:\Program Files\Steam\steamapps\.
- Once you manage to find the correct executable, go ahead and add it to the list of Allowed Apps, then ensure that the checkbox associated with Private and Public are both checked before clicking Ok to save the changes.
- Add both the main game executable and the main Steam executable to this list and enable the Private and Public checkboxes before saving the changes.
- Next, close the Allowed apps window and follow step 1 again to return to the initial firewall menu. But this time, click on Advanced settings instead (from the menu on the left). At the UAC (User Account Control) prompt, click Yes to grant admin access.
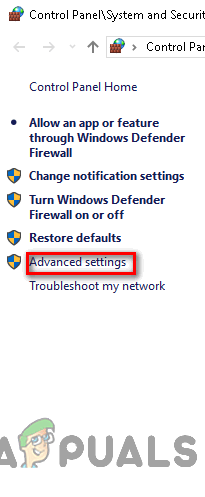
Click on the advance settings option to open firewall rules - Once you’re finally inside the advanced settings of your firewall, click on Inbound Rules from the menu on the left, then click on New Rule.
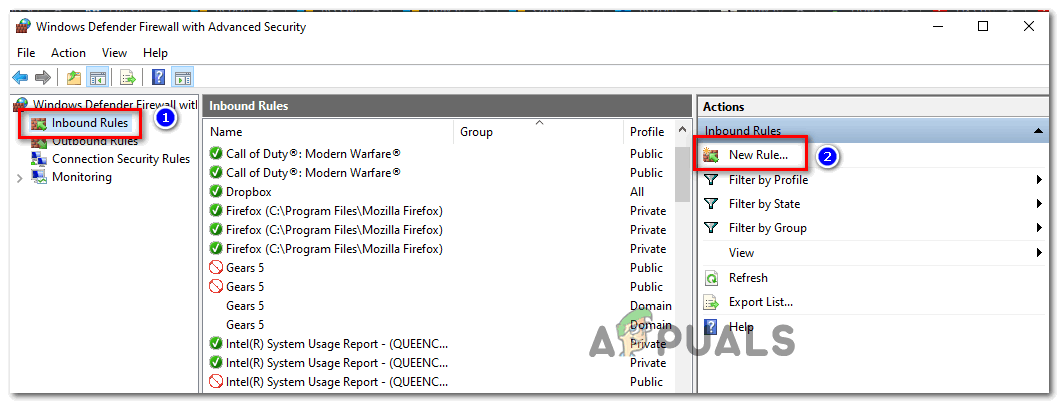
Creating New Rules in Windows Firewall - Once you’re inside the New Inbound Rule Wizard, choose Port when asked for the Rule Type, then click on Next once again.
- At the next screen, choose TCP and select the Specific Local ports toggle, then paste the following ports to prevent them from being blocked:
27015--27030
27036
27015
- Next, add another rule but this time chooses UDP, then select Specific Local ports and paste the following ports:
27015--27030
27000--27100
27031-27036
4380
27015
3478
4379
4380
- Once every required port has been successfully added, hit Next and you should land directly into the Action Prompt window. When this happens, click on Allow the connection and click Next once again.
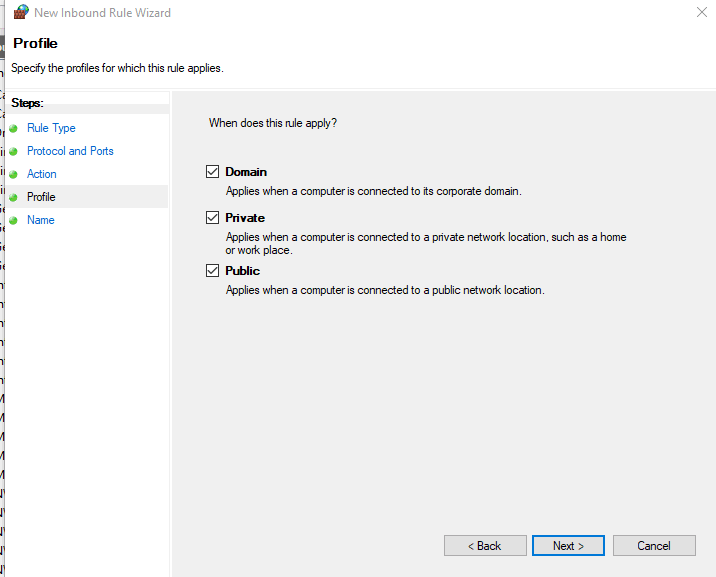
Enforcing the rule on various network types - Establish a name from the rule you just established, then click on Finish to save the changes.
- Restart your computer and wait for the next startup to complete before launching the game that was previously triggering the 83 error code.
If the same critical error is still popping up when you launch the game, move down to the next potential fix below.
Method 4: Uninstalling problematic 3rd party AV suite (if applicable)
If none of the potential fixes above have worked for you and you’re using a 3rd party suite with no apparent option to whitelist executables and ports, the only option is to simply uninstall the overprotective suite temporarily and see if it ends up fixing the problem.
Note: If you’re experiencing this issue with a security suite, this problem will not go away if you disable the real-time protection since the same security rules will remain in place.
If this scenario looks to be applicable, the only thing you can do is to uninstall it temporarily and see if that ends up fixing the issue.
Follow the instructions below to uninstall your 3rd party firewall or AV solution:
- Press Windows key + R to open up a Run dialog box. When you’re prompted by the text box, type ‘appwiz.cpl’ and hit Enter to open up the Programs and Features menu.

Type appwiz.cpl and Press Enter To Open Installed Programs Page - Inside the Programs and Features menu, scroll down through the list of installed applications and locate the 3rd party firewall or AV that you want to uninstall. When you finally manage to locate it, right-click on it and choose Uninstall from the newly appeared context menu.

Uninstalling Third-party Antivirus Software - Follow the on-screen instructions to complete the uninstallation, then reboot your computer and see if the 83 error code is fixed at the next startup.


