How to fix Windows Update Error 0x800f0922
Applies to Windows 7, Windows 8.1, Windows 10 & Windows 11
 Reviewed by Muhammad Zubyan
Error code 0x800f0922 is a common Windows update error that occurs when Windows fails to install or download an update. There are different reasons for both scenarios:
Error occurred when downloading: This typically occurs when Windows fails to establish a network connection with Windows update servers to download the update. [Source]

Error occurred when installing: If the System Reserved partition’s free space is low, you will face this error when installing the update. [Source]

You might be curious about why this error code is so prevalent? This error is incredibly common, to the point that nearly every Windows user has encountered it at least once while installing or downloading an update. The reason for the widespread occurrence of this error code is that many users who experience this issue are utilizing pirated copies of Windows or have not activated their Windows properly. [Source]
Pirated copies of Windows often have specific connections forcibly blocked, preventing Windows from successfully authenticating and verifying the legitimacy of the operating system. When Microsoft’s authentication process fails, it interrupts the distribution of Windows updates, leading to the occurrence of the following error.
Based on numerous forum reports and official documentation from Microsoft regarding certain updates, it has been identified that updates intended for UEFI BIOS systems but mistakenly delivered to users with Legacy BIOS setups can also contribute to the occurrence of this issue.
Table of contents
- Workaround: Simply hide the update
- Fix 1. Run the Windows Update Troubleshooter
- Fix 2. Free up some space in your System Reserved Partition
- Fix 3. Reset Windows Update Component
- Fix 4. Re-activate your Windows (if-applicable)
- Fix 5. Download the Windows Update from Microsoft Catalog
- Fix 6. Upgrade via the Media Creation Tool or Update Assistant
- Error still not fixed?
Now that we know what causes the error code 0x800f0922, let’s try to resolve this error. Before we begin, ensure that your internet connection is working properly and you are not using any VPN or proxy on your Windows.
Workaround: Simply hide the update
The solutions for this error are complicated to follow and they are for advanced users, if the update you are trying to install is not necessary. You can simply hide the update because if these steps are not followed properly, you might end up causing problems with other Windows components. Most of the times, if an update is not installing but everything else seems to be working properly. It’s best to simply hide that specific update and wait for the hotfix or resolution by Microsoft.
Sometimes, the issue is not your computer but with Windows update servers. They mistakenly push out wrong update (or wrong variant of it) that doesn’t apply to your computer. There are many instances of this exact scenario happening (such as KB5012170, KB4535680, KB5008212). All these updates were problematic and Microsoft released hotfixes for these updates to mitigate the issue.
If you want to hide the update, simply follow these steps:
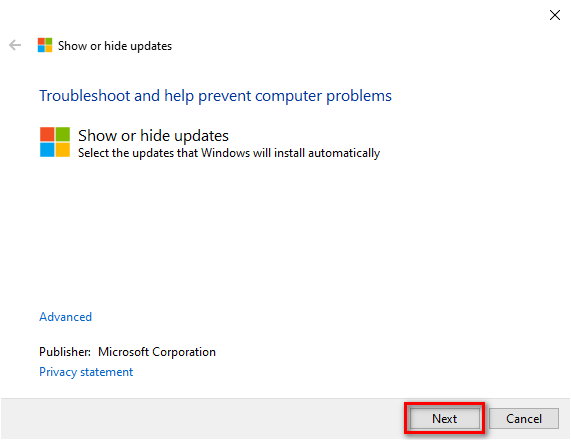
- Download the Official Windows “Show or hide updates” utility. Click > (here)
- Run the tool
- Press ‘Next’ and wait for it to scan the updates
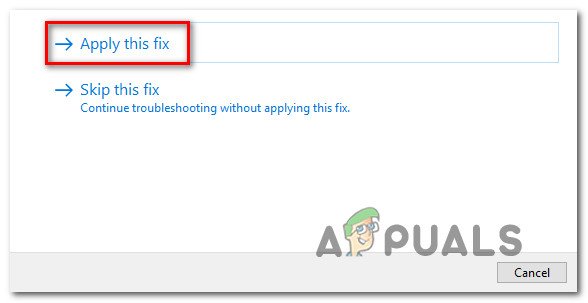
- Select ‘Hide updates’ option
- Now check the problematic update and press ‘Next’
- Wait for it to properly hide the update.
- That’s it! The update should not disturb you now.
Fix 1. Run the Windows Update Troubleshooter
Before you move on to the more advanced fixes below, you should start by checking if your Windows installation is not able to resolve the issue automatically.
- Press Windows key + R to open up a Run.
- Type ‘ms-settings:troubleshoot‘ and press Enter

Note: If you’re prompted by the User Account Control (UAC), click Yes to grant admins access.

Fix 2. Free up some space in your System Reserved Partition
Note: This solution ensures the resolution of the error code, but it should only be pursued if absolutely necessary. The steps involved are complex, and if not executed accurately, they could potentially result in your Windows system failing to boot altogether. It is advisable for this process to be carried out by an advanced user.
If you are stuck and any step or point, please refer to official documentation of this solution (support.microsoft.com)
Part 1. Figure out the partition table of your Disk:
- Press the Win + X keys together and press “Disk Management”
- Right-click on the “Disk” section that corresponds with where your System Reserved partition exists.
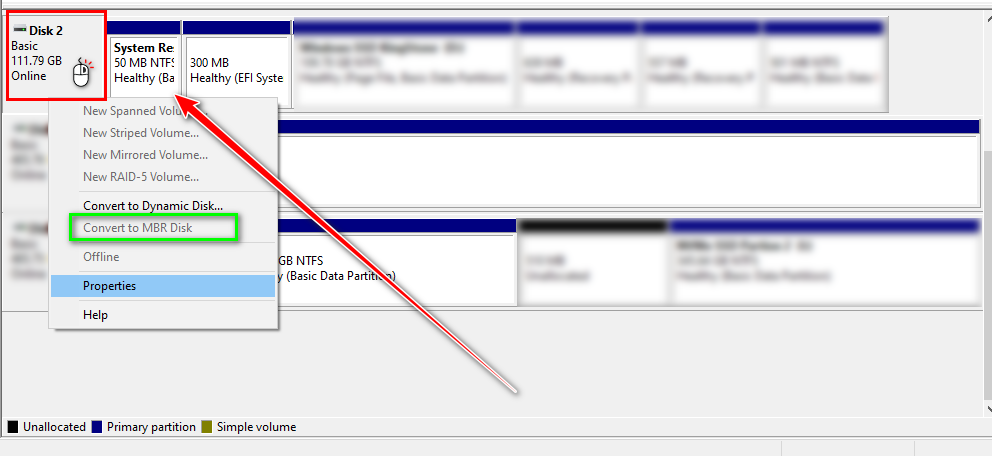
Note: This is important, once you right-click on the disk. Check if the option that’s highlighted with green box says “Convert to MBR Disk” or “Convert to GPT Disk”.
Convert to MBR Disk = The Disk has GPT Partition Table
Convert to GPT Disk = The Disk has MBR Partition Table
Steps are different depending on the partition table your Disk is using.
Part 2. Freeing up space in your System Reserved Partition
Now that you know which partition table your Disk is using, Go to this link (support.microsoft.com) and choose dedicated steps from official following guide.
Follow the steps based on your Windows & Partition table.
If you are stuck at any step when following the steps, don’t worry! simply write a comment down below and our technician will make sure to help you.
If you find this method too confusing or it doesn’t work for you, proceed to the next solution.
Fix 3. Reset Windows Update Component
Windows update components are required when installing or downloading an update. If any of these component or services are not working or if they are unable to connect to internet then the update will fail to install or download and you will face 0x800f0922 error code.
To ensure that these Windows update components & services are working properly, we have to restore their configurations to optimized defaults.
To reset Windows update components, you can either follow automatic way or the manual way. [Source]
Automatic Way:
By using the following steps, you won’t need to type the commands to reset the Windows update component manually. We have uploaded the batch file that contains all the necessary commands to reset the Windows update component. Just follow the steps to execute all the commands.
What exactly is this script going to do or change on my PC?
- Stopping update services
- Removing pending update Files
- Backing-up critical update files
- Resetting permissions to default
- Re-registering update DLLs
- Configuring update services startup settings
- Starting the update services
- Cleaning-up cached data
It’s designed to streamline the Windows Update process and resolve common update-related problems.
- Download the batch file of Reset Windows Update Component (drive.google.com)
- Once it is downloaded, right-click on it and select Run as administrator.
- Wait for all commands to run properly. Then, try updating Windows to see if this worked for you.
Manual way:
To reset the Windows update component manually, follow the steps one by one.
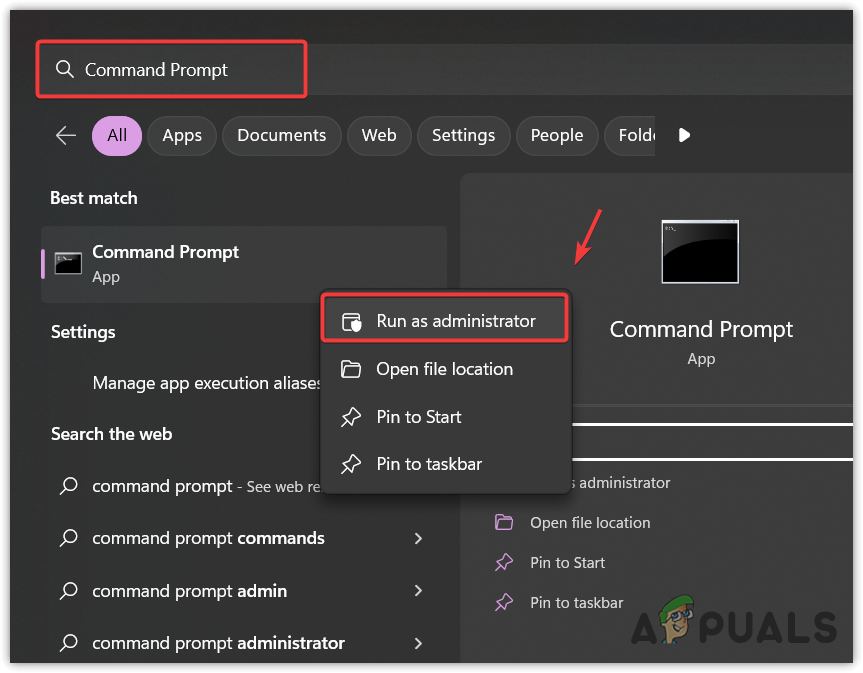
- Click the Start Menu and type Command Prompt in the search box.
- Right-click the terminal and select Run as administrator.
- Once the command prompt is opened, copy all the commands listed below and paste them into the command prompt.
net stop bits
net stop wuauserv
net stop appidsvc
net stop cryptsvc
taskkill /im wuauclt.exe /f
del /s /q /f "%ALLUSERSPROFILE%\Application Data\Microsoft\Network\Downloader\qmgr*.dat"
del /s /q /f "%ALLUSERSPROFILE%\Microsoft\Network\Downloader\qmgr*.dat"
del /s /q /f "%SYSTEMROOT%\winsxs\pending.xml.bak"
rmdir /s /q "%SYSTEMROOT%\SoftwareDistribution.bak"
rmdir /s /q "%SYSTEMROOT%\system32\Catroot2.bak"
del /s /q /f "%SYSTEMROOT%\WindowsUpdate.log.bak"
takeown /f "%SYSTEMROOT%\winsxs\pending.xml"
attrib -r -s -h /s /d "%SYSTEMROOT%\winsxs\pending.xml"
ren "%SYSTEMROOT%\winsxs\pending.xml" pending.xml.bak
attrib -r -s -h /s /d "%SYSTEMROOT%\SoftwareDistribution"
ren "%SYSTEMROOT%\SoftwareDistribution" SoftwareDistribution.bak
attrib -r -s -h /s /d "%SYSTEMROOT%\system32\Catroot2"
ren "%SYSTEMROOT%\system32\Catroot2" Catroot2.bak
attrib -r -s -h /s /d "%SYSTEMROOT%\WindowsUpdate.log"
ren "%SYSTEMROOT%\WindowsUpdate.log" WindowsUpdate.log.bak
sc.exe sdset wuauserv D:(A;CI;CCLCSWRPLORC;;;AU)(A;;CCDCLCSWRPWPDTLOCRSDRCWDWO;;;BA)(A;;CCDCLCSWRPWPDTLOCRSDRCWDWO;;;SY)S:(AU;FA;CCDCLCSWRPWPDTLOSDRCWDWO;;;WD)
sc.exe sdset bits D:(A;CI;CCDCLCSWRPWPDTLOCRSDRCWDWO;;;SY)(A;;CCDCLCSWRPWPDTLOCRSDRCWDWO;;;BA)(A;;CCLCSWLOCRRC;;;IU)(A;;CCLCSWLOCRRC;;;SU)S:(AU;SAFA;WDWO;;;BA)
sc.exe sdset cryptsvc D:(A;;CCLCSWRPWPDTLOCRRC;;;SY)(A;;CCDCLCSWRPWPDTLOCRSDRCWDWO;;;BA)(A;;CCLCSWLOCRRC;;;IU)(A;;CCLCSWLOCRRC;;;SU)(A;;CCLCSWRPWPDTLOCRRC;;;SO)(A;;CCLCSWLORC;;;AC)(A;;CCLCSWLORC;;;S-1-15-3-1024-3203351429-2120443784-2872670797-1918958302-2829055647-4275794519-765664414-2751773334)
sc.exe sdset trustedinstaller D:(A;CI;CCDCLCSWRPWPDTLOCRSDRCWDWO;;;SY)(A;;CCDCLCSWRPWPDTLOCRRC;;;BA)(A;;CCLCSWLOCRRC;;;IU)(A;;CCLCSWLOCRRC;;;SU)S:(AU;SAFA;WDWO;;;BA)
cd /d %SYSTEMROOT%\system32
regsvr32.exe /s atl.dll
regsvr32.exe /s urlmon.dll
regsvr32.exe /s mshtml.dll
regsvr32.exe /s shdocvw.dll
regsvr32.exe /s browseui.dll
regsvr32.exe /s jscript.dll
regsvr32.exe /s vbscript.dll
regsvr32.exe /s scrrun.dll
regsvr32.exe /s msxml.dll
regsvr32.exe /s msxml3.dll
regsvr32.exe /s msxml6.dll
regsvr32.exe /s actxprxy.dll
regsvr32.exe /s softpub.dll
regsvr32.exe /s wintrust.dll
regsvr32.exe /s dssenh.dll
regsvr32.exe /s rsaenh.dll
regsvr32.exe /s gpkcsp.dll
regsvr32.exe /s sccbase.dll
regsvr32.exe /s slbcsp.dll
regsvr32.exe /s cryptdlg.dll
regsvr32.exe /s oleaut32.dll
regsvr32.exe /s ole32.dll
regsvr32.exe /s shell32.dll
regsvr32.exe /s initpki.dll
regsvr32.exe /s wuapi.dll
regsvr32.exe /s wuaueng.dll
regsvr32.exe /s wuaueng1.dll
regsvr32.exe /s wucltui.dll
regsvr32.exe /s wups.dll
regsvr32.exe /s wups2.dll
regsvr32.exe /s wuweb.dll
regsvr32.exe /s qmgr.dll
regsvr32.exe /s qmgrprxy.dll
regsvr32.exe /s wucltux.dll
regsvr32.exe /s muweb.dll
regsvr32.exe /s wuwebv.dll
netsh winsock reset
proxycfg.exe -d
sc.exe config wuauserv start= auto
sc.exe config bits start= delayed-auto
sc.exe config cryptsvc start= auto
sc.exe config TrustedInstaller start= demand
sc.exe config DcomLaunch start= auto
net start bits
net start wuauserv
net start appidsvc
net start cryptsvc
net start DcomLaunch
del /s /f /q "%TEMP%\*.*"
del /s /f /q "%SYSTEMROOT%\Temp\*.*"
- Wait for the commands to be executed, then try updating Windows to see if the error persists.
Fix 4. Re-activate your Windows (if-applicable)
When you perform substantial hardware modifications to your computer, such as replacing the motherboard, CPU, or hard drive, Windows might consider the system to be on a new device, which can trigger a deactivation of your Windows license. This is because the Windows license is often tied to the hardware configuration to prevent unauthorized use on multiple computers.
Microsoft sometimes releases updates or features that are only available to genuine, activated copies of Windows as a way to encourage users to use legitimate licenses.
If you have a retail version of Windows or a digital license linked to your Microsoft account, reactivating after a hardware change should generally be straightforward.
If your Windows is already activated but you want to know the key, follow this amazing guide by aakkam22, visit (answers.microsoft.com). Use the key the program outputs in steps down below:
- Click the Start Menu and type Command Prompt.
- Right-click the Command Prompt and select Run as administrator.
- Once the Command Prompt is opened, enter the following command to re-activate your Windows.
slmgr /ipk <your-product-key>
slmgr /ato
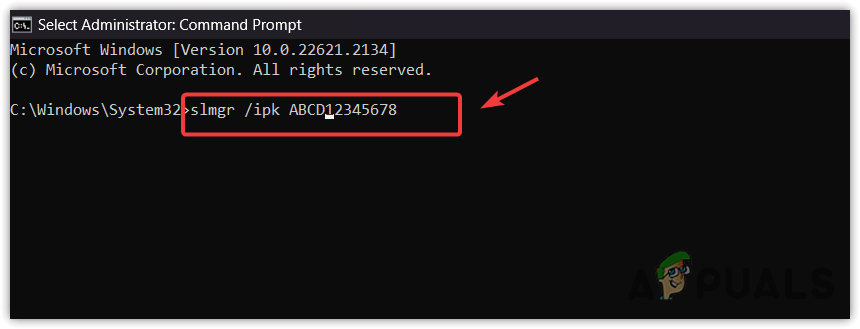
- Once done, try updating Windows to verify whether the error is fixed or not.
Fix 5. Download the Windows Update from Microsoft Catalog
Microsoft Catalog provides direct download link to all the updates ever released for Windows, using Microsoft Catalog can sometimes be more reliable, especially in cases where the Windows Update utility encounters issues or when you need to download updates for multiple systems without relying on the Windows Update service.
As mentioned above, this error also occurs if a Windows update service doesn’t have access to internet properly. Therefore, if you are facing the error code 0x800f0922 when downloading an update. Use Microsoft Catalog to download the update and install it. Follow these steps to do so:
- Go to the Microsoft Catalog using the link.
- Search for the update with its name and hit Enter.
- Now click the Download button associated with the update. This will open up the Window, click the link to download the update.
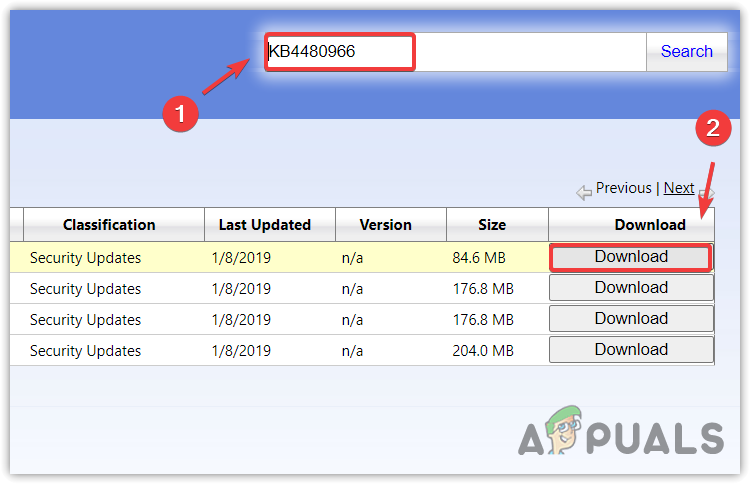
- Once done, simply run the update file to install the update.
Fix 6. Upgrade via the Media Creation Tool or Update Assistant
It is not necessary to update Windows via the built-in Windows update utility. You can upgrade Windows to the latest version using the media creation tool or Windows update assistant. If you have Windows 11, you can use Windows Update Assistant. Otherwise, you will have to use the Media Creation tool. To do so, simply follow the steps according to your operating system.
Using Media Creation Tool (Windows 10)
- Download the Media Creation utility from the link.
- Once it is downloaded, run the utility.
- Keep Upgrade this PC Now option selected and click Next.
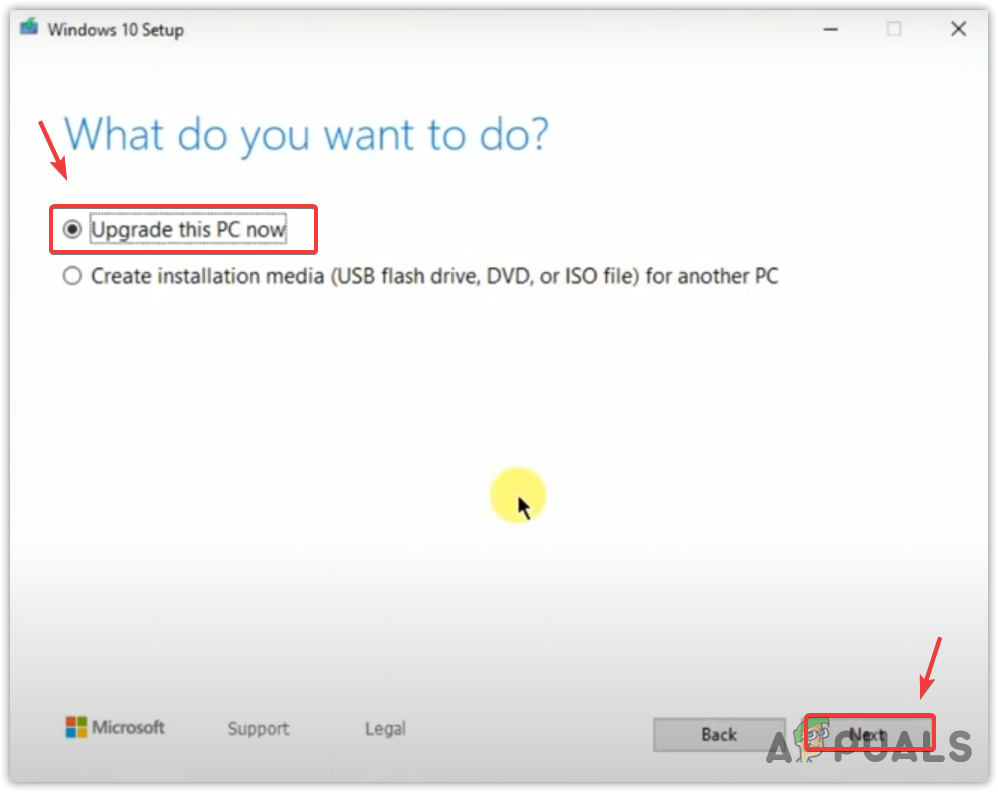
- Wait for the downloading to be completed.
- Once done, click Install to upgrade Windows.
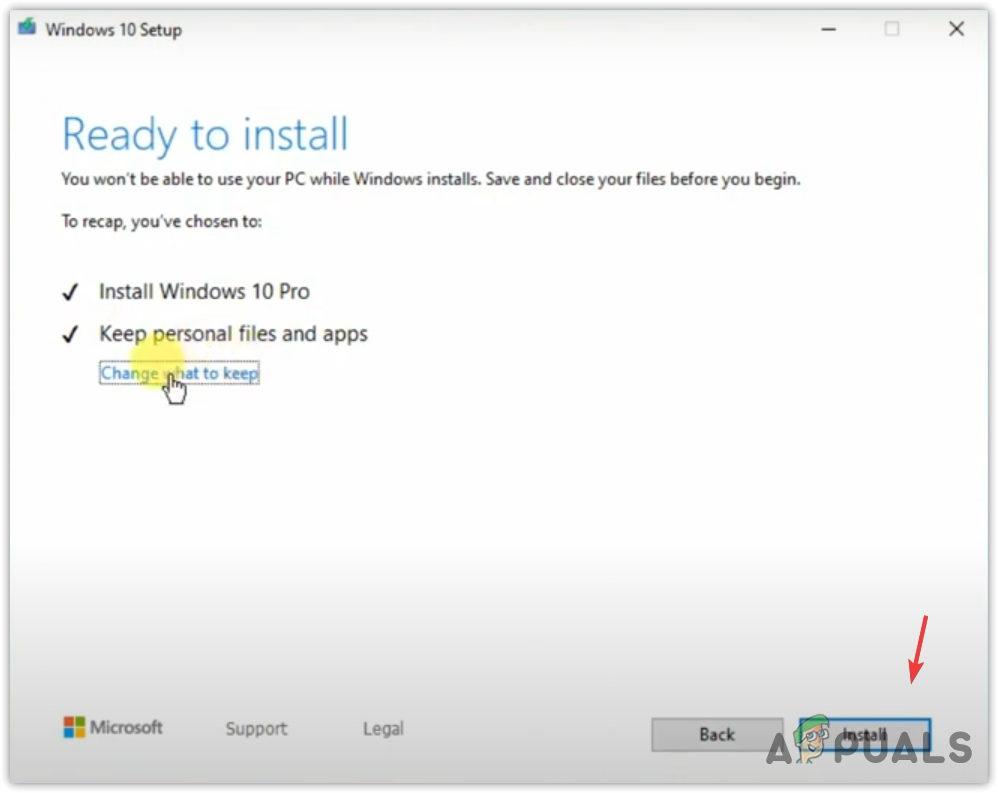
- Now the error should be fixed.
Using Windows 11 Update Assistant
- Download the Windows 11 Update Assistant by navigating through the link.
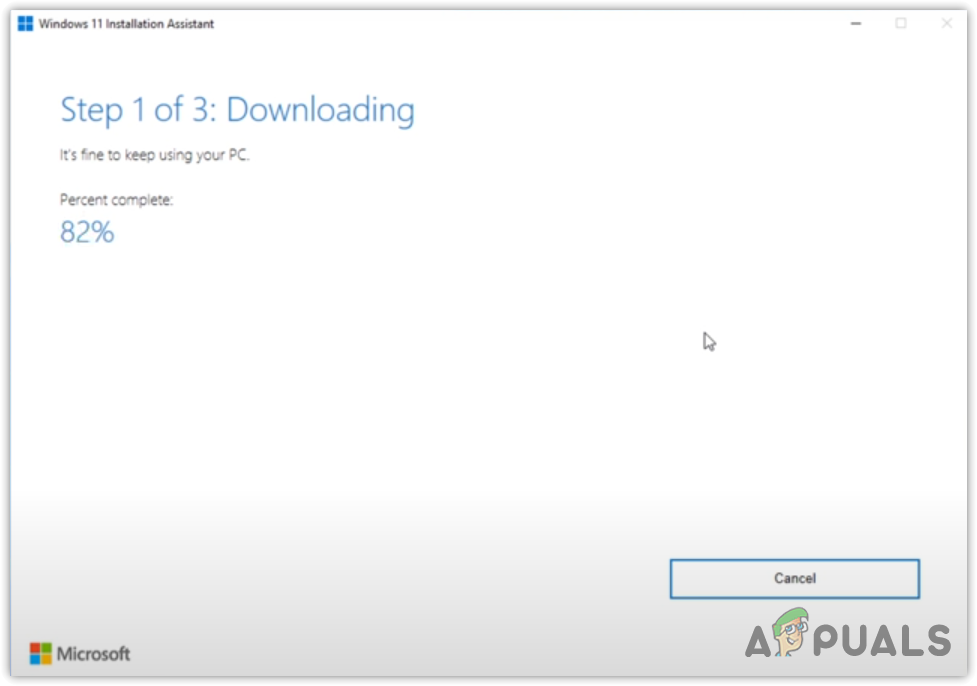
- Once it is downloaded, run the utility and wait for the Windows to be updated successfully.
Error still not fixed?
If you tried every method listed in this article but none of them worked. You will have to reinstall your Windows.
In this scenario, you can perform a clean installation of Windows, which won’t remove your personal data, such as documents, pictures, and videos, but will remove applications and drivers.
Or, you can perform a repair install will allow you to restore all the corrupted files while keeping your applications, drivers, and data. Both of these solutions can be used to fix this update error.
You can also comment down below and our technicians will be there to help you in
Reviewed by Muhammad Zubyan


