How to Fix Send/Receive Error Code 0x80072f89
The error code 0x80072f89 is typically encountered by Windows users when they are unable to send or receive new email through the Windows Email app. The error is mostly reported on Windows 10 but there are scarce reports of it occurring on Windows 8.1.
After investigating the issue and looking at various user reports, it seems like the error code is related to a problem with the SSL certificate. But keep in mind that this is only true if you’re getting the 0x80072f89 error code inside the Windows Mail App.
If you’re currently struggling with this particular issue, this article will help you troubleshoot the issue away. Below you have a collection of methods that other users in a similar situation have used to resolve the error code 0x80072f89. Please follow the methods in order until you find a fix that is effective in eliminating the issue.
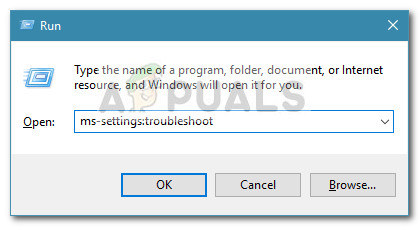
Method 1: Running the Windows Store Apps Troubleshooter
Some users have managed to resolve the issue by running the Windows Store Apps Troubleshooter utility. If the error occurs due some application data, the troubleshooter should be able to detect it and take care of the issue.
Note: This method is only applicable on Windows 10. If you have an older Windows version, download the utility from this link (here) or jump straight to Method 2.
Here’s a quick guide on running the Windows Store Apps Troubleshooter:
- Press Windows key + R to open up a Run box. Type “ms-settings:troubleshoot” and hit Enter to open the Troubleshooting tab of the Settings menu.
- In the Troubleshoot tab, scroll down to Find and fix other problems, select Windows Store Apps and click on Run the troubleshooter.
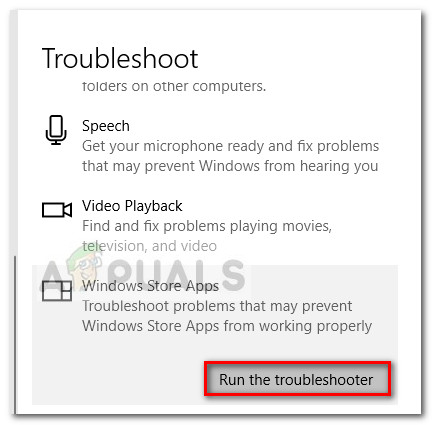
- Wait until the scan is complete, then click on Apply this fix to resolve any identified issues.
- Restart your computer and see if the issue is resolved at the next startup. If you’re still encountering the issue, continue with the next method below.
Method 2: Porting Incoming and Outgoing Mail Servers
Since the issue is mostly related to the SSL certificate, the issue will most likely be fixed if you decide to port incoming and outgoing mail servers. Some users encountering the error code 0x80072f89 have fixed it promptly by using the built-in Mail settings to port the connections. Here’s a quick on how to do this:
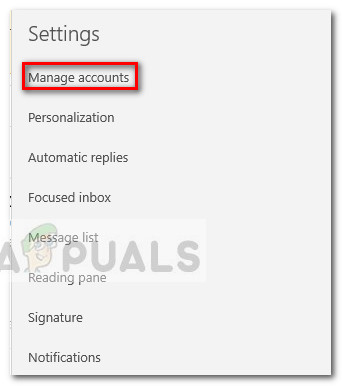
- Open the Mail App and click on the Settings icon (gear icon). Next, click on Manage Accounts and click on your account.
- In the account settings of your email, click on Change mailbox sync settings.
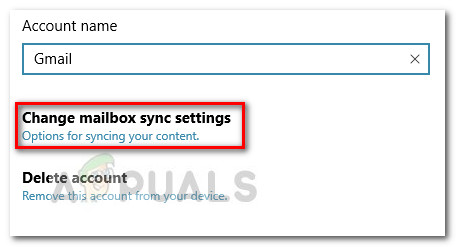
- In the next window, scroll all the way down and click on Incoming and outgoing mail server info (under Advanced mailbox settings).
- Add port :995 to your incoming mailserver. Here’s one example:
pop.*myserver.net*:995
Note: Keep in mind that *myserver.net* is simply a placeholder. Replace it with your mailserver name.
- Add port :465 to your outgoing server(smtp). Here’s one example:
smtpout.*myserver.net*:465
Note: The same as above, *myserver.net* is simply a placeholder. Replace it with your mailserver name.
- Save the changes, reboot your computer and see if the issue has been resolved at the next startup. If the issue is still there, move down to the final method.
Method 3: Re-creating the mail account in Windows Mail
If the problem is caused by a security certificate on your email server that Windows regards as invalid, the issue will be resolved by re-creating your email account in Windows Mail.
Some users have managed to resolve the issue after deleting the mail account from Windows Mail and setting it up again without the SLL options. This might loosen the anti-spam security of your email, but it’s usually effective in eliminating the 0x80072f89 error code.
Here’s a quick guide on how to do delete the email account and set it up again without the SLL options:
- Open Windows Email, click on the Settings wheel and choose Manage accounts.
- Click on your account and then choose Delete account from this device.
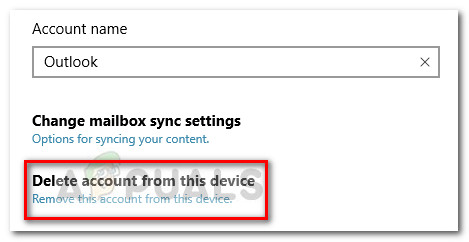
- Click the Delete button to confirm your choice. Once the account is deleted, click on Done to complete the process.
- Click the settings wheel again, go to Manage accounts and click on Add account.

- Choose your email provider, then enter your email credentials to complete the process. Make sure to uncheck every box related to SSL certificates so that the same certificate won’t be a problem anymore.
- Try to send an email from your newly re-created email account and see if the issue repeats.