Fix: Error Code 0x80040304 on Windows 10
Error codes are definitely a confusing way of informing users about a certain problem regarding their computer, especially when you consider the fact that the largest chunk of Windows users’ fanbase belongs to casual users who simply want to undertake a simple task without receiving any confusing error messages.
The most difficult regarding these problems is the fact that you have no idea how to even start solving the issue because the error message does not indicate what might be wrong or how to solve it but it usually displays various error codes which correspond to that error. Let’s find out just what to do when you encounter this error in particular.
Error Code 0x80040304 in Various Situations
This article introduces just why the error code happens and explains how to fix it step by step in different scenarios. The error code 0x80040304 can happen to thousands of users every day, but not everyone is able to fix this problem. If you are concerned about this problem now, please keep reading and you can find an effective solution in this article and free your computer from the error code.
Note that this error code can occur in various different scenarios but still make sure you go through all of the solutions above as some of them are able to fix various instances of this error message.
Solution 1: What To Do If This Error Occurs While Deleting Files
Being able to delete the files you no longer need should be no luxury and that is definitely not much to ask but users have been unable to delete their files because of the fact that their computers displayed this error code each time they wanted to delete a file. Unnecessary files can definitely pile up so this issue should be dealt with as soon as possible.
The first thing you could do is run the System File Checker (SFC). This is quite a useful tool preinstalled to each Windows computer which will scan your storage for missing or corrupt system files. The tool will also replace or fix the system files automatically which can prove to be useful in a variety of different cases.
- It’s advisable to run the DISM (Deployment Imaging and Servicing Management) tool before running SFC. This tool will scan your Windows image for errors and it will fix them automatically. Take a look at our guide on how to use this tool effectively here.
- In order to access a detailed guide on how to use the System File Checker tool safely and effectively, please refer to our handy guide by clicking here.
- Restart your computer and check to see if your issue has been resolved.
Solution 2: Perform a Clean Boot To See What Is Causing the Error
A clean boot is performed to start Windows by using a minimal set of drivers and startup programs. This helps eliminate software conflicts that occur when you install a program or an update or when you run a program in Windows 10, Windows 8.1, Windows 8, Windows 7, or Windows Vista. You may also troubleshoot or determine what conflict is causing the problem by performing a clean boot.
If your computer stops displaying this error message each time you try to delete the file when you perform a clean boot, the issue you have may be related to some of your drivers or the programs you installed recently.
- Make sure you are logged in to your computer with an administrator account as you won’t be able to perform some of the actions described in these steps.
- Know that your computer might not be able to perform some of the actions you were used to because we are going to get rid of everything but the basic drivers and programs during startup.
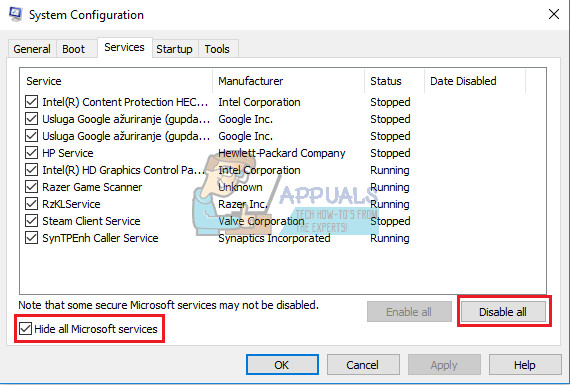
- Open up your Search box from the Start menu and search for msconfig. The first result should be named System Configuration so make sure you open it.
- Navigate to the Services tab when System Configuration opens and check the box next to the “Hide all Microsoft services” option.
- After you have hidden Microsoft services, click on the Disable all button located at the bottom right part of the window.
This will prevent any of the apps and programs you installed from running during startup and you won’t be able to open it later because we have disabled their services from loading at all. This will be reverted later.
- Open Startup either by navigating to the Startup tab in System Configuration and clicking on the “Open Task Manager” option or by simply opening the Task Manager by using the Ctrl + Shift + Esc key combination.
- Make sure you navigate to the Startup tab in Task Manager either way.
- No matter which items you have in your Startup list, click on each one of them and click the Disable button located in the bottom right corner. Double-check to see if you turned off everything.
- Apply these changes and restart your computer.
- If the error messages stops appearing after you restart your computer, it was either one of the services or one of the startup items that was causing the problem. Double check your services and installed programs and utilities in order to see just which one looks suspicious and get rid of it.

When you have finished working in your clean boot environment and after you have realized everything you wanted to know about your error message, it’s time you exit clean boot and boot Windows in your old environment, possible without the problematic service or startup item.
- Again, search for “msconfig” and open the System Configuration the same as it was described above.
- Navigate the the General tab and select the Normal Startup option.
- Navigate to the Services tab and check the box next to the Hide all Microsoft services option.
- Locate the Enable all button at the bottom right part of the window and click on it.
- Navigate to the Startup option by using either of the two methods described in the previous set of steps.
- Select each of your startup items in Task Manager’s Startup tab and click on Enable for all of them.
- Restart your computer in order to boot into Windows normally.
Note: If you were already able to figure out which off your services or startup items is causing these problems, you shouldn’t enable it in System Configuration or in Startup.
Solution 3: Error Message Appears When Using the Backup Option
Backing up files on your computer is vital because losing one of your important files due to a malicious application, hacker attack, or even a simple power outage is definitely one of the worst things that can happen to you. Keeping your files backed up is easy as long as you are not receiving this particular error code. Let’s find out how to deal with it.
- Open your Settings app by clicking on the gear icon above the power button when you click on Start menu.
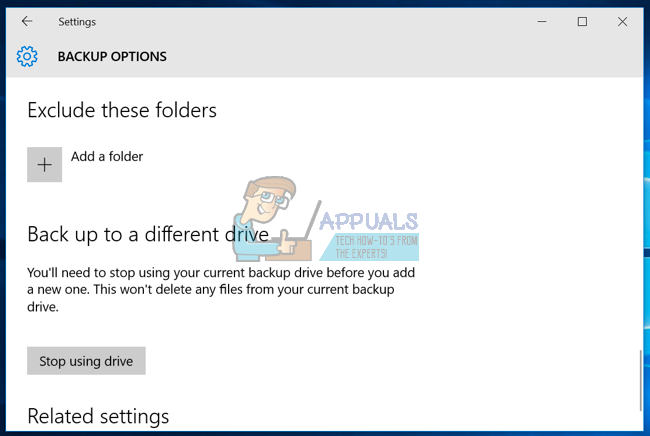
- Navigate to the Update & security section and open the Backup submenu.
- Click on More options and locate the “Stop using drive” option.
- As strange as this may sound, after stopping the use of your current backup drive, the error messages seized to appear and users were able to open and run it once again.
- This occurs because the File History setting went corrupt and it caused issues. However, after you have removed the drive, it turned itself off automatically and that is why you were able to access backup afterwards.
In case this solution doesn’t work, try running the backup from a different location. Some users have reported that initiating backup from Control Panel worked and running it from settings didn’t.
- Open Control Panel by searching for it in the Search box.
- Change the View by option to Small icons.
- Locate the Backup and Restore option and click on it.
- If you haven’t used backup before, you will have to click on the Set up backup option and follow the instructions on screen.
- If you have used it before, try opening it and check to see if the error message appears.

Solution 4: Update Windows Regularly
If this issue was caused by one of Microsoft’s many updates, you should be provided with a hotfix in the next update. Keeping your PC up to date is quite important so please make sure you always run the latest version of Windows OS.
Windows 10 updating process is automatic and updates install automatically by default, without even notifying the users, by default. If you think your Windows PC is not receiving these updates regularly or at all, you can download them manually from Microsoft Update Catalog.
- Visit this site in order to find out just what the latest update is. It should be located at the top of the list at the left part of the site with the current Windows 10 version at the top.
- Copy the KB (Knowledge Base) number along with “KB” letters as well (e.g. KB4040724).
- Open Microsoft Update Catalog and search for the number you just copied.
- Click on the Download button to the left, choose the version of your OS (32bit or 64bit) and download the file.
- Run the file you just downloaded and follow the instructions on screen in order to complete the updating process.
- After the update has finished, restart your computer and check to see if the Error Code 0x80040304 has ceased from appearing.