Fix: Error Code 0x8700017 – Xbox App Not Downloading Update
Recently, several users reported that they are encountering the error code 0x8700017 upon their attempts to install any app.
We had a look into the issue and discovered that it is typically caused by the following factors:
- Generic glitch – In cases where the problem is caused by an already documented genetic glitch by Microsoft, you should be able to resolve it automatically by running the troubleshooter and applying the recommended fixes.
- Corrupt Windows Update components – Your operating system relies on Windows Update components to install the recent updates. If any one of the components becomes corrupt, you are likely to face issues like the one at hand.
- Glitched Windows Store installation – Additionally, it’s possible to encounter this issue as a result of an issue that impacts UWP applications as a whole. Users who found themselves in a similar scenario have reported that by running a Powershell command that reregisters the application, the error code 0x8700017 was permanently resolved.
- Networking error – You might also be facing the issue if a corruption error or bug is affecting your network settings. This issue can be resolved by restarting the router or running the built-in network troubleshooter.
Now that we know about the potential causes, let’s have a look at some effective troubleshooting methods to fix the issue at hand.
Reboot Your Router
The first thing you should try if you are having trouble installing updates is to reboot your router since errors like the one at hand are commonly caused by temporary software/communication glitches.
Such glitches can be easily resolved by restarting your router. If doing so does not do the trick for you, then proceed with the next troubleshooting method below.
Run the Internet Connection Troubleshooter
Microsoft Windows 10 also includes a troubleshooter tool that is useful for diagnosing and fixing common network problems. Typically, the troubleshooter can fix the issue within a short amount of time if it is caused by a connection bug in your system.
- Press Windows + I keys simultaneously on your keyboard to open Windows Settings.
- In the Settings window, click on Update & Security.
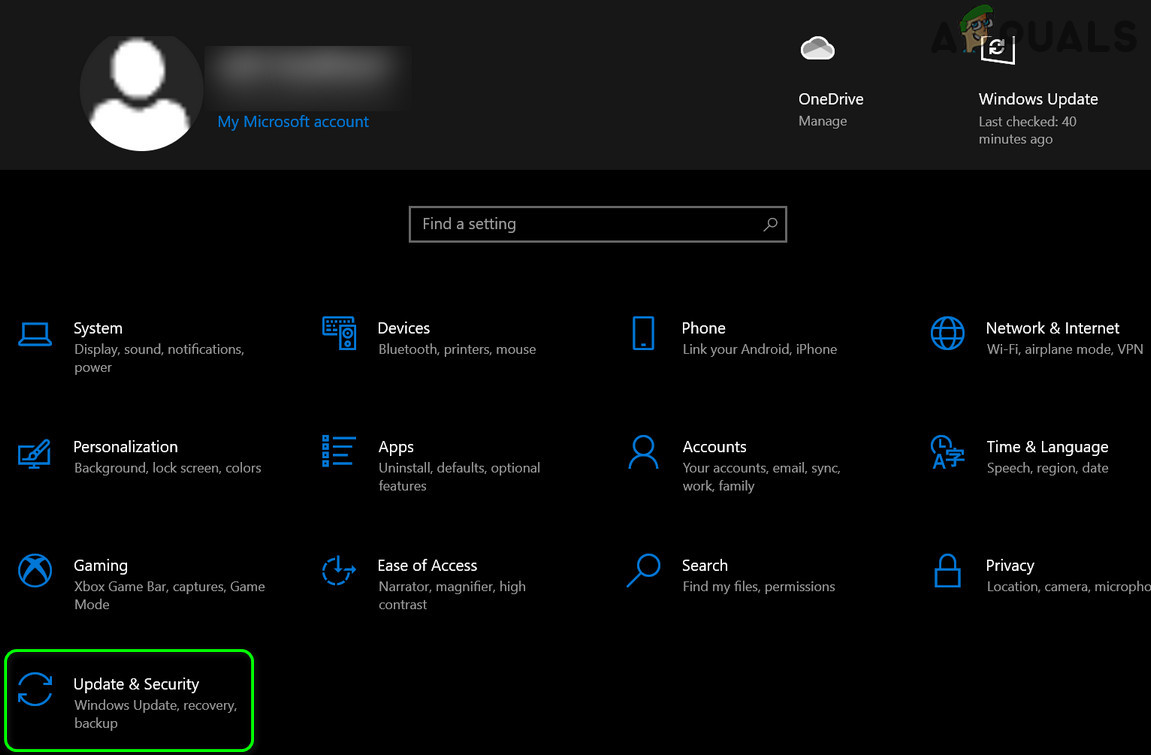
Open Update & Security - Now select Troubleshoot from the left panel and then select Additional troubleshooters.
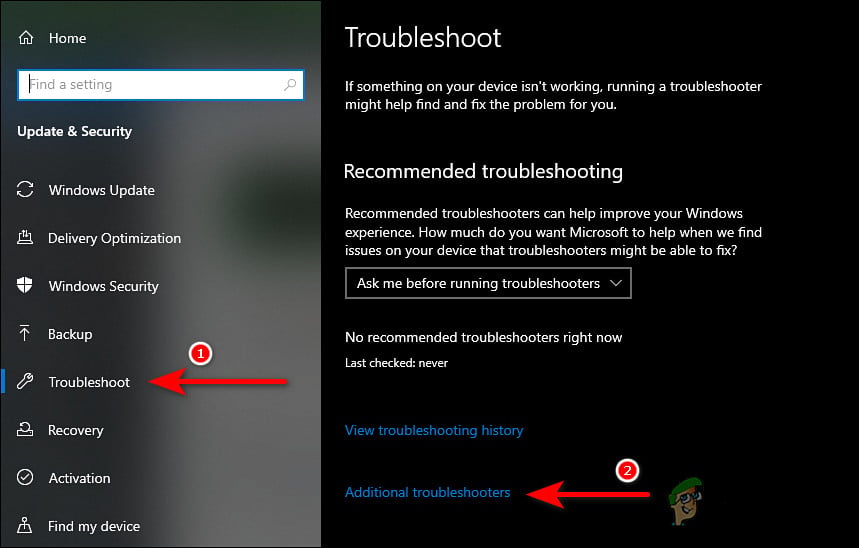
Access the additional troubleshooters - Select Internet Connections and click on Run the troubleshooter.
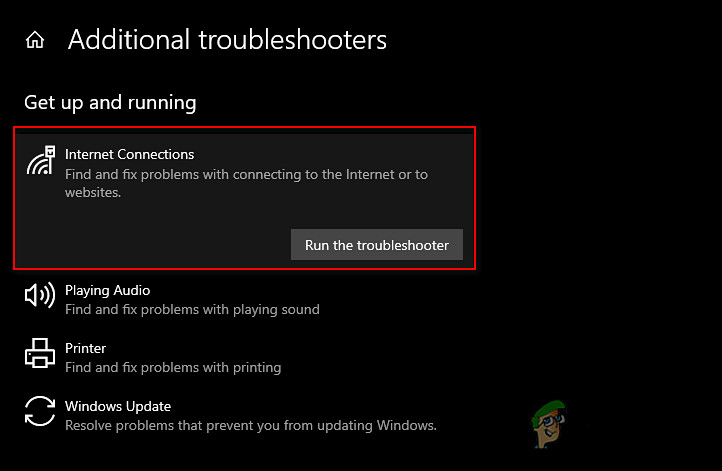
Run the Internet Connections troubleshooter - Once the troubleshooter completes its scan, it will recommend fixes if any issues are found. In this case, apply the fixes and then try installing the update again.
Reset the Network Settings
You can also try resetting the network settings to fix internet and connectivity problems and error code 0x8700017. Performing a network reset or resetting network settings restores all network-related functions and settings to their original value; just like a factory reset.
Resetting your network settings will delete your Wi-Fi name and password, Bluetooth device connections, VPN settings, and cellular network preferences like data management.
- Press Windows + I keys simultaneously on your keyboard to open Windows Settings.
- In the Settings window, click on Network & Internet.
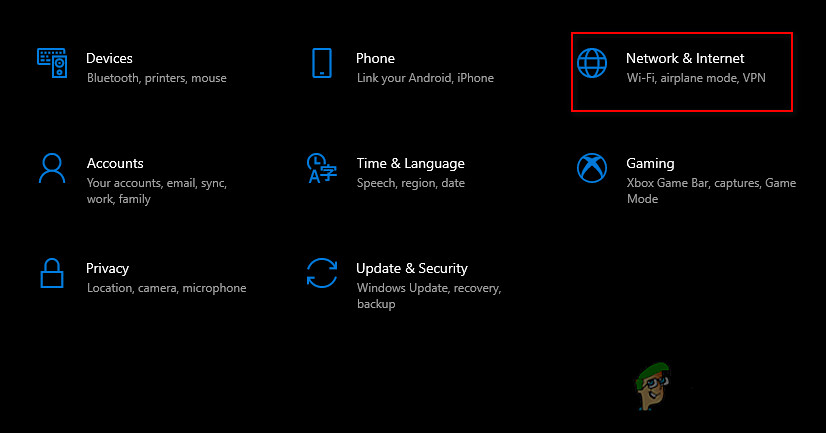
Launch Network & Internet Settings - Now scroll down and select Network reset.
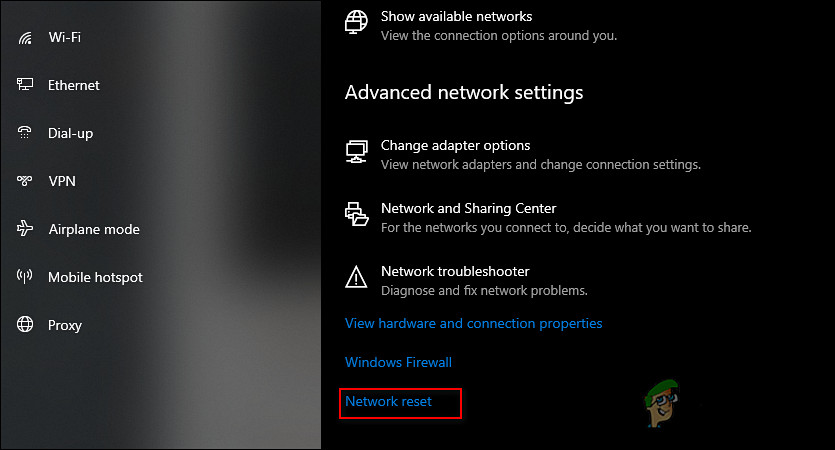
Reset Network settings - Hit the Reset now button and wait for the process to complete. Once done, check if you can download the update successfully.
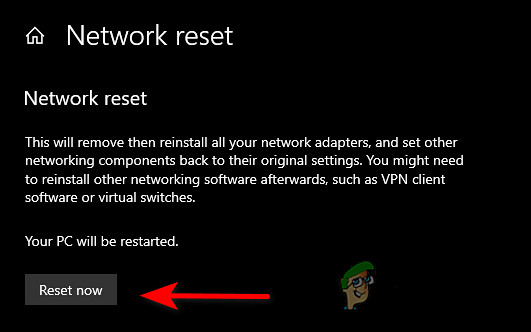
Hit the Reset now button
Reset the Windows Update Components
You also might not be able to install the app and face the error code 0x8700017 if the Windows Update components on your Windows are corrupt. The solution is simple to this problem; all you have to do is reset the components to get them up and running again.
- Type cmd in the search bar and click on Run as administrator to launch Command Prompt with administrative rights.
- Now type the commands mentioned below and hit Enter after each to execute them.
net stop wuauserv

net stop cryptSvc

net stop bits

net stop msiserver
- Once done, execute the following commands one by one:
net start wuauserv

net start cryptSvc

net start bits

net start msiserver
- Finally, restart your PC and check if the issue is resolved.
Reinstall the Microsoft Store
There is also a chance that your Microsoft Store installation is corrupt, due to which you are unable to install updates like the one under consideration. In this case, reinstalling the Microsoft Store might be able to help you download the app update without the error code 0x8700017.
It is important to note that there is no option to reinstall an application within the Microsoft Store. The only way to do this is to use PowerShell as an administrator.
- Type Powershell in the search area of your taskbar and click on Run as administrator.
- Inside the Powershell window, type the command mentioned below and hit Enter to execute it.
Get-AppXPackage -allusers | Foreach {Add-AppxPackage -DisableDevelopmentMode -Register "$($_.InstallLocation)\AppXManifest.xml"}
Reinstall the Microsoft Store
- Once the command is executed, restart your PC.
- Upon reboot, head over to the Microsoft Store and click on Library.
- Then select Get updates and try installing the app update.
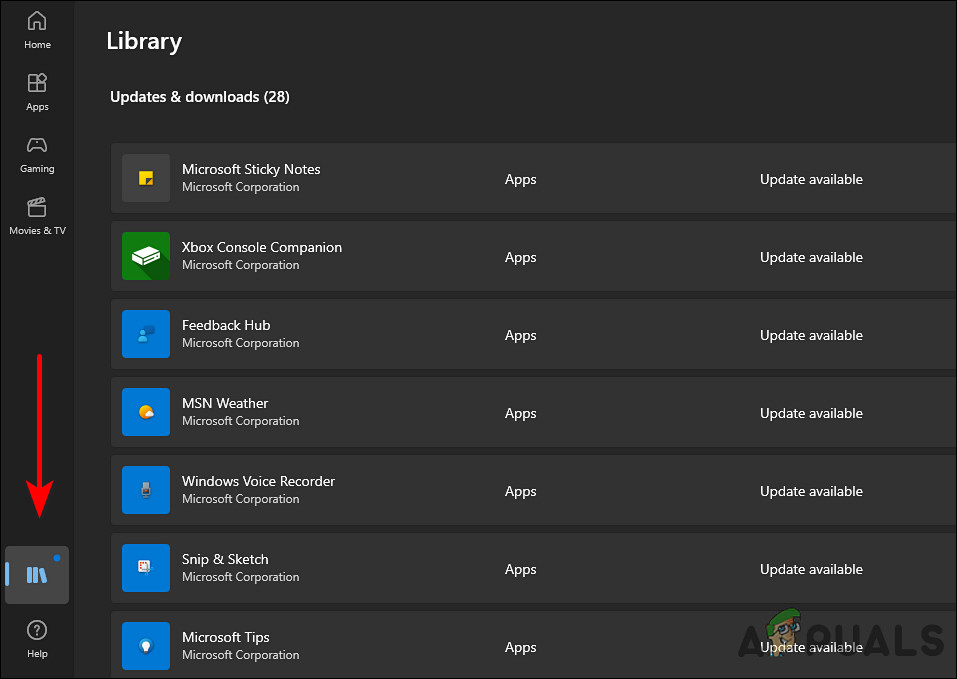
Launch Microsoft Store library
Change the DNS Settings
A domain name system is vital to all internet activities. When your DNS server is slow, or not configured properly for caching, it can slow your connection, leading to errors such as the one at hand.
Fortunately, it is possible to improve your browsing speed by modifying the DNS settings or changing to a DNS server that is optimized for efficiency. In this method, we will modify the DNS settings in Windows to resolve the error code 0x8700017.
- Press Windows + R keys simultaneously on your keyboard to open a Run dialog box.
- In the text field of the dialog box, type control and hit Enter to launch the Control Panel.
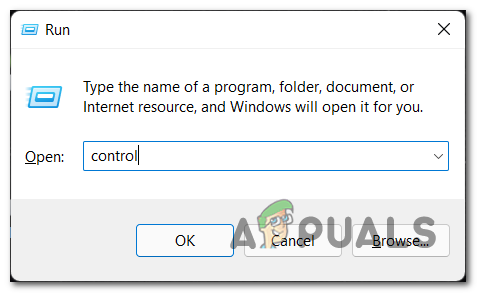
Open up the Classic Control Panel interface - Inside the Control Panel window, click on Network and Internet.
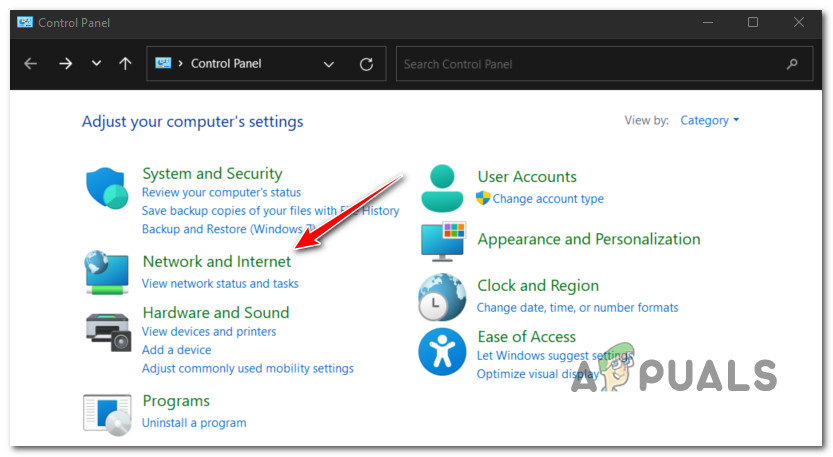
Accessing the Network and Internet menu - Then go to the Network and Sharing Center.
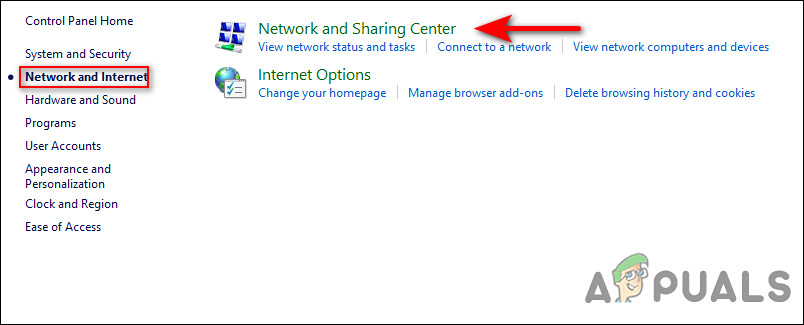
Access the Network and Sharing center - Now select the Connections hyperlink against your Private network connection.
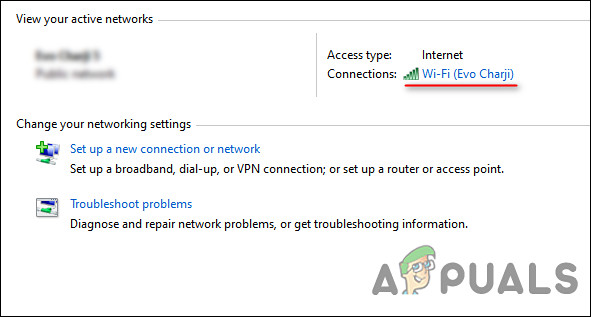
Click the connections hyperlink - In the newly launched dialog box, click on the Properties button.
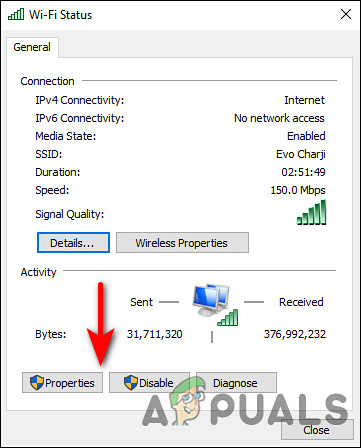
Click the Properties button - Go to the Networking tab in the Properties screen of your connection and select Internet Protocol Version 4 (TCP/IPv4). Then click the Properties button again.
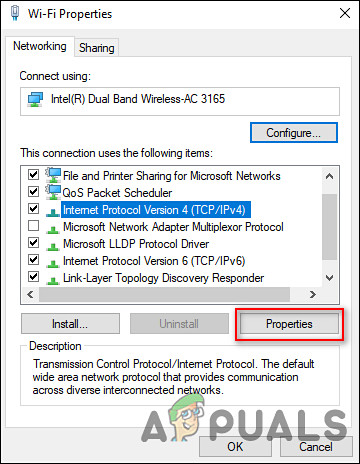
Select IPV 4 and click Properties again - After that, change the DNS server settings to Use the following DNS server addresses.
- Then, set the value of the Preferred DNS server to 8 8 8 8 and Alternate DNS server to 8 8 4 4. To save your changes, click OK.
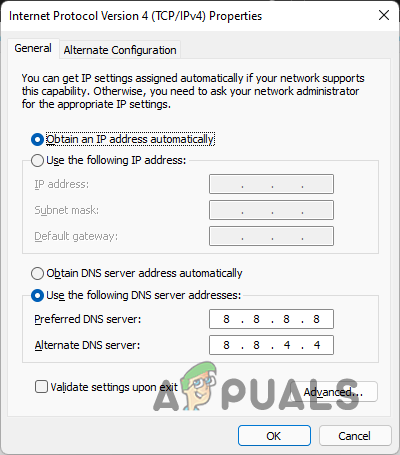
Changing DNS Server Address - Once done, close the opened windows and restart your PC.
Perform a Repair Upgrade
If you have come this far without a solution, then this implies that the error code 0x8700017 cannot be solved using conventional troubleshooting methods.
If this scenario is applicable, then pretty much the only thing you can do is perform a repair upgrade. During a repair upgrade, the system files are repaired, and the latest windows updates are installed. Hopefully, this will fix the issue once and for all.


