Troubleshoot Error 0x81000036 when Using Windows Backup
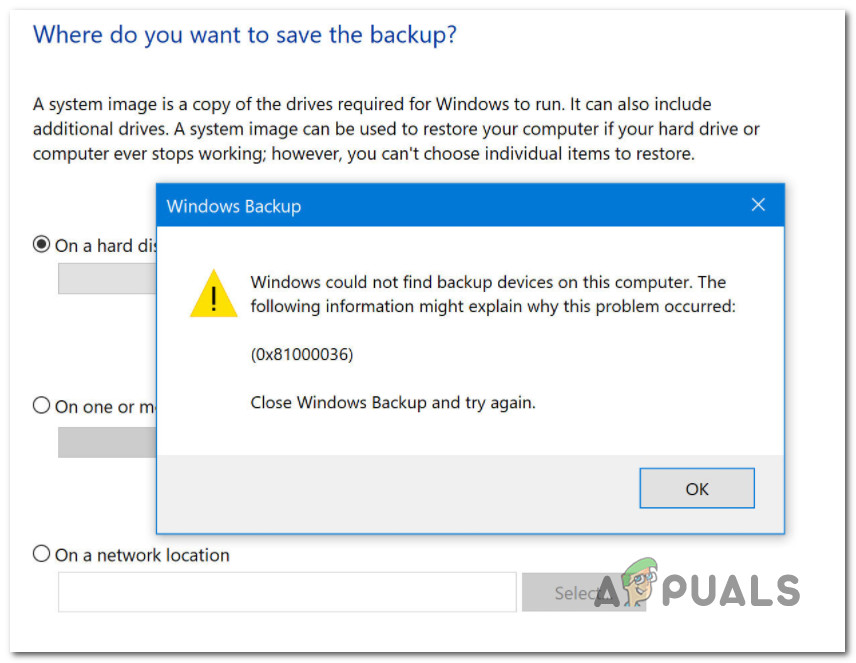
Some Windows users are always encountering the 0x81000036 error when attempting to restore the OS state to a previous point in time using Windows Backup. This particular issue seems to be specific to Windows 10.
After investigating this particular error code, it turns out that several different underlying causes might be triggering this issue. Here’s a shortlist of potential culprits:
- Conflict with Windows Sandbox – According to a lot of affected users, the most common culprit that is known to cause this error code is a conflict between the Windows Sandbox environment and the Windows Backup process. In this case, you can get the issue resolved by accessing the Windows Features menu and temporarily disabling Windows Sandbox before attempting to use the Windows Backup once again.
- Conflict with Hyper-V – Another potential culprit that could be responsible for this type of Windows Backup error code is hyper-V. If you are seeing this error while attempting to mount a previously created Windows Backup, you should precede this by disabling the Hyper-V functionality from the Windows Features screen.
Now that you are familiar with every potential reason that will trigger the 0x81000036 error code, here’s a list of verified fixes that other affected users have successfully used to get to the bottom of this issue:
1. Disable Windows Sandbox
As it turns out, one of the most common scenarios that will cause the 0x81000036 error to occur is a conflict between Windows Backup and the Windows Sandbox functionality.
Note: Windows Sandbox serves as a lightweight environment that allows Windows users to safely run applications in complete isolation. Due to the way this environment remains ‘sandboxed’, you can expect a backup procedure to conflict with this infrastructure.
Several affected users have reported that they managed to prevent the 0x81000036 error from occurring again during the mounting of a backup by accessing the Windows Features screen and temporarily disabling the Windows Sandbox environment.
If you haven’t tried this fix yet, follow the instructions below to disable the Windows Sandbox from the Control Panel menu before attempting to create the system image once again:
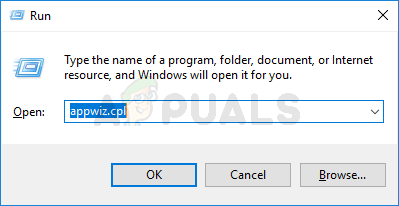
- Press Windows key + R to open up a Run dialog box. Next, type ‘appwiz.cpl’ and press Enter to open up the Programs and Features menu. If you are prompted by the UAC (User Account Control), click Yes to grant admin access.

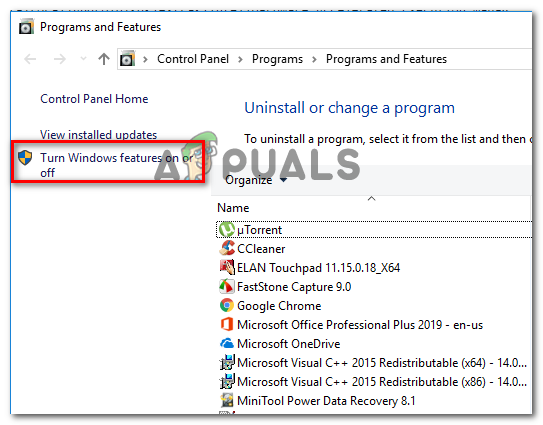
Opening up the Programs and Features menu - Once you’re inside the Programs and Features screen, click on Turn Windows features on or off from the left-hand section.

Accessing the Windows Features screen - Once you’re inside the Windows Features screen, scroll down through the list of native features and ensure that the checkbox associated with Windows Sandbox is disabled.
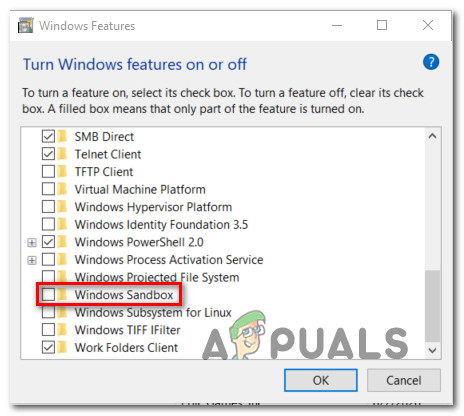
Disabling the Windows Sandbox environment - Once you attempt to disable Windows Update, you will be prompted to confirm the operation. Do so by clicking Yes and wait for the Sandbox environment to be disabled.
- Return to your Windows Backup utility and repeat the action that was previously triggering the 0x81000036 error.
If the problem is still not fixed, move down to the next potential fix below.
2. Disable Hyper-V
As it turns out, it turns out that you can also expect to encounter this error due to a conflict between the main Windows Backup restore process and the main Hyper-V service that’s enabled by default on Windows 10.
Some users that were also encountering this problem have reported that they finally managed to fix the 0x81000036 error by temporarily disabling Hyper-V and all associated services before attempting to restore the previously created backup once again.
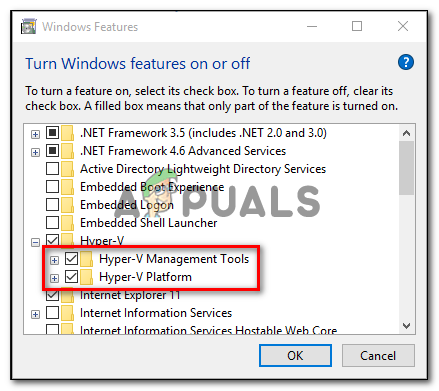
If you suspect this scenario might apply to your current situation, follow the instructions below to disable Hyper-V from the Windows Features menu:
- Start by pressing Windows key + R to open up a Run dialog box. Inside the text box, type ‘appwiz.cpl’ and press Enter to open up the Programs and Features menu. If you are prompted by the UAC (User Account Control), click Yes to grant admin access.
Opening the Programs and Features screen - Once you get to the Programs and Features menu, use the menu on the left to click on Turn Windows features on or off. At the User Account Control prompt, click Yes to grant admin access.
Accessing the Windows Features again - Inside the Windows Features screen, scroll down through the list of Windows Features and uncheck the box associated with Hyper-V. Next, click on Ok to save the changes.
Completely disabling Hyper-V - After the Hyper-V functionality is completely disabled, reboot your computer and see if the problem is fixed by attempting to enforce the Windows Backup once again.


