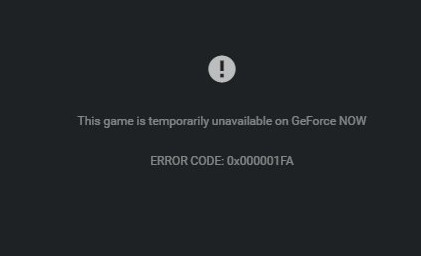
[Fix] Error 0x000001FA with Nvidia GeForce Now
Some GeForce Now users are encountering the error code 0x000001FA (This game is temporarily unavailable on GeForce Now) when attempting to stream certain games using this cloud gaming service.
After investigating this particular issue, it turns out that there are several different causes with the potential of producing this particular error code. Here’s a shortlist of potential culprits that might be responsible for the 0x000001FA error code:
- Underlying server issue – Under certain circumstances, you might see this error code appearing due to an underlying server issue that’s currently affecting users in your area. If this scenario is applicable, all you can do is confirm the issue and wait for the involved developers to fix this issue.
- Corrupted DNS cache – As it turns out, this problem can also occur due to some type of DNS inconsistency that’s making it impossible to establish cloud-gaming jobs. In this case, you should be able to fix the problem by flushing the current DNS config and forcing it to renew from an elevated command prompt.
- Bad DNS Range – Depending on your ISP, it’s possible that the DNS range forced by your Internet Service Provider is not really compatible with GeForce NOW. If this scenario is applicable, one viable alternative is to move over to the Google Public DNS range and retry the connection.
- Level 3 ISP Node / Admin restriction – If you’re using a level 3 ISP or you’re connected to a network that restricts cloud streaming in order to limit the usage of bandwidths, the only thing that will help you around this issue is to use a gaming VPN to funnel your connection through a reliable VPN that will not affect your ping that much.
- Dedicated GPU glitch – According to some affected users, this issue can also occur on a dual-GPU setup when GeForce Now is forced to use the dedicated solution. Several affected users have confirmed that they managed to fix the problem by forcing the app to run using the integrated solution.
Method 1: Checking for Server Issues
Before you try any of the other fixes below, you should start by ensuring that you’re not actually dealing with a server issue that is not beyond your control.
Keep in mind that in the past, this particular error code has occurred whenever the Nvidia GeForce Now service was affected by an unexpected server issue that is affecting cloud streaming.

If you think this scenario might be applicable, the first thing you should do is see if other users in your area are currently encountering the same type of issues. To do this, you can use services like DownDetector or IsItDownRightNow to check if this issue is widespread.
In case you uncover evidence of a server problem, you should also check the official Twitter page of GeForce NOW for any official announcements of a server issue.
Note: If you discover a server issue, none of the other potential fixes below will allow you to resolve the 0x000001FA since the issue is entirely beyond your control – In this case, the only thing you can do is wait until the developers fix the problem on their side.
On the other hand, if there’s no evidence of a server issue, start deploying the potential fixes below in the same order as we presented them. One of them should allow you to fix the problem.
Method 2: Flushing the DNS Config
According to some affected users, this problem can also occur due to an inconsistency having to do with the current DNS (Domain Name Inconsistency) that your system is using.
If you think this scenario might be applicable, you should use an elevated Command Prompt to run a couple of commands that will successfully flush and renew your current DNS configuration. This operation was confirmed to fix the 0x000001FA with GeForce Now by a lot of affected users.
Note: This operation will not cause any underlying data loss. The only thing that does it is will clear the current DNS related temp data and force the assignment of new values that will hopefully prevent the same issue from occurring again.
In case you haven’t tried this potential fix yet, follow the instructions below to force your current DNS config:
Note: The instructions below will work regardless of your Windows version. It will work on Windows 7, Windows 8.1, and Windows 10.
- Start by ensuring that Nvidia GeForce Now is completely closed and no process associated with it is running in the background.
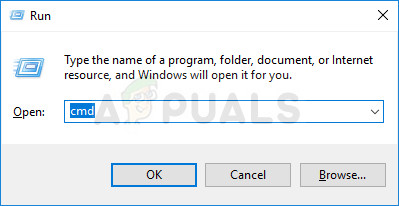
- Next, press Windows key + R to open up a Run dialog box. Next, type ‘cmd’ inside the text box and press Ctrl + Shift + Enter to open up an elevated Command Prompt. When you’re prompted by the UAC (User Account Control), click Yes to grant admin access.
Running Command Prompt - Once you’re inside the elevated Command Prompt, type the following command and press Enter to flush the current IP configuration:
ipconfig /flushdns
- Wait until the command is processed successfully – You should get a confirmation message telling you that the DNS has been successfully refreshed. After you see this message, type the following command and press Enter to renew the current IP configuration:
ipconfig /renew
- After the second command is successfully renewed, you can go ahead and close the elevated Command Prompt before launching GeForce Now once again to see if the issue is now fixed.
If the same problem is still occurring, move down to the next method below.
Method 3: Using a Gaming VPN
As some affected users have reported, this problem can also occur due to some kind of network restriction that is preventing you from using GeForce Now.
It’s possible to see the 0x000001FA error because your network administrator has imposed a restriction on cloud gaming in order to prevent network users from hoggin’ too much bandwidth. Another potential scenario that might cause this problem is if you’re using an ISP that’s actively using Level 3 nodes.
In case one of the scenarios described above looks like they could be applicable, using a VPN client might allow you to bypass the error and stream games from GeForce NOW without seeing the same 0x000001FA error code.
However, this will not come without a cost. Funneling your data exchange through a VPN network will likely mean that your ping will be worse, which might hinder the experience. But it’s still better than not being able of utilizing the GeForce Now service at all.
If you’re in the market for a reliable gaming VPN, we’ve made a list of the best VPNs for gaming, so take your pick.

Note: Most of the VPN suites mentioned above will include a free plan. Our recommendation is to avoid committing to a paid plan until you verify that this workaround is effective.
If the same problem is still occurring even after trying to tunnel your connection through a VPN network, move down to the next potential fix below.
Method 4: Changing the DNS to Google’s Equivalents
If none of the potential fixes above have worked for you, your next attempt at fixing the 0x000001FA error should be to change the current DNS range from the default one allocated by your ISP (Internet Service Provider) to the range provided by Google.
We managed to find a lot of affected users that have managed to fix this issue by switching to Google’s Public DNS for IPv4 and IPv6. In most cases, this problem also helped them improved their ping when streaming games via GeForce Now.
If you haven’t tried this yet, follow the instructions below to change the default DNS range from your Windows computer to Google’s Public DNS:
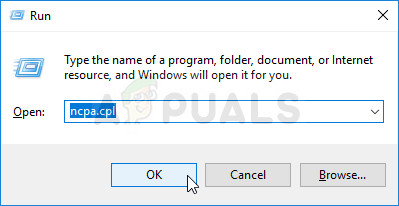
- Open up a Run dialog box by pressing Windows key + R. Next, type ‘ncpa.cpl’ and press Enter to open up the Network Connections window.
Run this in the Run dialog box - Once you’re inside the Network Connections window, right-click on Wi-Fi (Wireless Network Connection), and choose Properties from the context menu. If you’re using a wired connection, right-click on Ethernet (Local Area Connection) instead.
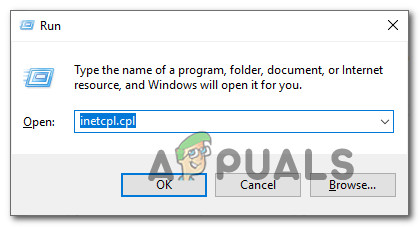
Opening the Internet Properties screen Note: When you are prompted by the UAC (User Account Control), click Yes to grant admin access.
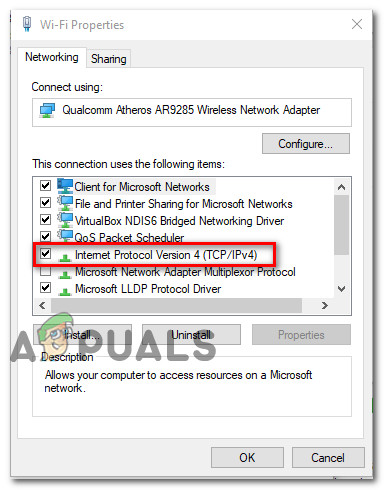
- Once you’re finally inside the Ethernet or Wi-Fi menu (depending on your connection), click on the Networking tab, then find the section that says This connection uses the following items. When you get to the correct menu, click on the box associated with Internet Protocol Version 4 (TCP /IPv4), then click on Properties button.
Accessing the Internet Protocol Version 4 settings - Once you’re inside the Internet Protocol Version 4 settings menu, go ahead and click on General, then enable the box associated with Use the following DNS server address.
- After you get to the next screen, replace the current values of Prefered DNS server and Alternate DNS server with the following values:
8.8.8.8
8.8.4.4
Note: This is the Public DNS range facilitated by Google, but if you’re not a fan of it, you can also use 1.1.1.1 and 1.0.0.1 as Preffered DNS server and Alternate DNS server.
- Save the changes to enforce the new DNS range, then reboot your computer and see if the problem is fixed at the next computer startup.Note: If you’re relying on IPv6, you also need to modify the Preferred DNS server and Alternate DNS server of Internet Protocol Version 6 (TCP / IPv6) with the following values:
2001:4860:4860::8888
2001:4860:4860::8844
- Save the changes to enforce the change, then reboot your computer and see if the problem is fixed once the next startup is complete.
In case you’re still encountering the same 0x000001FA error code, move down to the next potential fix below.
Method 5: Starting GeForce Now with Integrated Graphics
If none of the potential fixes above have worked for you and you’re using a setup with both an integrated and a dedicated GPU, one last thing you should try to do is force the GForce Now application to run with the integrated graphics option.
We’ve not been able to confirm why this operation was successful, but a lot of affected users have reported that the 0x000001FA error was no longer occurring after they’ve forced the integrated GPU on it.
If you haven’t tried to do this yet, try to force the usage of the integrated GPU when running Nvidia GeForce Now and see if this allows you to avoid the pesky error code.