How to Enable or Disable the File History in Windows 10?
File History is used to automatically backup your files on a schedule to a drive that you selected. You can save data to an external or internal drive. It also provides additional settings for adding, removing, and excluding folders for backup. However, most of the users are unfamiliar with this tool. If users have not used this tool before, they must want to know about how they can enable or disable this tool on their system. In this article, we will be showing you different methods for enabling and disabling File History on Windows 10.
Enabling or Disabling File History in Windows 10
File History is the new feature that replaces Backup and Restore in Windows. It will backup user’s folders like libraries, desktop, favorite folder, and so on. File History will ignore the file during back up when they are in use by applications. By default, in Windows 10, File History will not be enabled.
The first two methods are the common ones to enable and disable the File History on your system. The Local Group Policy Editor and Registry method will enable or disable access to the settings of File History. Then, the users will be unable to Turn On or Turn Off the File History in Windows Settings and control panel.
Users can enable it by using one of the following methods. We also included steps in each method, that tells you about disabling it back.
Method 1: Enabling or Disabling through the Windows Settings
The default way to configure most of the common settings can be done through the Windows Settings. File History can be found in the backup settings of Windows. Microsoft intends to eventually replace the control panel with the new Settings. File History settings can be found in the Update & Security category. Follow the below steps to enable or disable File History:
- Press the Windows + I key together to open the Windows Settings. Then click on the Update & Security option.
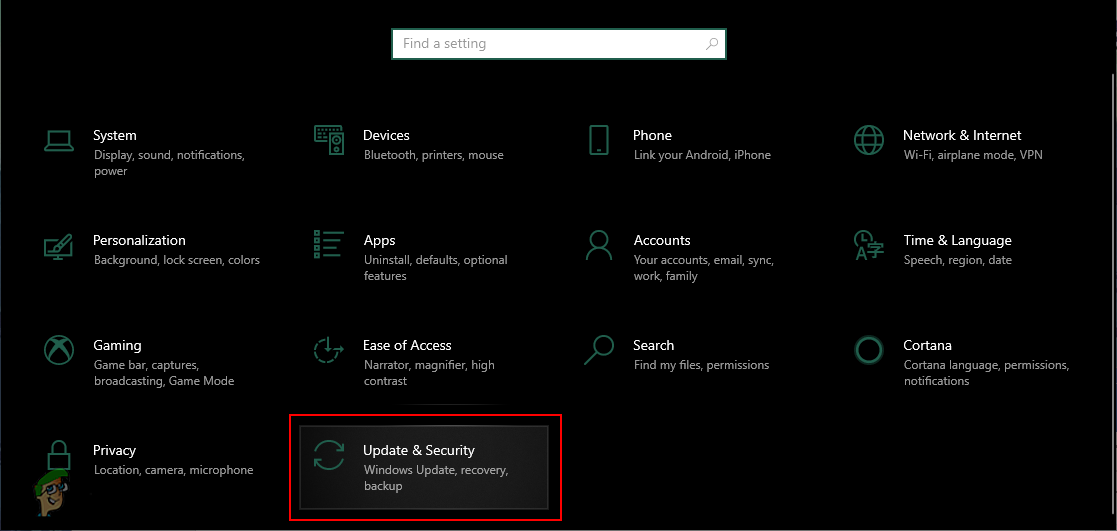
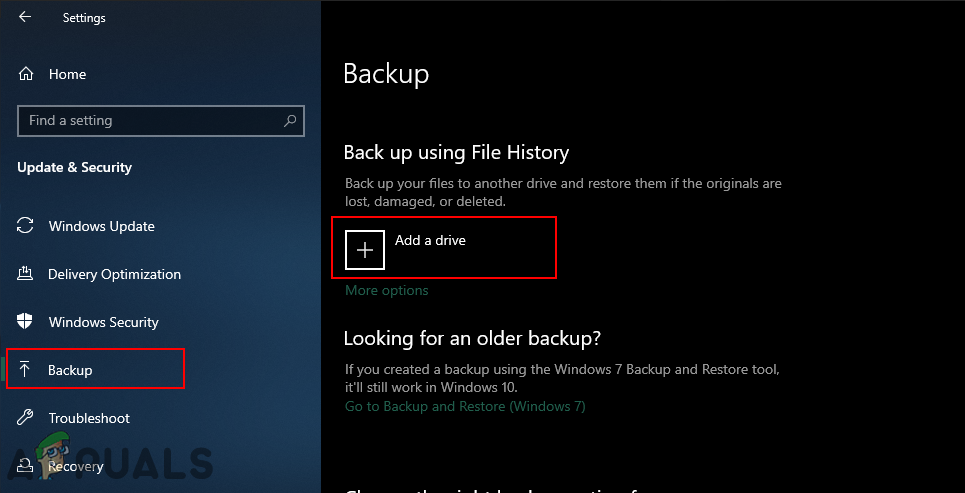
Opening Update & Security settings - In the left pane, select the Backup option and click on the Add a drive button to add a drive for backup.
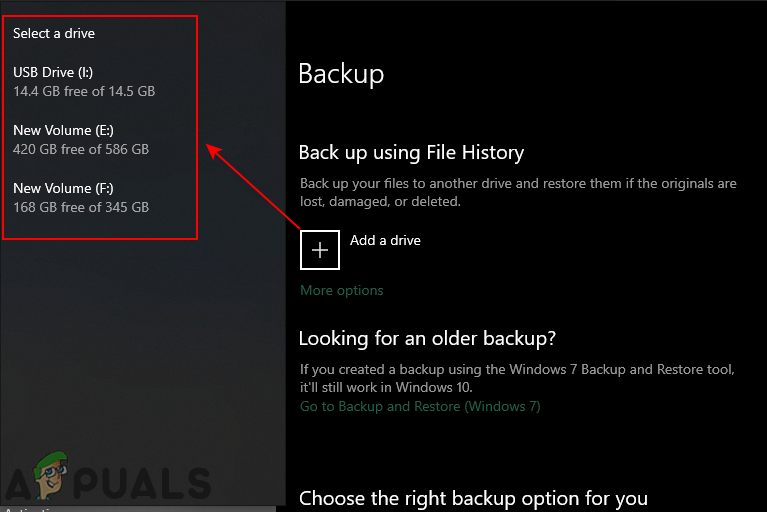
Adding a drive for back up - It will show both internal and external drives that can be used for File History backup. Choose the one you want.
Choosing a drive between available options - After choosing the drive, it will show the toggle button for automatic backup. You can turn it off if you want to backup it manually. You can also click on more settings under it.
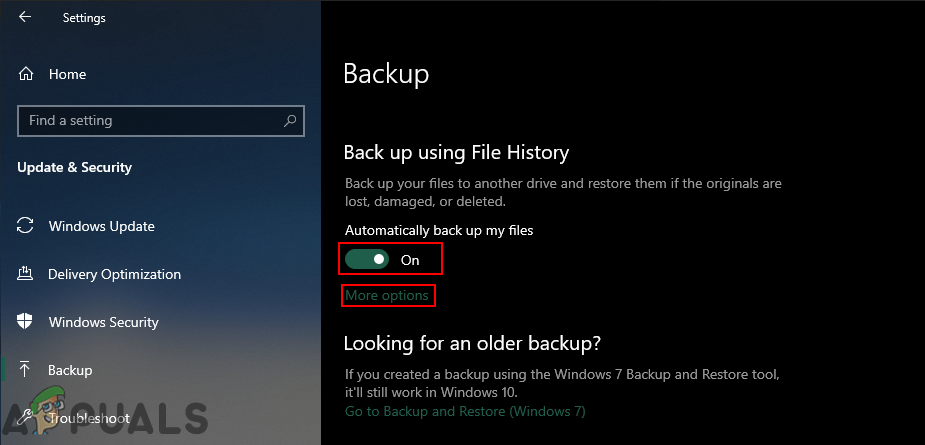
Opening more settings for File History - This will open more options for your backup settings. You can click the Back up now button to start the backup right now without scheduling. You can also schedule backup with different timing and set the keeping backup time.
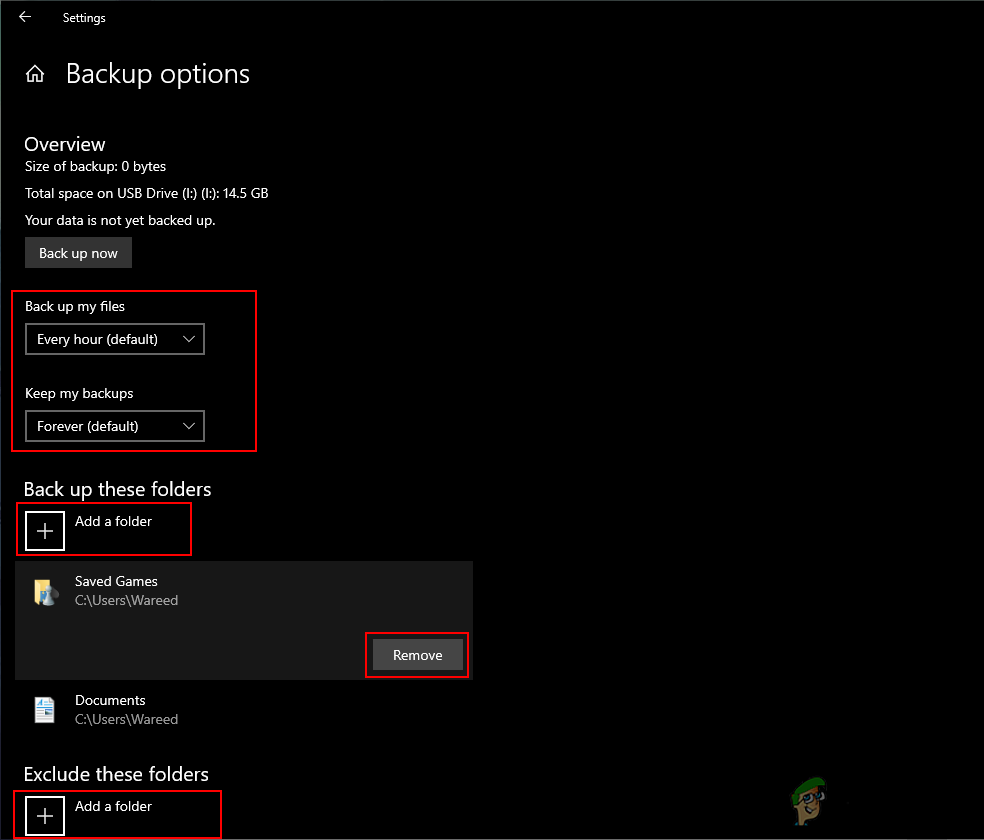
Modifying different settings - Down below you can click on Add a folder under Back up these folders to include folders in File History backup. By default, it will add user folders to the list. You can exclude folders by clicking the Add a folder under the Exclude these folders option. You can also simply click on the folder and then choose the remove option.
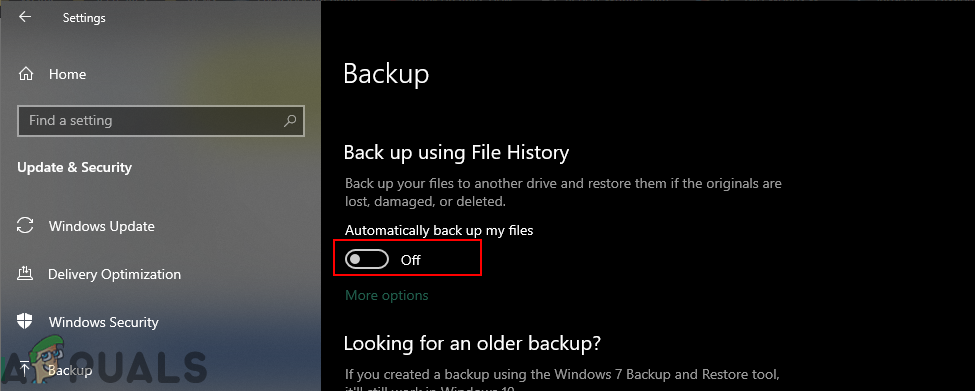
- To disable the File History in Windows Settings, simply go to back up options and click on the Automatically back up my files toggle to turn it off. This will only stop the automatic backup.
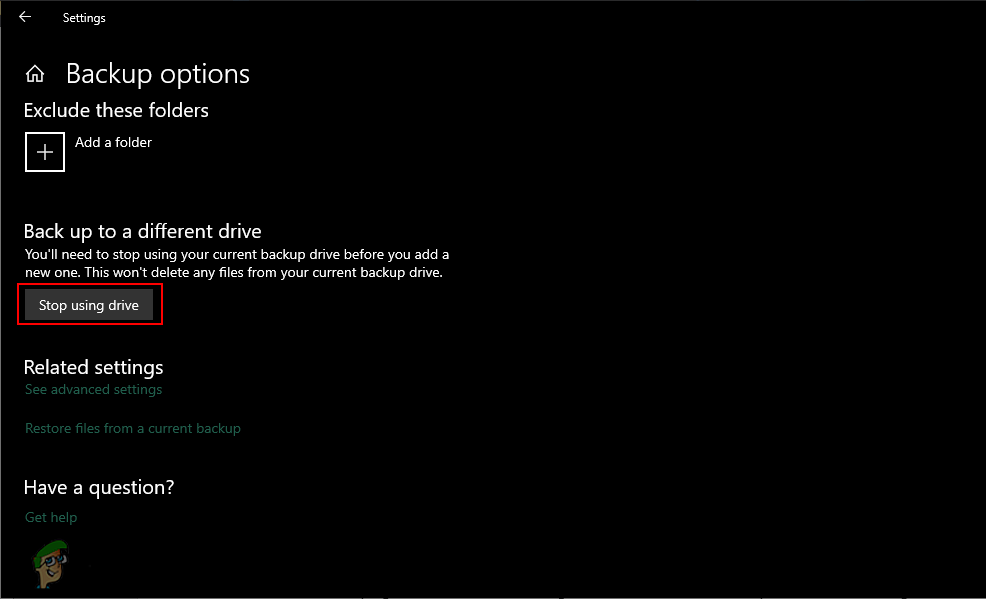
Disabling File History automatic update - To completely stop File History, go to more options under the toggle. Scroll down to the bottom and click on the Stop Using Drive button. This will remove the backup drive and disable Full History back up.
Removing drive and disabling File History
Method 2: Enabling or Disabling through the Control Panel
Control Panel is an old way to customize the settings for computers. Even though now it’s less used, but you can still find most of the settings in it. It also provides some of the additional details for File History. You can turn on and turn off File History anytime through the control panel. Follow the below steps to enable or disable File History:
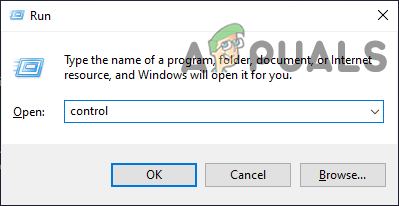
- Press the Windows + R keys together to open the Run dialog. Type “control” and press the Enter key to open Control Panel. You can also search the Control Panel through the Windows search feature.
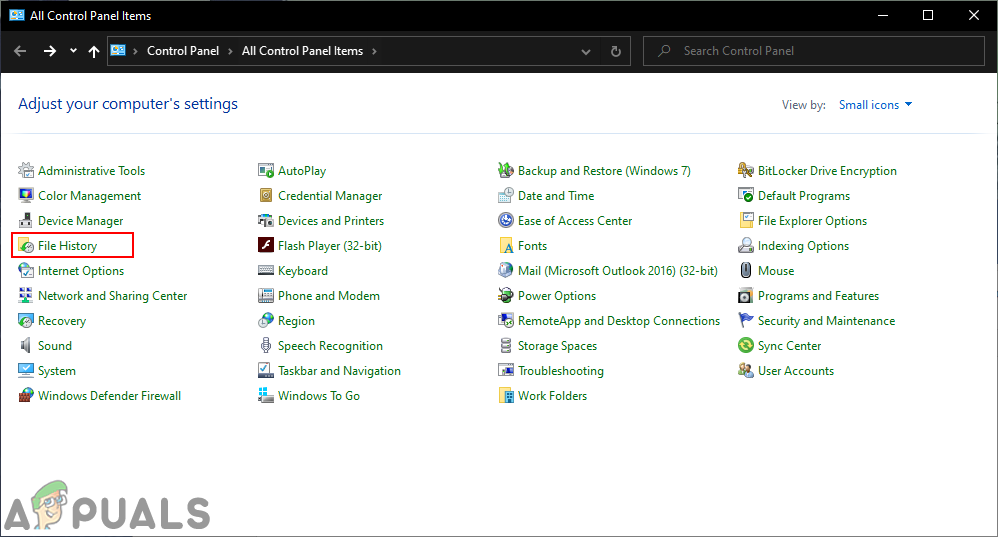
Opening control panel - Change the View by option to get all the Control Panel Settings.

Changing the view by option for control panel - Now click on the File History setting.
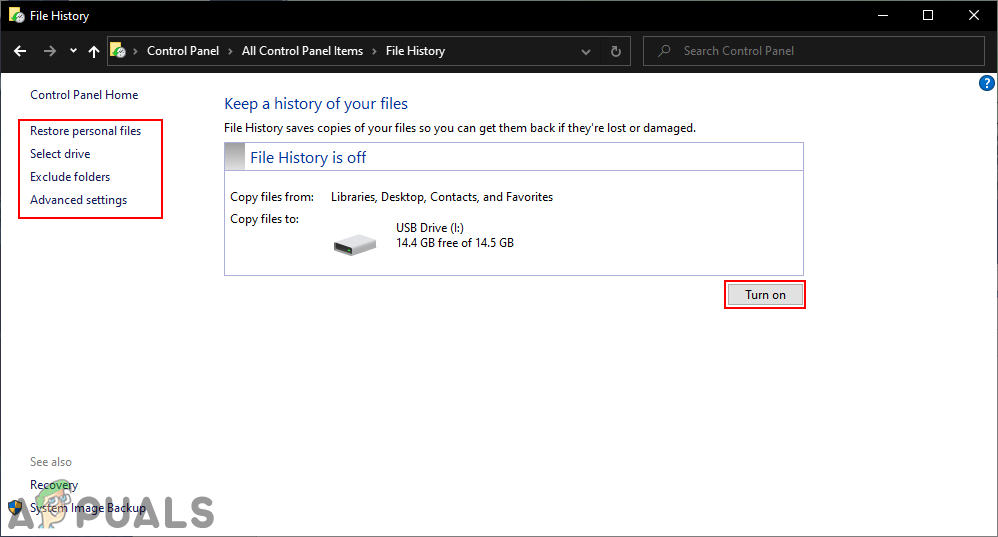
Opening File History in the control panel - Click on the Turn On button to enable the File History back up.
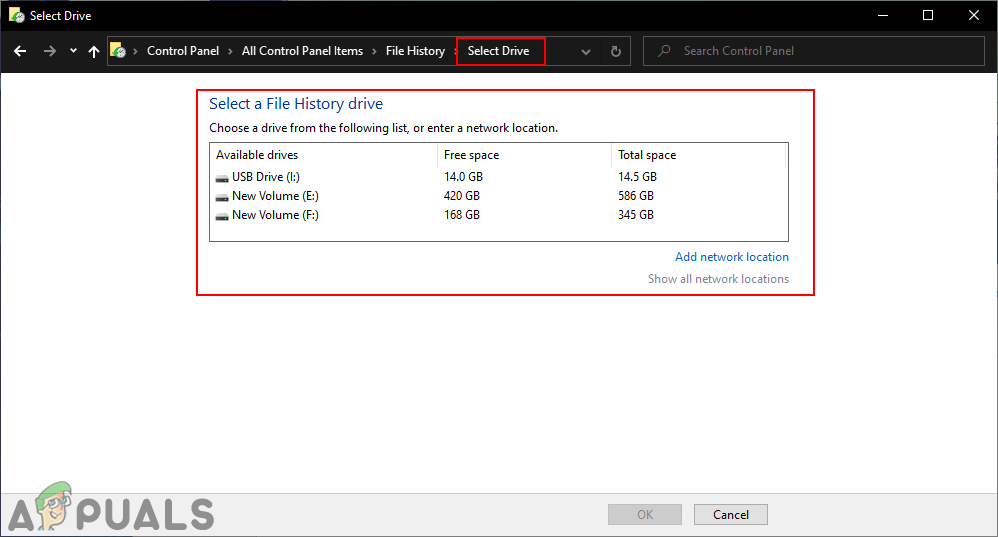
Enabling File History - Once the File History backup is enabled, now you can get access to the left side additional settings for File History. You can click the select drive and choose the drive that you want to set for backup.
Selecting drive for File History back up - Also, in the Advanced settings, you can set the backup schedule timing and keeping the time of files for File History.

Setting time for automatic back up - To disable File History through Control Panel just go to the same File History setting and click on the Turn Off button.

Disabling File History - That is how you can enable and disable File History back up through the control panel.
Method 3: Enabling or Disabling through the Local Group Policy Editor
The Local Group Policy Editor is a Windows feature that lets you manage and configure the Windows operating system. By using the Group Policy Editor user can allow or prevent any of the settings for Windows. Administrators can disable the File History access completely from Group Policy Editor. This will also disable the settings in Windows Settings or control panel.
Note: If you are using Windows Home Edition, then kindly skip this step and use the Registry Editor method.
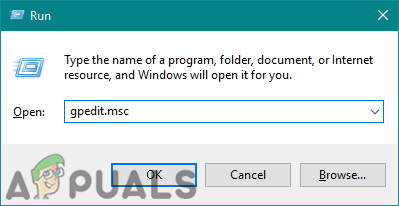
- Press the Windows and R keys together to open a Run dialog. Then type “gpedit.msc” in the box and click on the Ok button. This will open the Local Group Policy Editor.
Opening Local Group Policy Editor - In the Group Policy Editor, navigate to the following policy:
Computer Configuration\ Administrative Templates\ Windows Components\ File History

Navigating to the policy - Double-click on the setting named “Turn off File History“. It will open a new window, now change the toggle from Not Configured to Enabled. Then to save the changes, click on Apply/Ok button. This will disable the access to File History feature completely.
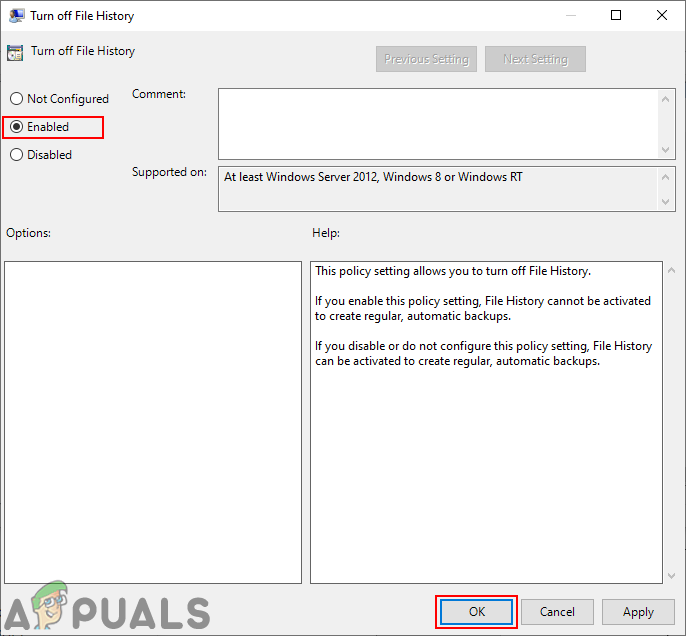
Disabling File History - To Enable it back, just change the Toggle option back to Not Configured or Disabled.
Method 4: Enabling or Disabling through the Registry Editor
The registry Editor method is an alternative to the Local Group Policy Editor method. If you used the Group Policy Editor then the Registry Editor will automatically update the values for that specific setting. However, if you are directly using the Registry Editor, then you will need to create the missing key/value for that specific setting. This will also disable the settings for File History in Windows Settings and control panel both. Follow the below steps to try it out:
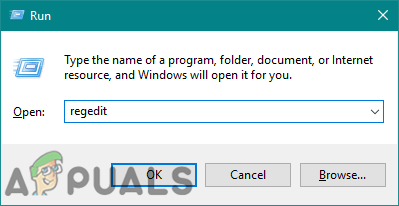
- Press the Windows key and R key together to open a Run dialog. In the text box, type “regedit” and press the Enter key to open Registry Editor. Choose the Yes option for UAC (User Account Control) prompt.
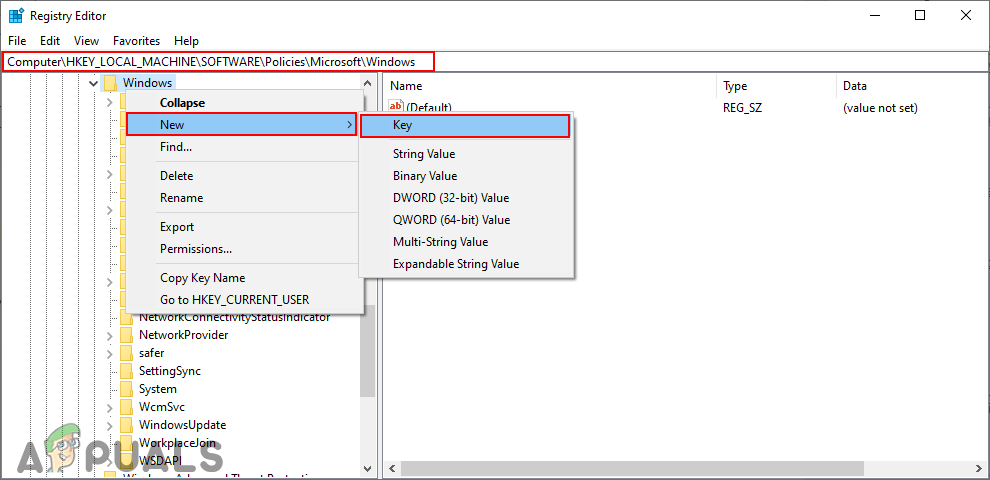
Opening the Registry Editor - Navigate to the following key in the Registry Editor window:
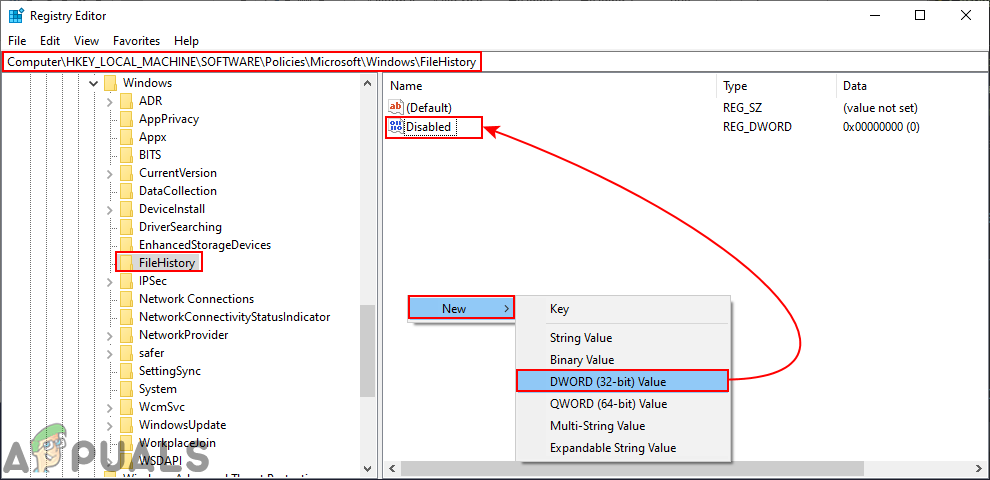
HKEY_LOCAL_MACHINE\Software\Policies\Microsoft\Windows\FileHistory
- By default, the File History key will be missing. You can create it by right-clicking on the Windows key and choosing the New > Key option. Name the new key as “FileHistory“.
Creating missing key - In the FileHistory key, create a new value by right-clicking on the right pane and choosing New > DWORD (32-bit) Value. Then name the value as “Disabled“.
Creating a new value - Finally, double-click on the Disabled value and set the value data to “1“. This will disable the access to File History completely on your system.
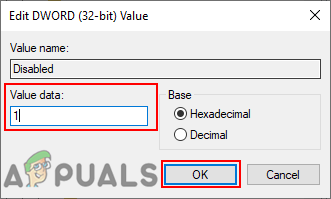
Disabling File History - To enable access to File History back, you can simply delete this new value or set the value data to “0“.


