How to Enable or Disable Delete Confirmation Dialog on Windows 10?
The Windows operating system has changed a lot with each update and many features have been adjusted. When it comes to the Recycle Bin, it is still more or less the same as it was in the older versions of Windows. The previous versions of Windows used to display a confirmation dialog box whenever users try to delete files. This feature has been disabled as default since Windows 8. Since the deleted files are directly moved to Recycle Bin, the use of the confirmation dialog box was less. However, this can still be enabled back on the system to see what file is being deleted. Some users may want to check the file name and details before deleting it.
There are several different methods through which you can enable or disable the delete confirmation dialog. The delete confirmation dialog that we will be talking about in this article is for the normal delete, without holding the shift key (permanent delete). The Local Group Policy Editor and Registry Editor method will also stop the users from changing the settings from Recycle Bin properties. We have also included the disabling steps at the end of each method.
Enabling Delete Confirmation Dialog through Recycle Bin
The option for enabling and disabling the delete confirmation dialog is available in the properties window of Recycle Bin. This is the default way to enable or disable the option. Since the Recycle Bin can be found on the desktop, it requires just a few clicks to enable it.
If the option is greyed out, then you can use other methods to access the delete confirmation dialog settings.
- Right-click on the Recycle Bin shortcut on the desktop and choose the Properties option in the list.
Note: If you don’t have the shortcut on the desktop, then you can enable it by going to Start > Settings > Personalization > Themes > Desktop icon settings.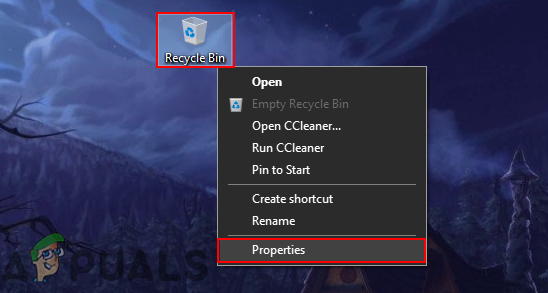
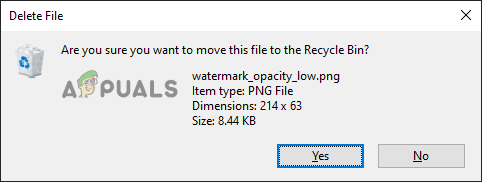
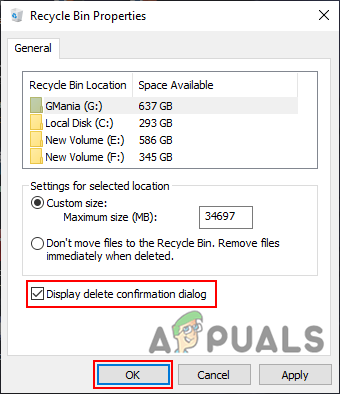
Opening properties of Recycle Bin - In the Properties, check the box for “Display delete confirmation dialog” and click on Apply/Ok button to save changes.
Enabling the confirmation dialog - Now, whenever you delete any files on your system, it will automatically display the delete confirmation dialog for it. Then you can choose yes or no for it.
- To disable it back, simply uncheck the “Display delete confirmation dialog” option in the Recycle Bin properties.
Enabling Delete Confirmation Dialog through the Local Group Policy Editor
The Local Group Policy Editor is a Windows feature that is used to configure and modify different settings for the operating system. The policy setting to enable or disable the delete confirmation dialog can be found under the User category in the Group Policy Editor.
Skip this method if you are using the Window Home Edition and try the Registry Editor method.
However, if you have the Local Group Policy Editor on your system, then follow the below steps.
- Press the Windows + R keys on your keyboard to open the Run dialog box. Then type “gpedit.msc” in it and press the Enter key. It will open the Local Group Policy Editor window.
Note: Click on the Yes button for UAC (User Account Control) prompt.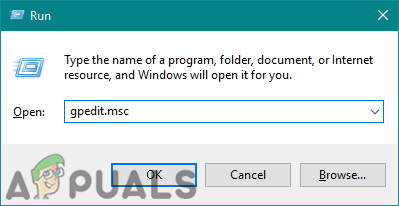
Opening Local Group Policy Editor - In the User Configuration category, navigate to the following setting:
User Configuration\Administrative Templates\Windows Components\File Explorer
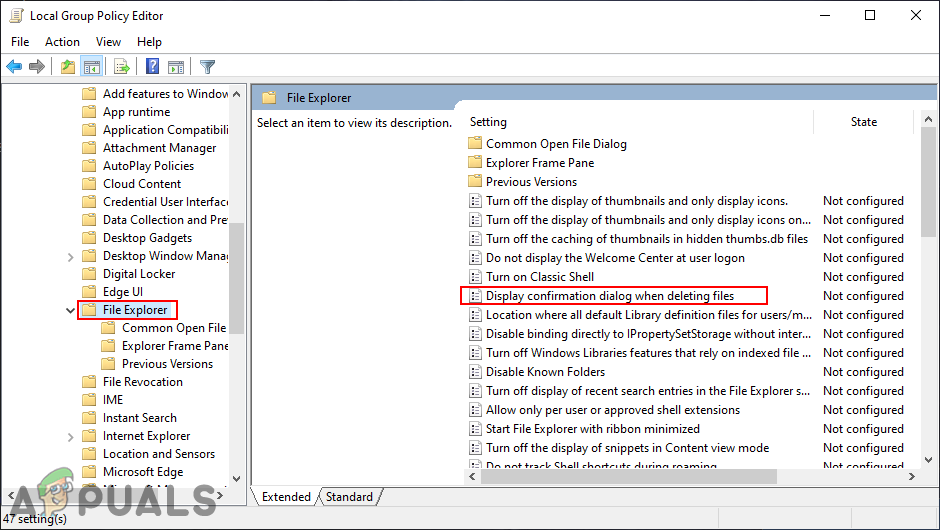
Navigating to the setting - Double-click on the policy named “Display confirmation dialog when deleting files” and it will open in another window. Now change the toggle from the Not Configured to Enabled.
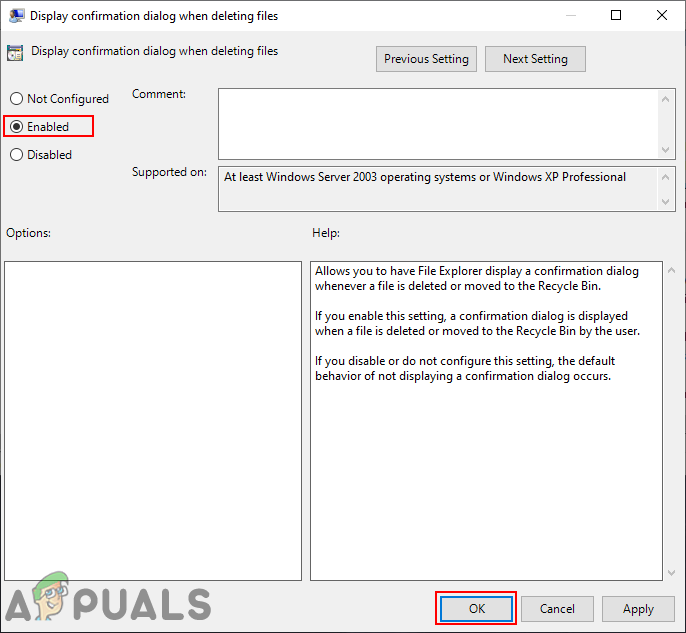
Enabling the setting - Click on the Apply/Ok button to save the changes. After that, the user will get a confirmation dialog whenever they try to delete a file or folder.
- To disable it back, simply change the toggle back to Not Configured or Disabled.
Enabling Delete Confirmation Dialog through the Registry Editor
Another way to configure this setting is by going through the Registry Editor. It stores all the configurations for the Windows operating system, installed applications, and hardware devices. However, it will only have the default keys and values for default settings. To add additional settings, users need to create the missing key and value for that specific setting as shown below:
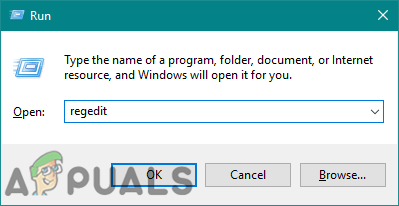
- Press the Windows + R keys together on your keyboard to open a Run dialog. Now type “regedit” in it and press the Enter key to open the Registry Editor. Choose the Yes option for UAC (User Account Control) to get administrator privileges.
Opening the Registry Editor - In the Registry Editor window, navigate to the following key in the Current User:
HKEY_CURRENT_USER\Software\Microsoft\Windows\CurrentVersion\Policies\Explorer
- Right-click on the right pane and choose New > DWORD (32-bit) Value. Name this value as “ConfirmFileDelete“.
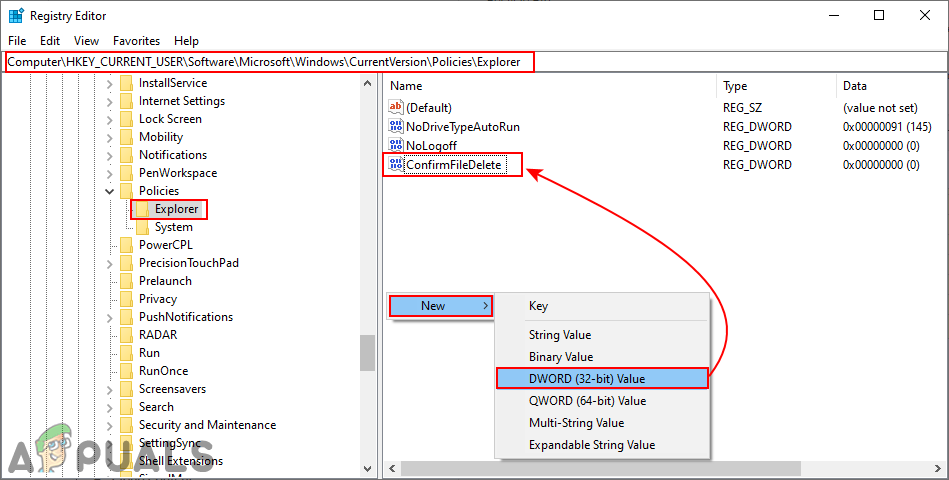
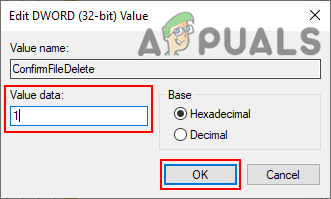
Navigating to the key and creating a new value - Double-click on the ConfirmFileDelete value and change the value data to 1 to enable value.
Enabling the value - Finally, make sure to restart the computer after making all the changes.
- To disable it back, simply change the value data back to 0 or delete the value from the Registry Editor.


Under Policies it only shows System for me… why…