How to Enable or Disable Autofill in Microsoft Edge?
Autofill is a feature in web browsers that automatically fills the form fields with previously entered information. The information can be addresses, passwords, and credit card data. The autofill entries will depend on the form field’s name. It is a great feature for time-saving but your information will be at risk. By disabling the autofill feature, you will have to manually fill the fields which will be time-consuming, but it will keep you safe from risk. In this article, we will show you methods through which you can easily disable the autofill in Microsoft Edge.
Disabling Autofill for Legacy Microsoft Edge
The Microsoft Edge legacy browser comes as a default browser with the Windows 10 operating system. Some companies or school still uses the legacy version rather than downloading the latest one. The policy settings that come with Windows will work on this browser without updating them. Most of the settings for this browser are already available in the system.
Method 1: Using Microsoft Edge’s Settings
The autofill setting can be configured in Microsoft Edge’s settings. This is the basic method through which you can enable and disable the autofill anytime you want. The settings can be easily accessed and changed according to your needs. However, if the option is grayed out or you want to disable the setting for other users then check the other methods.
- Open your Microsoft Edge browser by double-clicking on the shortcut or searching it through the Windows search feature.

Opening the Microsoft Edge - Click on the three dots (Settings and more button) at the top right corner and select the Settings option in the list.

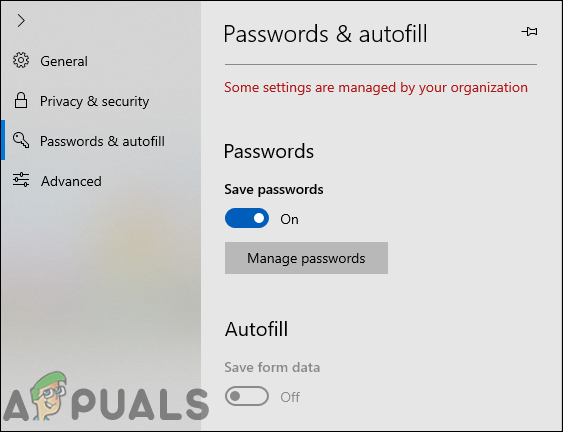
Opening the Settings - Select the Passwords & autofill option from the left pane and then toggle OFF the option for autofill. This will disable the autofill on your Microsoft Edge browser.

Disabling the autofill - You can always enable it back, by turning ON the toggle option by following the same steps.
Method 2: Using the Local Group Policy Editor
The Group Policy Editor is used to control the working environment of the operating system. It has a setting that can enable or disable the autofill for the Microsoft Edge. This setting can be found in both the Computer Configuration and User Configuration categories. It’s up to the user which one of the settings they want to set for their system. Both of the settings will have the same path but different categories. This will also gray-out the option in Microsoft Edge’s setting and standard users will be unable to change it.
Note: The Group Policy Editor isn’t available in the Windows Home edition. Skip this method if you are using the Windows Home operating system.
- Open a Run dialog box by pressing the Windows and R keys on your keyboard. Then, type “gpedit.msc” in the box and press the Enter key to open the Group Policy Editor.

Opening the Local Group Policy Editor - In the Local Group Policy Editor, navigate to this specific setting:
User Configuration\ Administrative Templates\ Windows Components\ Microsoft Edge\

Navigating to the setting - Open the setting named “Configure Autofill” by double-clicking on it. Now change the toggle option to Disabled for disabling the autofill in the Microsoft Edge.

Enabling the setting - You can also choose the Enabled option, which will enable the autofill and employees can use it to automatically fill in forms. The Not Configured option will let the employees choose whether to use autofill or not.
- Once you are done choosing one of the following options, click on the Ok or Apply button to save the changes.
Method 3: Using the Registry Editor
Another method for disabling the autofill for Microsoft Edge is by using the Registry Editor. The Registry is a database that stores low-level settings for your operating system. This is also the alternative method for Windows Home users. By using this method, users can enable or disable the autofill feature in Microsoft Edge. This can also gray out the option for the standard users in the settings of Microsoft Edge. The setting can be configured in both the Current Machine and Current User hive. The path will be the same, but the hives will be different.
- Hold the Windows key and press R to open a Run dialog box, then type “regedit” in it and press the Enter key to open the Registry Editor. If prompted by UAC, then choose the Yes option.

Opening the Registry Editor - In the Registry Editor, navigate to the Main key:
HKEY_CURRENT_USER\Software\Policies\Microsoft\MicrosoftEdge\Main
- In the Main key, right-click on the right pane and choose the New > String Value option. This will create a new string value and then name it as “Use FormSuggest“.

Creating a new value - Open the value by double-clicking on it and then add the value data as “no“.
Note: No is for disabling the value and yes is for enabling the value.
Changing the value data - Once all the configurations are made, make sure you restart your system to apply the changes.
- If you want to reset the settings to default, then you can simply remove the value from the Registry Editor.
Disabling Autofill for the New Microsoft Edge
The chromium-based Microsoft Edge will have different settings than the Legacy Microsoft Edge. Every method will have different settings and modifications. Some of the settings may not be available for the latest Microsoft Edge and you have to download them through the Microsoft site. All the below methods will have the same result for disabling the AutoFill feature.
Method 1: Using Microsoft Edge’s Settings
The interface of the settings is changed with every new update of the Microsoft Edge. The autofill for the new Microsoft Edge can be disabled differently than the legacy version. Depending on the requirement, you can turn off the Autofill feature for different options.
- Open your Microsoft Edge browser by double-clicking on the shortcut or searching it through the Windows search feature.

Opening the Microsoft Edge - Click on the three dots (Settings and more button) at the top right corner and select the Settings option in the list.

Opening Settings in Edge - Select the Profiles option in the left pane and then click on the Payment info or Addresses and more. These two options will have a toggle for autofill that you can disable or enable.
Note: You can also check the toggle option for the Passwords.
Opening settings for AutoFill - Turn OFF the toggle option for “Save and fill payment info” to disable the autofill for payment info.

Disabling the AutoFill - Another place for disabling autofill is through flags because the Advance Settings concept is replaced by flags. Type “Edge://flags” in the address bar and press the Enter key.

Opening flags in Edge - Search for Show Autofill prediction and Substring matching for Autofill suggestions flags. Change their setting from Default to Disabled and restart your Edge browser.

Disabling autofill flags
Method 2: Using the Registry Editor
The same settings can be configured through the Registry Editor. Users have to create different values for each setting. For the new Microsoft Edge, the Registry method is quicker than the Group Policy method. Sometimes the key where you have to create values will be missing and you have to create it manually as shown in the below steps:
- Open the Run dialog by pressing the Windows and R keys on your keyboard. Then type “regedit” in it and press the Enter key to open the Registry Editor. Choose the Yes option for the UAC (User Account Control) prompt.

Opening the Registry Editor - Navigate to the following path in the Registry Editor:
HKEY_LOCAL_MACHINE\SOFTWARE\Policies\Microsoft\Edge
- If the Edge key is missing, right-click on the Microsoft key and choose the New > Key option. Rename this key as “Edge“.

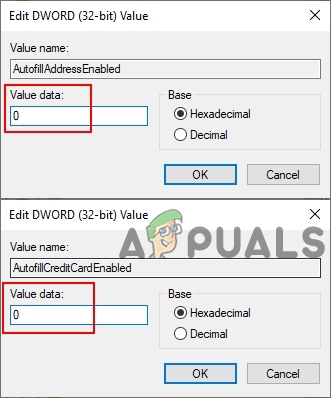
Creating a new key - You can create two different values by right-clicking on the right pane and choosing the New > DWORD (32-bit) Value option. The names of the values will be “AutofillAddressEnabled” and “AutofillCreditCardEnabled“.

Creating new values - You can open each of the values and change their value data to 0.
Changing the value data - Finally, make sure you restart the system to apply these changes. This will disable the autofill for the addresses and credit cards.
- You can always enable it back by removing these two values from the Registry Editor.
Method 3: Using the Local Group Policy Editor
Navigate to the “User Configuration\Administrative Templates\Windows Components\Microsoft Edge” or “Computer Configuration\Administrative Templates\Windows Components\Microsoft Edge” in the Group Policy Editor and check if the settings in this method are available in the list. If they are available, then move to step 8 directly. If they aren’t available, then start from step 1.
- Go to the Microsoft site, choose the version details, and click on the GET POLICY Files to download.

Downloading new policy files - Extract the downloaded files by using the WinRAR.

Extracting files - Navigate to “MicrosoftEdgePolicyTemplates\windows\admx” path in the download folder.
- Copy the “msedge.admx” and “msedge.adml” files and paste them into the “C:\Windows\PolicyDefinitions“.

Copying files Note: You can choose the language file according to your language.
- If the new policy settings don’t appear in the Group Policy Editor, make sure you restart your system.
- Now open the Run dialog box by pressing Windows + R key together. Type “gpedit.msc” and press the Enter key to open the Group Policy Editor.

Opening the Group Policy Editor - Navigate to the following path in the Group Policy Editor:
Computer Configuration\ Administrative Templates\ Microsoft Edge

Navigating to the settings - You can modify two settings named “Enable AutoFill for addresses” and “Enable AutoFill for credit cards” by double-clicking on them. Change the toggle option to Disabled for both.

Disabling settings - Click on the Ok/Apply button to save the changes. This will disable the AutoFill in the new Microsoft Edge.
- You can always enable it back by changing the toggle option to Not Configured or Enabled in step 7.