How to Fix Dying Light 2 Crashing on Windows?
The Dying Light 2 crashing issue has been troubling a lot of users since the game has launched. This issue was reported recently by a significant amount of players who found themselves getting crashes while playing the game. Although there is no direct link to the cause, some solutions may help fix this issue.
Even though there can be many reasons, we have listed some main of them below:-
- Corrupted or unverified Graphics Driver- If you have installed a graphics driver from a third-party source, you may encounter crashing problems while playing the games. Either try updating or reinstalling the graphics driver. Further, if you have not updated the drivers in a long time, updating the graphics driver via the respective vendor is recommended.
- Turned On Real-Time Protection- Sometimes, the interception from a third-party antivirus or Windows defender prevents the game from loading. Therefore, try to disable antivirus or Real-time Protection.
- Conflict Of Services- There would be many applications and services on your computer, which load at the startup. As it turns out, that irrelevant services and applications can conflict with the game, which can cause a game to crash at startup.
- Corrupted Game Files- In most cases, crash issues can be resolved by verifying the integrity of game files. It is an option provided by steam to their users to restore corruption in game files.
- Overclocking GPU- As it turns out, if you have overclocked the graphics card, you may face specific issues while playing games. In this case, we advise you to revert the overclock settings to default.
- Outdated Windows- If you have not updated the Windows in a long time, we recommend you to update the Windows as new updates improve Windows security, which may prevent game crashes.
1. Delete runtime_dx11.dll
Runtime_dx11.dll is a DirectX file, located in the game files. According to several affected users, deleting the runtime_dx11.dll fixes the crashing issue.
- To delete the runtime_dx11.dll, open File Explorer and navigate to the following path
C:\SteamLibrary\steamapps\common\Dying Light 2\ph\work\bin\x64
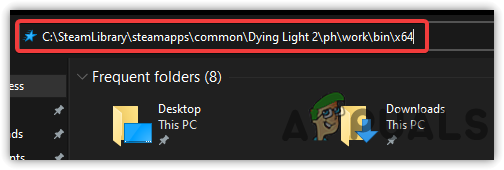
Navigating to Dying Light 2 Location - Right-click on runtime_dx11.dll and click delete
- Once done, launch the game and check if it fixes the crashing issue.
2. Perform a Clean Boot
The conflict of third-party applications or Microsoft services can be the sole reason for the crashing issues. If an application interferes with the game by preventing it from launching or loading, then performing a clean boot will help. A clean boat is a troubleshooting technique used to diagnose the culprit of the problem by disabling the third-party applications which load at the startup. Moreover, it boots Windows with a minimum of drivers and services, which saves memory usage and also helps other applications and games to run smoothly.
- To perform a clean boot, click Start Menu and type MSConfig
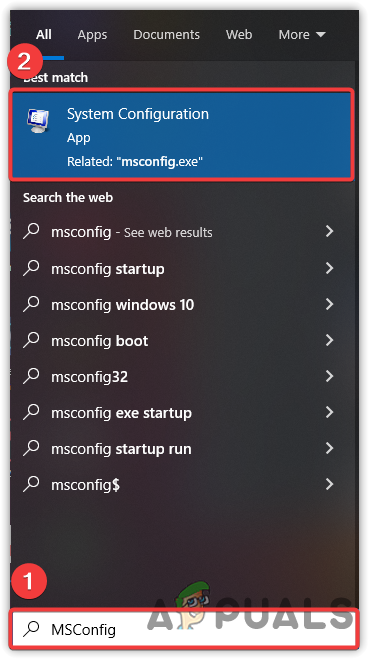
Open System Configuration - Open System Configuration and wait for the Window to launch
- Click on Selective Startup then click the Services tab from the top
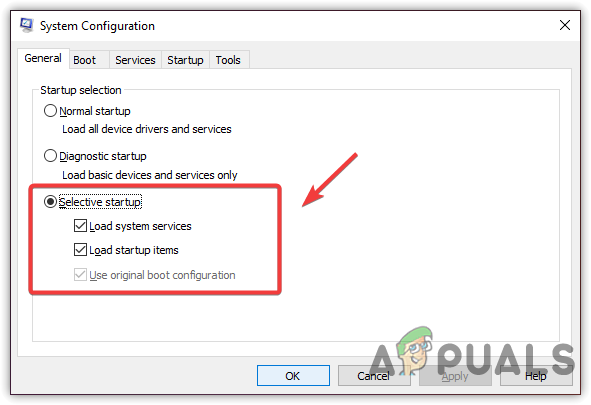
Click Selective Startup - Tick Hide All Services then click Disable All
- Click Apply then click OK

Performing a Clean Boot to Windows - Once done, restart your computer then launch Dying Light 2 and see if the error persists.
3. Run Dying Light 2 With Administrator Privileges
Another easy and effective method that can fix crashing issues is to run with administrator privileges. Apparently, some services and components can prevent the game from launching. Therefore, running the Dying Light 2 with administrator privileges will help eliminate the interference from services and firewalls.
- To run Dying Light 2 as an administrator, right-click on the Dying Light 2
- Select Run As Administrator, and click Yes when asked for administrator permissions

Run Dying Light 2 in Administrator Mode - Wait for the game to launch and check if Dying Light 2 still crashing.
4. Add Launch Parameters
If the issue is not resolved, try adding launch commands to the game. Launch commands allow the game to launch accordingly to the specific command given by the user. For Example, If you use dirextX12 and you want the game to launch with directX11, you can easily do it by entering the command to the launch option. The main motive behind adding the launch commands is to change the internal settings of the game without even launching.
- To add launch parameters, launch Steam and navigate to the Library
- Right-click on Dying Light 2 and select Properties
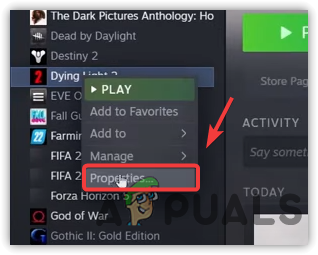
Navigate to Game Properties - You will see Launch Options, type /nolightfx then launch the game and see if it works. In case, it does not fix the problem, try -dx11 and -dx12 in launch options

Adding Launch Command to Dying Light 2
5. Reinstall Graphics Driver
Another reason which cannot be ignored is corrupted and unverified drivers. The unverified driver can be downloaded from third-party sources and cannot be verified by the game application. As a result, the game won’t launch if you use the third-party driver for your graphics card, as most games require a verified signature to ensure that the driver cannot be used by suspicious programs to enable the cheats. The cheaters can use the third-party driver to cheat in the game through memory. Therefore, most games and application does not allow unsigned drivers to be installed on the computer.
5.1 Uninstall Graphics Driver
First, you need to uninstall the graphics driver. For that, we have a great application called Display Driver Uninstaller, also known as DDU. It is an application used to remove drivers entirely from the computer. We use DDU over the device manager to avoid crashing issues, as sometimes the device manager does not remove drivers entirely. Therefore, you need to uninstall the driver using DDU by following the steps below:-
- Download Display Driver Uninstaller, and wait for the downloading to complete
- Once it’s done, now you need to boot the Windows to the safe mode for complete installation
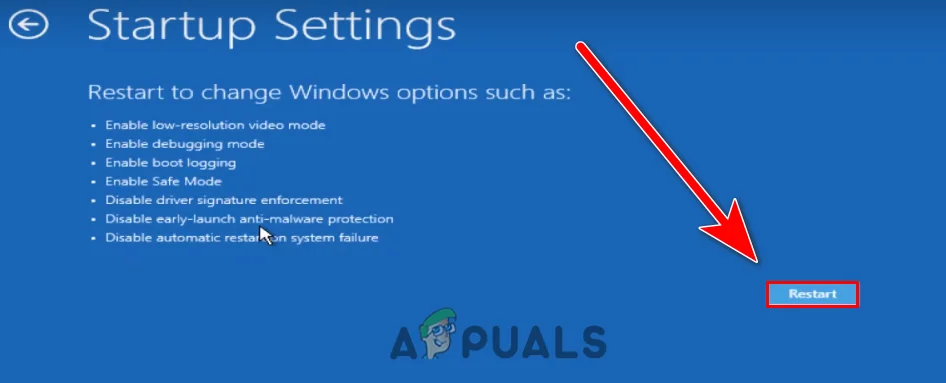
- Click Start Menu > Power Button, hold the shift key, and click Restart
- You will be navigated to the Startup options, click Troubleshoot>Advanced option>Startup Settings
- Then click Restart. Your computer will boot into Safe Mode after the restart
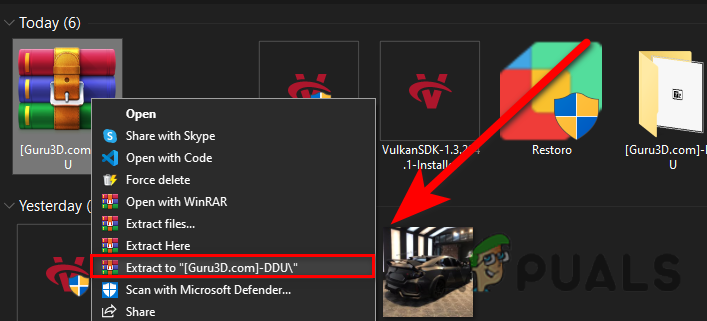
Restart to Boot into Safe Mode - Go to the directory where you have installed DDU, right-click on the ZIP folder and click Extract to DDU
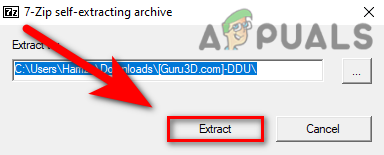
Click Extract to DDU - Once the extraction is finished, navigate to the folder and open Display Driver Uninstaller
- Click Extract and navigate to the extracted folder
Extracting DDU Application - Run Display Driver uninstaller and choose Device Type from the right
- Select GPU vendor and click Clean & Restart
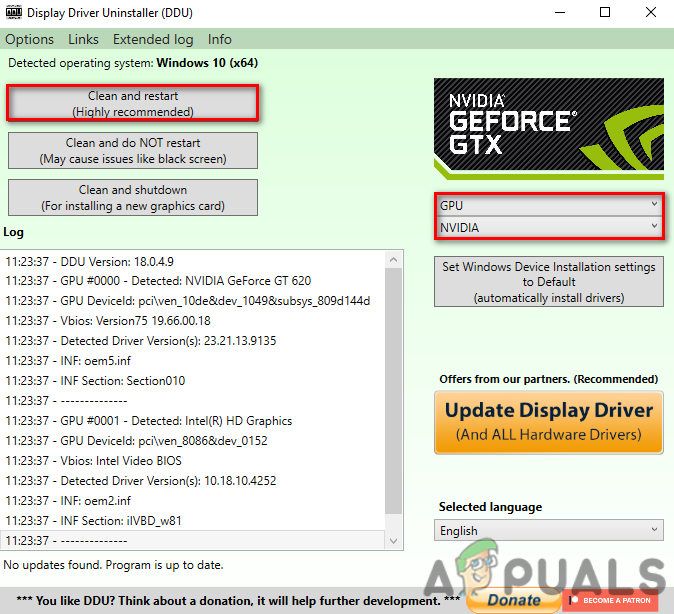
Choose Device Type For the Uninstallation Process
5.2 Install Graphics Driver
Now, you need to install the latest graphics driver from the official website.
- To install the driver, go to the official website of your graphics card manufacturer’s
- Navigate to the driver section, choose your graphics card
- Select operating system if Asked
- Click Search or Download the latest driver
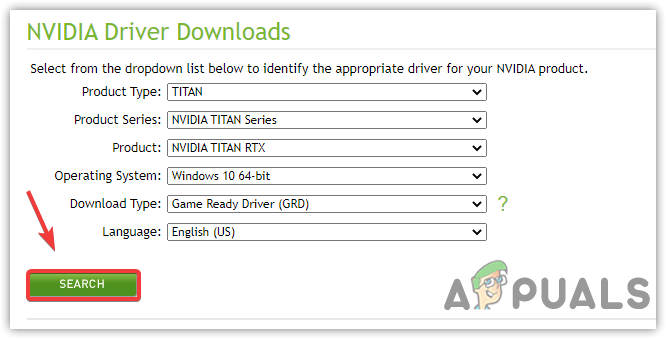
Searching For Latest Driver - Once done, open the installer and follow the on-screen instruction
- Once done, launch the game and check if the issue still persists.
6. Update Your Windows
You may notice that Microsoft releases cumulative updates every month or week to eliminate bugs and improve Windows security for their users to feel safe. There are plenty of reasons why you should update your Windows. Updating Windows will keep your hardware drivers up to date and also improve security components as new games require the latest security features for their games to run smoothly. If you haven’t updated your Windows in a long time, your Windows might not be compatible with the latest version of the game, which can cause frequent game crashes. In case, you are unable to update Windows, follow the link to apply the steps mentioned in the article.
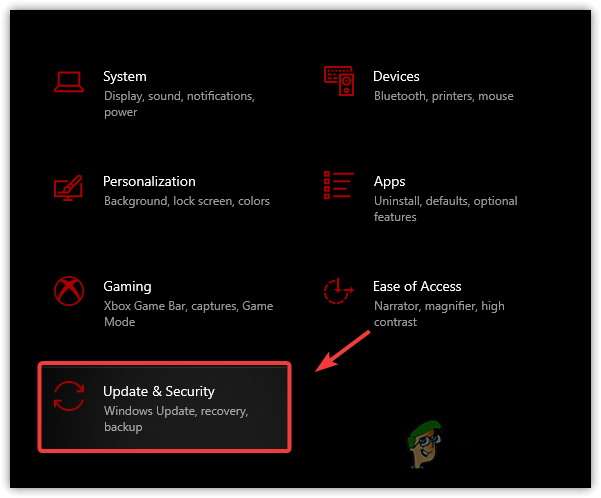
- To update Windows, open Settings by pressing the Win + I at the same time
- Navigate to Update & Security
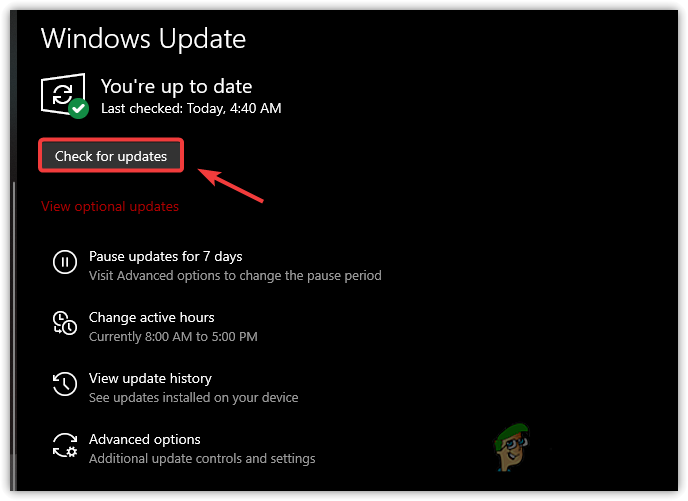
G to Windows Update Security - Click Check For Updates then if the new updates are found, download and install them on your computer
Updating Windows Update
7. Disable Windows Defender
Another reason behind game crashes is interference from the Windows defender, which can block the essential game files that are used to launch the game. The same thing will apply to the third-party antivirus software as both inbuilt Windows Defender and third-party software have access to block the files. Apparently, Windows defender eliminates the files that consume high memory usage or when malicious data is found in the files. Besides, it can even interfere with the game files for other reasons. Therefore, we recommend disabling windows defender as it can aid in fixing crashing issues. If that does not work, try disabling Windows Firewall.
- To disable Windows Defender, go to Settings by hitting Win + I on the keyword
- Go to Update & Security and click Windows Security from the left pane
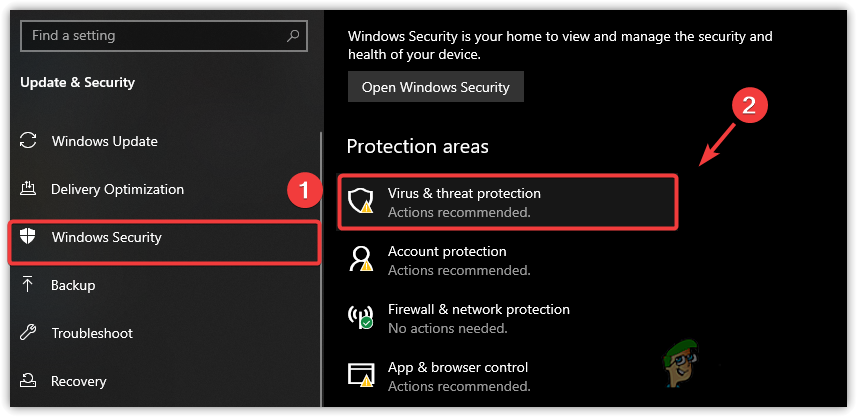
Go to Virus & Threat Protection - Click Virus & Threat Protection under Protection Areas
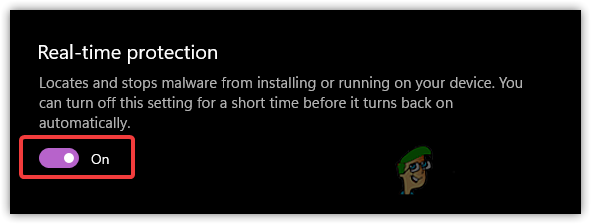
- Click Manage Settings and turned off Rela-Time Protection
Turn Off Real-Time Protection - Once done, launch the game and check if the issue persists.
8. Allow Game.exe through Firewall
If disabling Windows Defender does not fix the crashing issue, you may need to allow the game through the firewall. Allowing the game through a firewall helps unblock the game ports that need to be contacted with the server. Sometimes, the Windows firewall blocks the game ports whenever the game launches. Therefore, to fix this, you will have to unblock the ports by allowing the game.exe file in the Windows firewall.
- To allow the Dying Light 2.exe, click Start Menu and type Control Panel
- Launch the control panel and navigate to the following location
Control Panel\System and Security\Windows Defender Firewall
- Click Allow An App or Feature Through Windows Defender Firewall
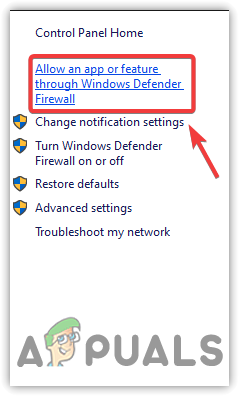
Navigate to Firewall Settings - Click Change Settings then click Allow Another App
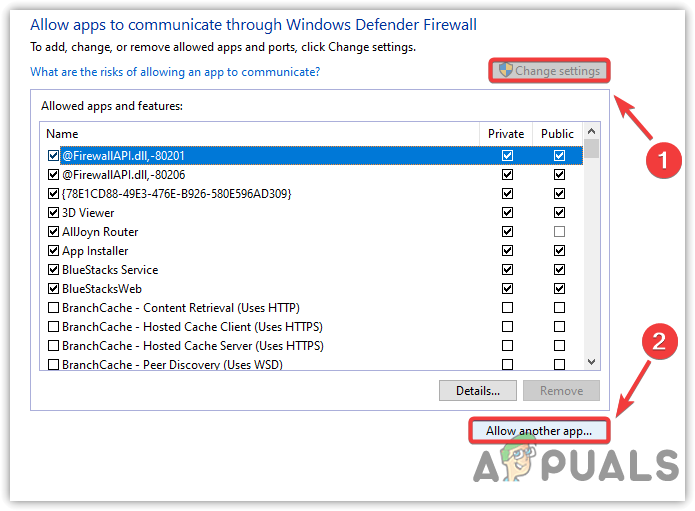
Click Allow Another App - Click Browse and navigate to the location where the Dying Light 2 has been installed
- Select Dying Light 2.exe and click Open
- Click Add and make sure to check the boxes under Private and Public

Allowing Private and Public Networks Through Windows Firewall - Once done, click OK to save the changes then launch Dying Light 2 and see if it still crashes.
9. Verify Integrity Of Game Files
If none of the methods worked, the last and final solution left is to verify the game files. Sometimes, game files get corrupted and can cause issues while playing. To avoid this, verify your game files to repair corrupted or reinstall the entire game.
- To verify the game files, open Steam and go to Library
- Right-click on Dying Light 2, and select Properties
Go to Game Properties - Click Local Files from the left pane then click Verify Integrity Of Game Files
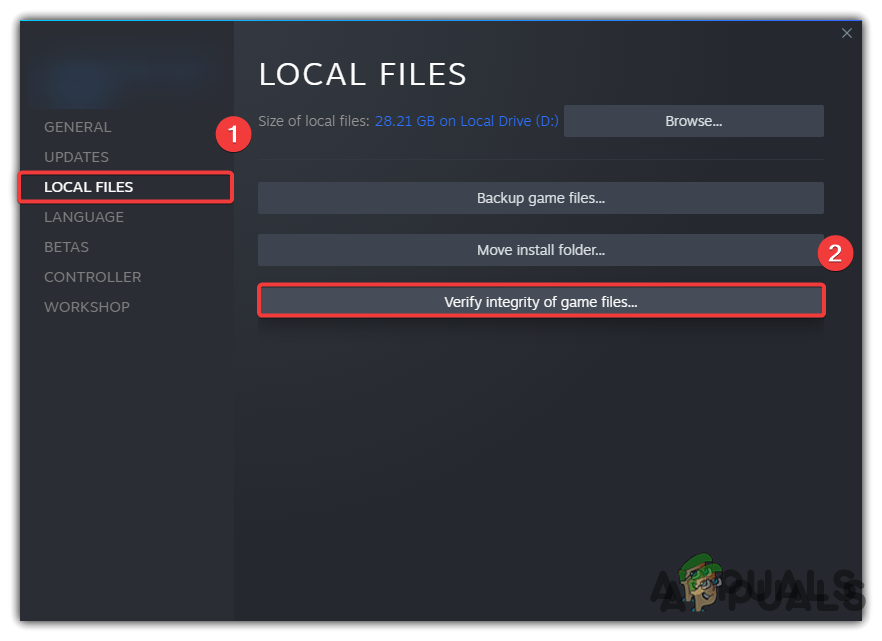
Verifying Steam Game Files - It will take some time, once done, launch the game and check if the issue is fixed.


Deleting runtime_dx11.dll fixed it for me! Thanks