How to Double Space Lines in Microsoft Word
Microsoft Word lets you control basically every aspect of any document you create on it. This includes how much space Word leaves between each line in the document. The more space you have between lines in a Word document, the easier it will be for anyone reading the document to follow the flow of words, and the easier it will be for anyone to make notes on the document after it has been printed out. In text formatting, double-space between lines means that two lines have an entire blank line (or at least the space equivalent to a full line of text) between them.
Almost all word processors out there (including Microsoft Word) leave less than double space between lines by default. However, users who want double spaces between lines can certainly configure Microsoft Word to double space lines, and this is not only easy but is also possible on all currently supported versions of Microsoft Word. When it comes to double spacing lines in a Word document, you can either double space the entire document or a specific selection of lines within the document.
Double spacing an entire Word document
If you would like to double space the entirety of a Word document, here’s what you need to do:
On Microsoft Word 2007 and 2010
- Open the Word document you want to have double spacing between lines in.
- Navigate to the Home tab in Microsoft Word’s toolbar.

- In the Styles section, right-click on Normal and click on Modify… in the resulting context menu.


- Under the Formatting section, locate the Double Space button and click on it to enable double spacing between lines.
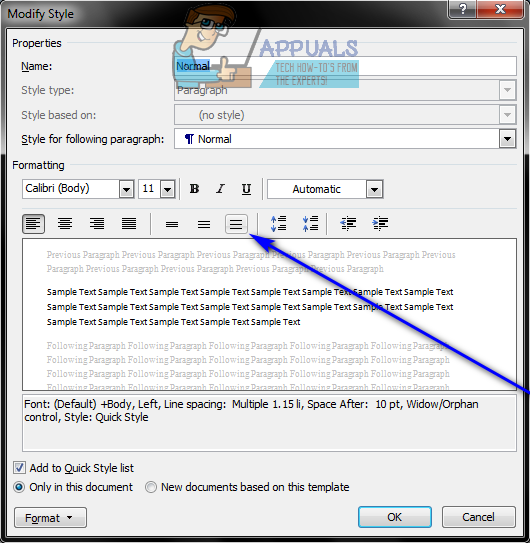
- Click on OK. As soon as you do, the formatting of the entire document will be changed to have double spacing between lines.

On Microsoft Word 2013 and 2016
- Open the Word document you want to have double spacing between lines in.
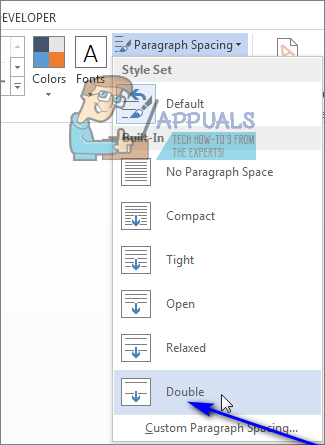
- Navigate to the Design tab.
- Click on Paragraph Spacing.
- In the context menu that appears, click on Double. Once you do, the entire document will have double spacing between every line.
Doing so overrides the line spacing settings of whatever style set you are currently using. If, later on, you want to go back to using the line spacing settings of the style set you are using, simply navigate to the Design tab, click on Paragraph spacing and, under Style Set, click on Default or whatever other option you see under there (if it is not Default, it will probably be the name of the style set you are using).
Double spacing a specific selection of lines within a Word document
If you would only like to have double spacing between the lines in a specific part of a Word document, simply:
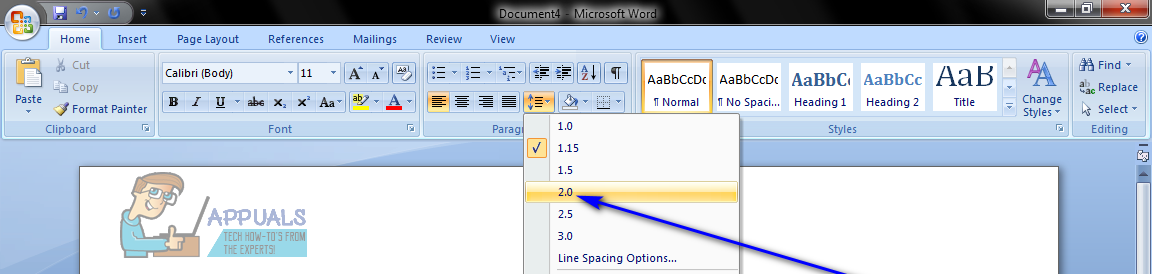
- Highlight the part of the word document you want to have double spacing between lines in to select it.
- Navigate to the Home tab in Microsoft Word’s toolbar.
- In the Paragraph section, click on the Line Spacing button (if you’re using Microsoft Word 2007) or the Line and Paragraph Spacing button (if you’re using Microsoft Word 2010, Microsoft Word 2013 or Microsoft Word 2016).

- Click on 2.0 in the menu that appears on your screen. As soon as you do so, all of the lines included in the selection you made will have double spacing between them.