How to Fix Margins in Google Docs
Chromebooks are cheap, portable and have excellent battery life, which puts them right in the radar of college students. However, Chromebooks don’t run MS Word, so all our document needs have to be fulfilled by Google Docs. Docs is almost as powerful as MS Word and is equipped with most Word features that the average student would need. However, there are a couple of glitches here and there in Google Docs that need to be fixed.
One of those glitches is that document margins seem to come out incorrectly while printing a document through Google Docs. With most colleges having extremely strict guidelines on formatting essays with specific margin requirements, this becomes a major problem for students using Chromebooks. In this tutorial, we will show you how to get rid of the margin discrepancy in Google Docs, and print your documents with the exact margins that you require.
Why does this happen?
On Google Docs, the default paper size is set to ‘Letter’, which is slightly shorter in length than the classic A4 sized printing sheet that is used in most printers. Hence, printed Google Documents do not utilize the full length of the A4 sheets, and your top and bottom margins look larger than you actually set them to be. Also, printing directly through Google Docs is known to be riddled with problems like incorrect fonts and margins.
All we need to do, then, is change the Page size on Google Docs from ‘Letter’ to ‘A4’, and download the document as PDF to print it. Follow the tutorial below for getting the margins correct on your Google Document.
How to Fix the Margin Error
Change Paper Size
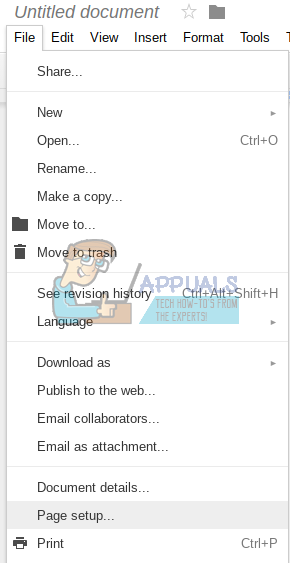
First, open the document you want to print in Google Docs. Then, go to ‘Files’ on the left corner of the options menu on the top. In the Files dropdown menu, click on ‘Page Setup’.
In the Page Setup window, you will see a dropdown menu for ‘Paper Size’, with the size set as ‘Letter’. Through the dropdown menu, change the size to ‘A4’. (On the right, you will see the Margin measurements in inches, and you can also change them according to your requirements from here.)
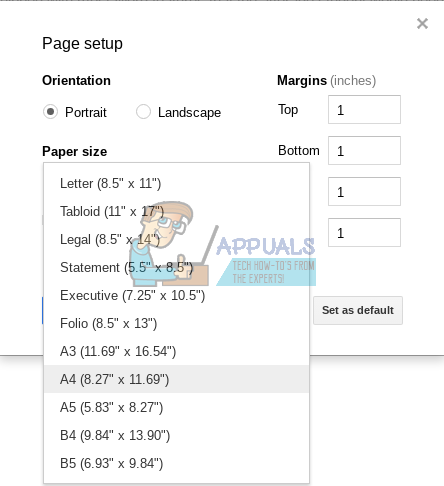
Once you change the Paper Size to A4, you can click on ‘Set as default’, to set the paper size as A4 by default for all your documents. Otherwise, you can click ‘Ok’ to return to your document.
Download as PDF
After you have changed the paper size, you will have to download your document as PDF. Printing the document directly from Google Docs reportedly has some glitches that tend to mess up margins, so we will download your document as PDF and then print it to preserve our margins.
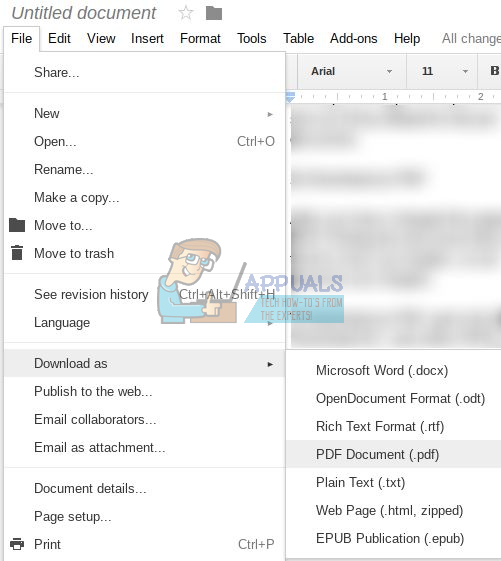
To download as PDF, get to the ‘File’ drop-down from the options menu. Then go to ‘Download As’, and select PDF.
Once you have your document downloaded as PDF, you can go ahead and print it by opening it and pressing Ctrl + P for the Print command. The margins on your printed document should now be perfectly sized and ready for submission.
should I keep the paper size on letter because I use letter paper?