.Docx Files not Showing Word Icon [FIX]
.docx file might not show Word icons if the Docx file associations are misconfigured or corrupt. Moreover, outdated or corrupt Office installation may also cause the error under discussion.
The issue arises when the icons of the .docx files change to blank/shield icons (not the default MS Word icons). The files can be normally opened & edited, but Word icons are not displayed (which work perfectly for the .doc files).
Before moving on to fix the Docx icon, check if uninstalling any other outdated document application (like Adobe Acrobat Reader) sorts out the icons’ problem.
Solution 1: Update the Windows and MS Office of Your PC to Their Latest Builds
The MS Word icons issue may arise if the Windows or MS Office installation are outdated as it may create incompatibility between the both. In this case, updating the Windows & MS Office to the latest builds may solve the problem.
- Manually update Windows to the latest release & check if the file icons issue is resolved.
- If not, launch an Office application (e.g., MS Word) & steer to its File menu.
- Now expand More & select Account.
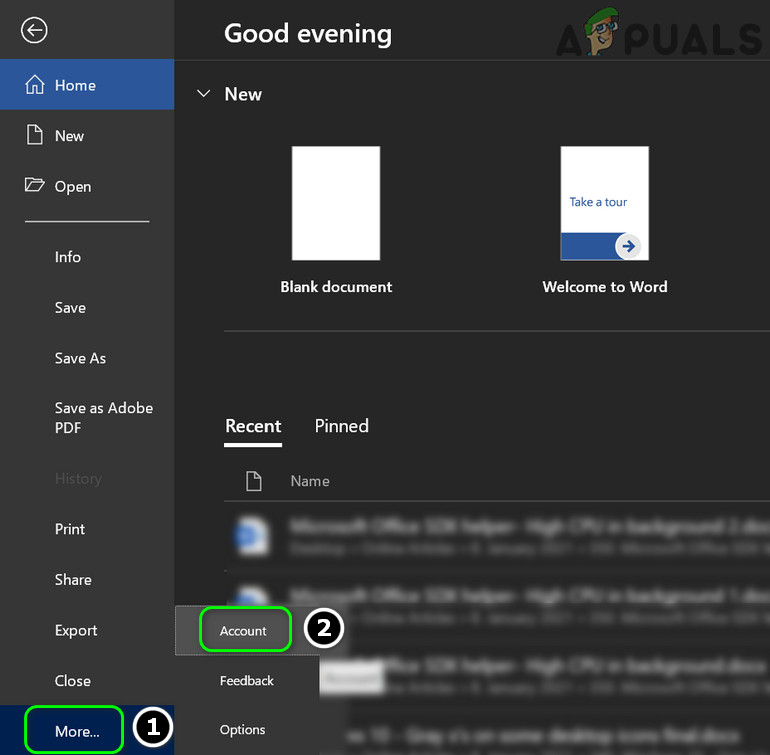
Open Account in the File Menu of MS Word - Then click on Update Options & in the menu shown, click Update Now.

Update Office Application - Now let the Office update process complete & check if the Word file icons issue is resolved.
Solution 2: Revert the File Association to MS Word and Reset the Defaults
The icon issue may arise if the .docx file association is not set to MS Word or corrupt. In this scenario, reverting the .docx file association to MS Word & resetting the default apps to MS defaults may solve the problem.
Set the MS Word as the Default Application for the .docx File Type
- Press the Windows key & in the search, type: Default Apps. Then open Default Apps.
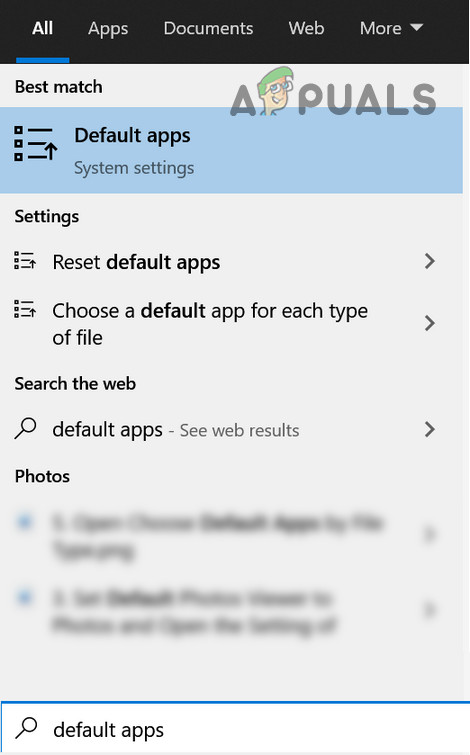
Open Default Apps - Now open Choose Default Apps by File Types & expand the option in front of the .docx.

Open Choose Default Apps by File Type - Then choose Word & repeat the same to .docxml. If the option is also set to Word, select another app as the default app for .docx & revert the setting to MS Word.
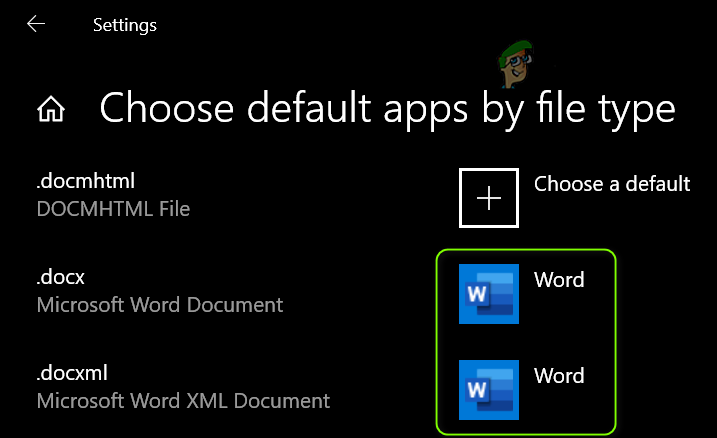
Set MS Word as the Default App for Docx File Type - Now reboot your PC & check if the icon issue is resolved.
Use the Right-Click Context Menu
- Right-click on an MS Word file & select Open With > Choose Another App.
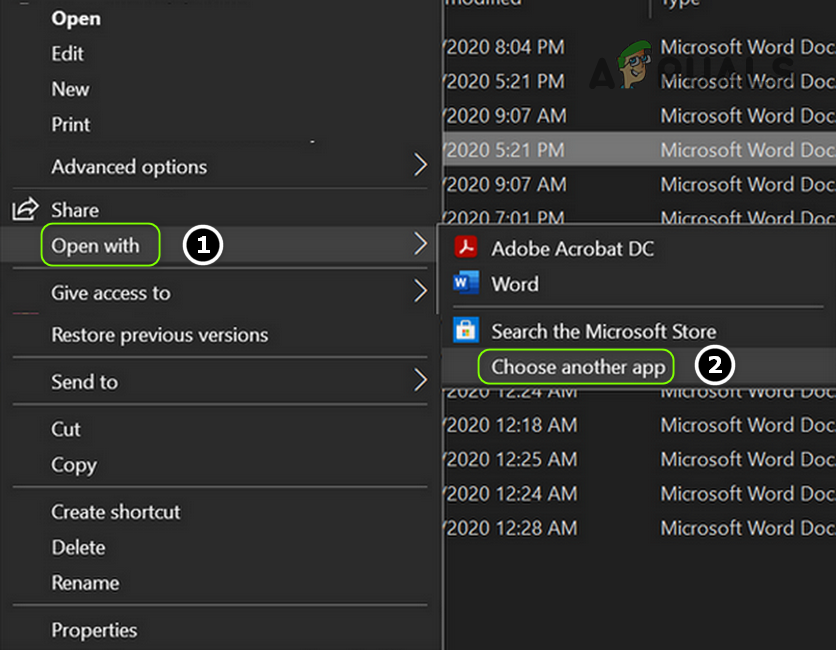
Open Choose Another App - Now click on More Apps and choose Wordpad.

Open More Apps - Then checkmark Always Use This to Open .docx Files and click on the OK button.

Set Wordpad as the Default App for Docx Files - Then repeat the above steps but set MS Word as the default app and check if the icons have reverted to the Word defaults.
- If the issue persists, revert the default Docx app to Wordpad (by following steps 1 to 3) and right-click on a Word File.
- Now hover your mouse over Open With and open Choose Another App.
- Then expand More Apps and click on Look for Another App on This PC.

Look for Another App on This PC - Now steer to the MS Word installation directory (you can use the method discussed in solution 5).
- Then double-click on WINWORD.exe (make sure to checkmark the Always Use This option) and check if the icons’ issue is resolved.
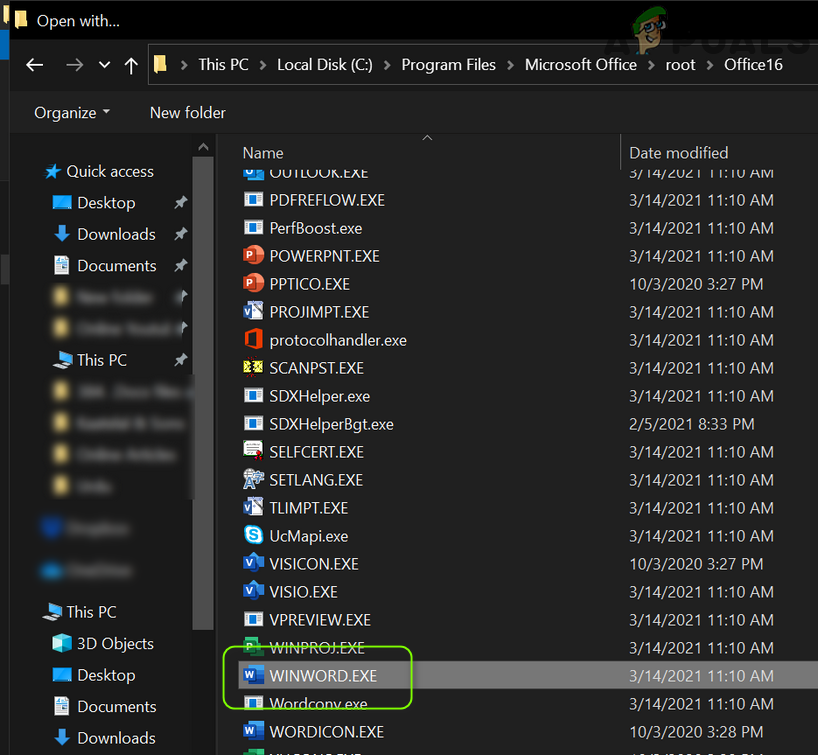
Select WinWord.exe
Reset the Default Apps to the Microsoft Recommended
- Open Default Apps (discussed above) and scroll down till the end.
- Now, under Reset to the Microsoft Recommended Defaults, click on the Reset button and check if the MS Word icons issue is resolved.
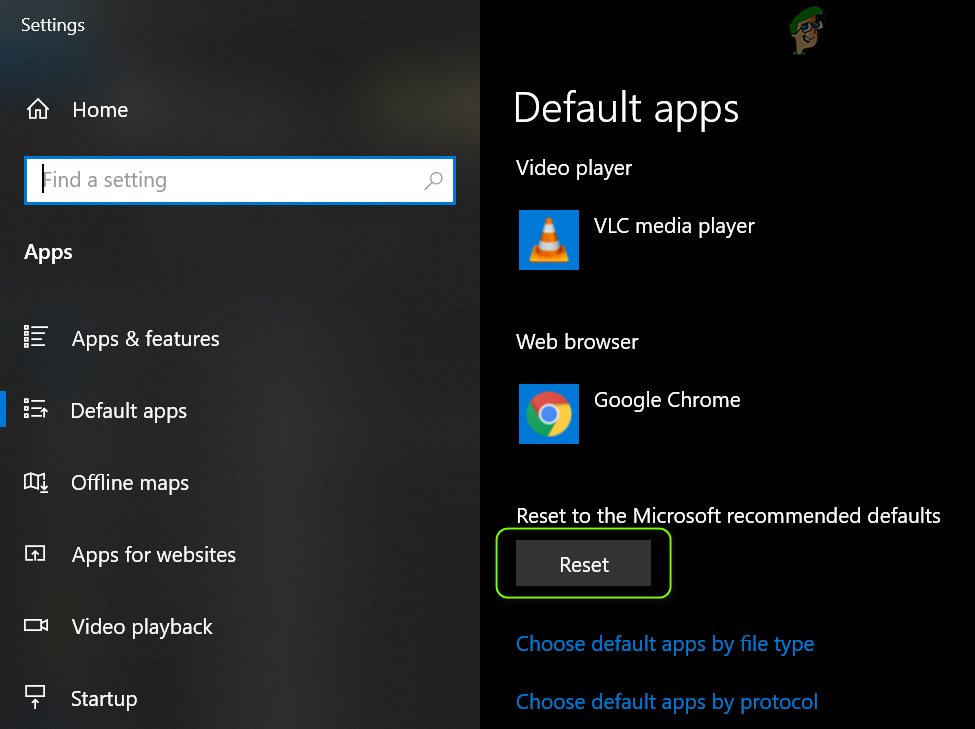
Reset to the Microsoft Recommended Defaults
Solution 3: Rebuild the Icon Cache Database
The Docx icon issue could be a result of a corrupt Icon Cache Database. In this case, rebuilding the Icon Cache Database may solve the problem.
- Close all the applications/folders on the system and right-click on the Windows button.
- Then choose Task Manager and right-click on the process of Explorer.exe (or Windows Explorer).
- Now select End Task and confirm to end the process.
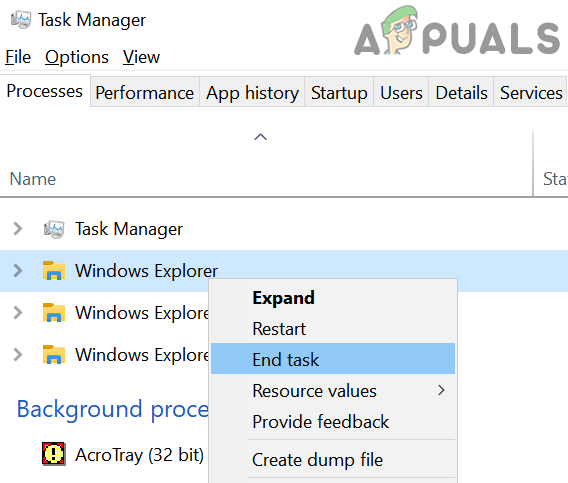
End Task of Windows Explorer - Then expand the File menu and choose Run New Task.
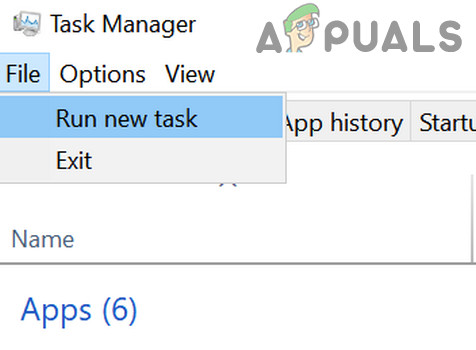
Run a New Task in the Task Manager - Now checkmark the option of Create This Task with Administrator Privileges and in the Open box, type: CMD.exe.

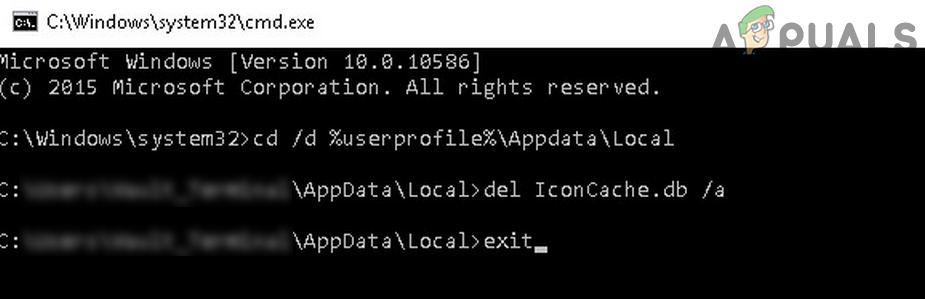
Run CMD.exe Task - Then click the OK button and in the Command Prompt window, execute the following one by one:
CD /d %userprofile%\AppData\Local

DEL IconCache.db /a

EXIT
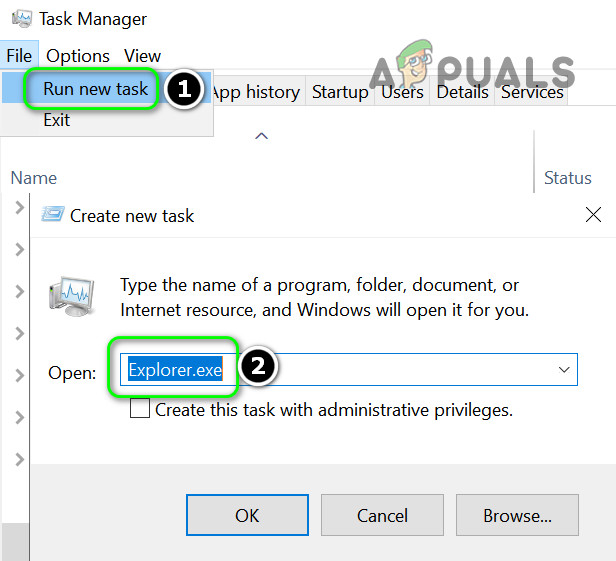
Delete Iconcache Database - Now, in the Task Manager, open the File menu and choose Run New Task.
- Then type Explorer.exe and click on the OK button.
Run a New Task of Explorer.exe in the Task Manager - Now check if the Word icon issue is resolved. If not, reboot your system and check if the icons are restored.
Solution 4: Repair the MS Office Installation
The corrupt MS Office installation may cause the missing Word icon issue. In this context, repairing the MS Office installation may solve the problem.
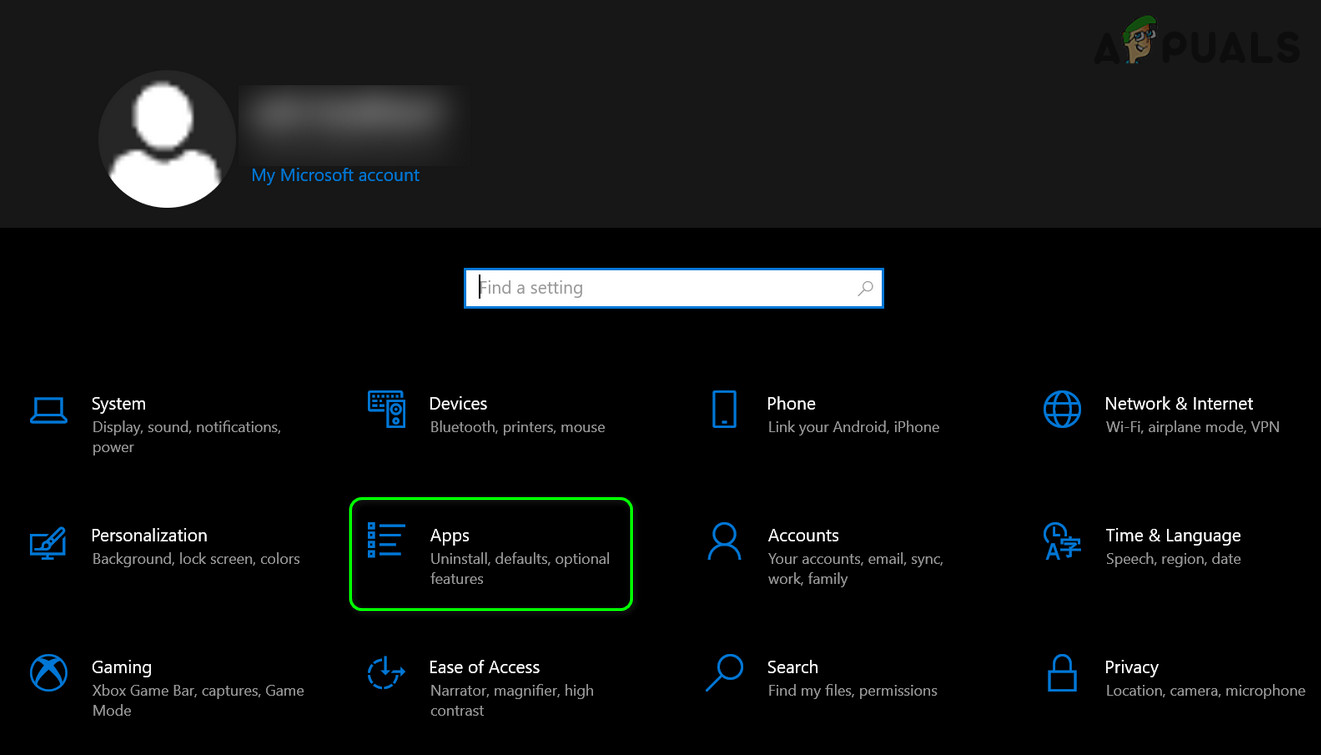
- Press the Windows key and open Settings.
- Now select Apps and expand the MS Office installation.
Open Apps in the Windows Settings - Then click on the Modify button and click Yes (if UAC prompt received).

Modify the Office Installation - Now choose the Quick Repair option and click on the Repair button.

Quick Repair Office - Then let the process complete and reboot your PC to check if the Word icon has restored to normal.
- If not, repeat the above steps but at step 4, choose Online Repair.
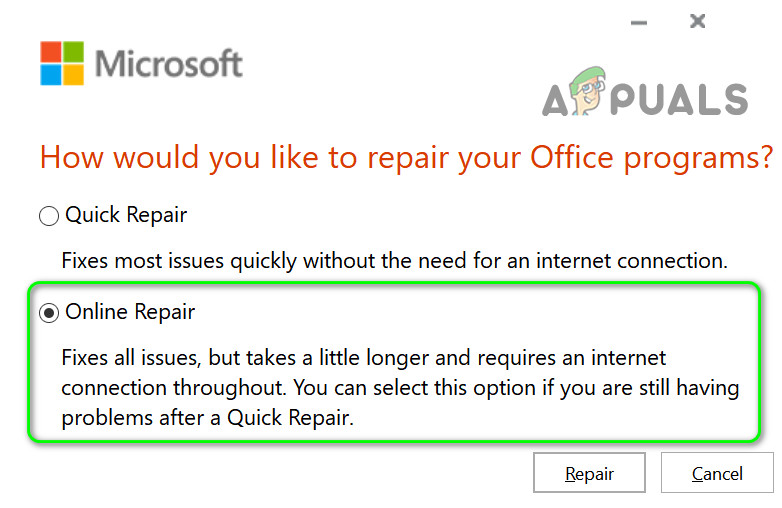
Online Repair Office - Once the Online repair is complete, check if the icon’s issue is resolved.
Solution 5: Reregister the MS Word
The icons’ issue may arise if the MS Word application fails to claim the .docx file association (despite the user set it to be) in Windows. In this case, reregistering the MS Word application (which may reclaim the association) may solve the problem. Before proceeding, make sure to close any running processes related to MS Office in the Task Manager.
Re-Register the MS Word Application
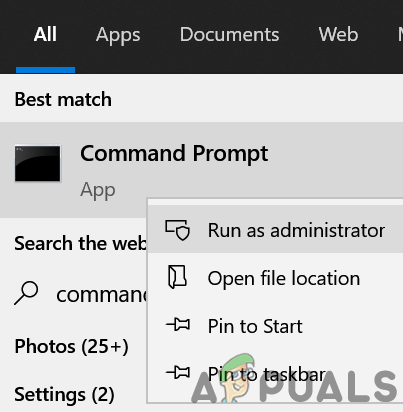
- Press the Windows key and in the search box, type: CMD. Now, in the results list, right-click on the Command Prompt, and in the mini-menu, choose Run as Administrator.
Open Command Prompt as Administrator - Then, execute the following (copy-paste the command):
winword /r
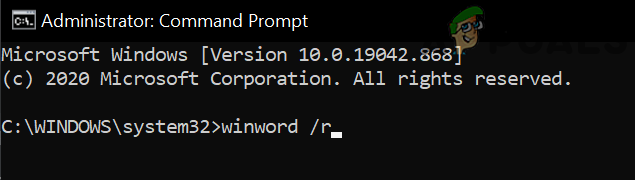
Execute Winword /r in the Command Prompt - Keep in mind that nothing will be shown in the Command Prompt window but the Word application will register itself in Windows. Once the cursor is shown in the Command Prompt, check if the icons issue is resolved.
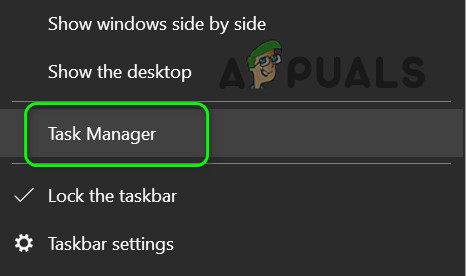
- If not, launch the MS Word and right-click on the Taskbar. Now open Task Manager.
Open the Task Manager of Your System from the Taskbar - Now, right-click on the process of MS Word and choose Open File Location.
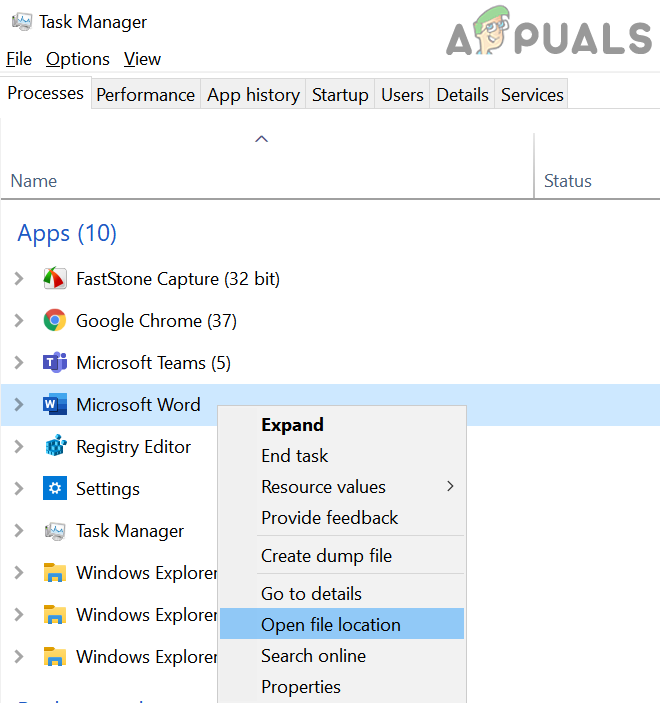
Open File Location of MS Word - Then copy the address from the address bar, e.g.,
C:\Program Files\Microsoft Office\root\Office16)
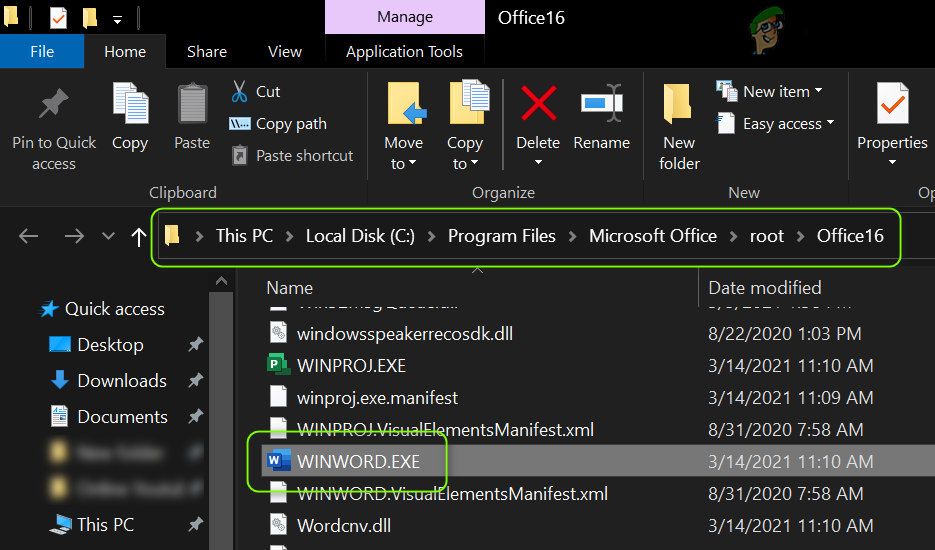
Find the Installation Directory of the MS Word - Then launch an elevated Command Prompt (step 1) and execute the following to steer to the installation directory of MS Word.
cd C:\Program Files\Microsoft Office\root\Office16
(you may paste the path noted at step 6)
- Now, execute the following and check if the icons are restored:
winword /r

Run the Winword /r from the MS Word Installation Directory - If the issue persists, and you have more than one Office suite installed, check if repeating step 8 from the installation directory of the other Office suite resolves the issue.
Re-Register the MS Word Application
- Launch an elevated Command Prompt (as discussed above in step 1) and execute the following (with inverted commas):
"C:\Program Files\Microsoft Office\root\Office16\winword.exe" /unregserver
The path in inverted commas is the same path noted in step 6 (discussed above).

Unregister Winword - Once the execution is complete, execute the following in the Command Prompt window:
"C:\Program Files\Microsoft Office\root\Office16\winword.exe" /regserver
- Once the execution is complete, check if the Word files icons have reverted to defaults.
Solution 6: Edit the System’s Registry and Reinstall the Office Suite
The icons’ issue may arise if the MS Word application’s registry keys are not properly configured or corrupt. In this case, editing the registry keys relevant to MS Word may solve the problem.
Warning: Advance at your own risk and with extreme care as editing the system’s registry is a proficient task and if not done properly, you may cause everlasting damage to your OS/data/system.
Before proceeding, make sure to perform a backup of your system’s registry. Press the Windows key and search for: Registry Editor. Now, in the list of results, right-click on the Registry Editor, and in the mini-menu, choose Run as Administrator.

You may try the following edits to check if resolves the icons issue (keep in mind some of these keys may not be available to some users).
Delete the IconHandler Key
- Navigate to the following path:
Computer\HKEY_CLASSES_ROOT\Word.Document.12\ShellEx
- Now, in the right pane, delete the IconHandler key and reboot your PC.
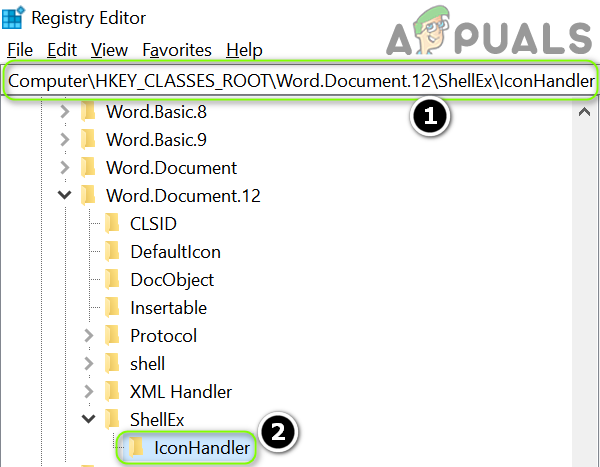
Delete the IconHandler Key - Upon reboot, set the Word as the default application for .docx files (as discussed in solution 2) and check if the word icons issue is resolved.
Change the Default Key Path
- Navigate to the following path:
Computer\HKEY_CLASSES_ROOT\.docx
- Now, in the right pane, double-click on Default and set its value to Word.Document.16.
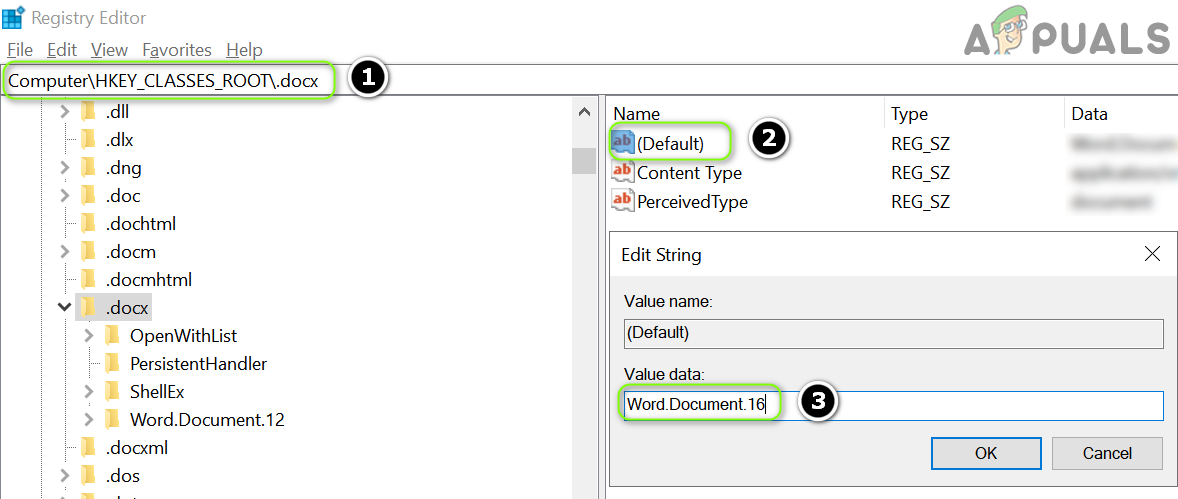
Set the Default Value to Word.Document.16 - Then repeat solution 2 to set MS Word as the default app and check if the proper icons are shown.
- If not, repeat the above solution but at step 2, set the value of Default to Word.Document.12 and check if it resolves the icons issue.
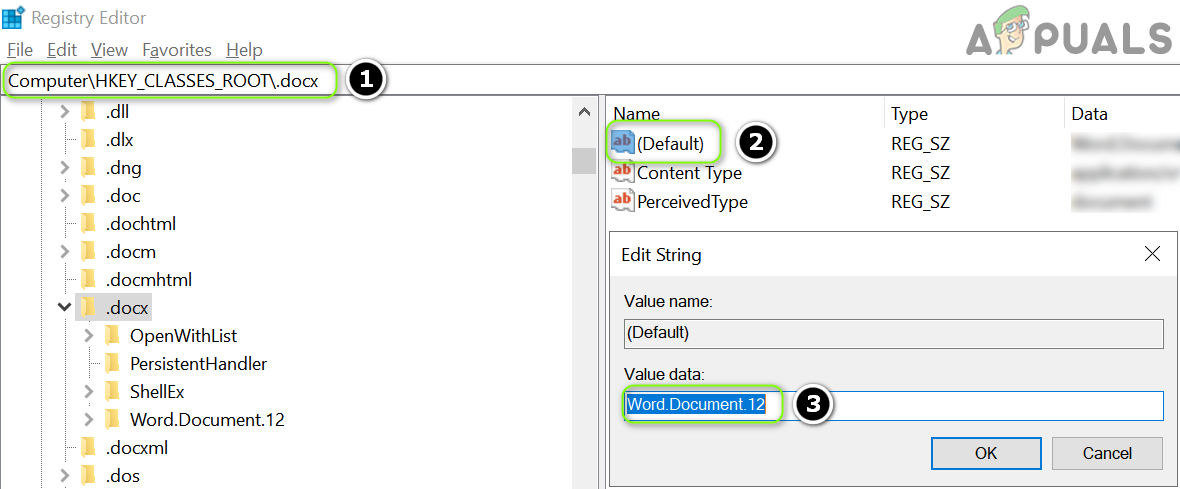
Set the Default Value to Word.Document.12
Import the .docx Registry Key
- On a working and trusted computer, navigate to the following path:
Computer\HKEY_CLASSES_ROOT\.docx
- Now, in the left pane, right-click on the .docx key and select Export.
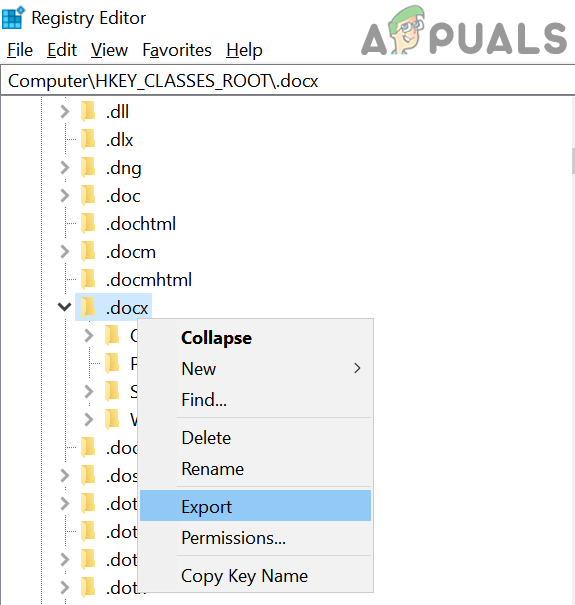
Export the .Docx Registry Key - Then save the file to someplace (e.g., the desktop) and transfer it to the affected computer.
- Now, on the affected computer, launch the Registry Editor and navigate to the following path:
Computer\HKEY_CLASSES_ROOT\.docx
- Then, in the left pane, select the .docx key and expand the File menu.
- Now select Import and after completion of the import process, reboot your PC.
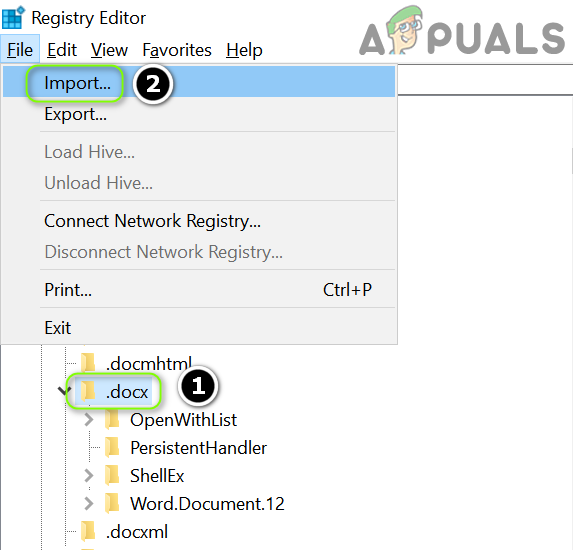
Import the .Docx Registry Key - Then repeat solution 2 to check if the icons issue is resolved.
Delete the Docx File
- Navigate to the following path:
Computer\HKEY_CLASSES_ROOT\docxfile
(for some users, the key will be Docx file auto)
- Then, in the left pane, right-click on the docxfile key and select Delete.

Delete the docxfile Registry Key - Now confirm to delete the docxfile key and exit the editor.
- Then, reboot your PC and launch a word file (if asked to, choose MS Word as the default application) to check if the icons’ issue is resolved.
Delete the .docx Keys and Reinstall the Office Suite
- Uninstall the Office suite and in the Registry Editor, navigate to the following path:
Computer\HKEY_CLASSES_ROOT\.docx
- Now, in the left pane, right-click on the .docx key and choose Delete. Then confirm to delete the .docx key

Delete the .Docx Registry Key - Now repeat the same to delete the .docx key from the following path and exit the editor:
Computer\HKey_Classes_Root\SystemFileAssociations\.docx
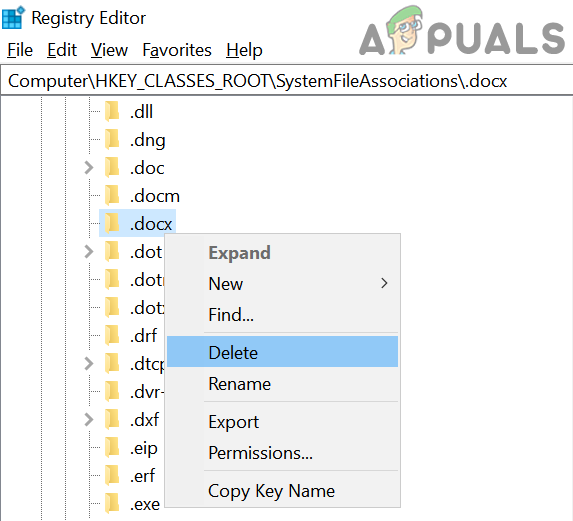
Delete the .Docx Registry Key - Now reboot your PC and reinstall the Office suite to check if the icons issue is resolved.
Solution 7: Create a New Windows User Account
If none of the solutions has done the trick of you, the issue may be caused by a corrupt user profile. In this context, creating a new Windows user account may solve the problem.
- Create a new Windows user account (it will be better to create a local administrator account) and log out of your current user.
- Then log-in using the newly created Windows account and check if the Word file icons have reverted to defaults. If so, you may transfer all the old account data (a tedious task).
If the issue persists, you may use 3rd party utilities (like IconsExtract & FileTypesMan) to sort out the issue. If the issue is still there, you may edit the security permissions (it may have its repercussions) of the Local folder to allow Everyone (in the Advanced and Group/User names) in the following location:
%userprofile%\AppData


Thanks. This fix actually worked instead of using the official response on the Microsoft community site.