How to Rebuild Icon Cache in Windows 11?
The icons that are shown on your screen for different file types are essentially saved in an icon cache on your computer. This helps in letting the operating system quickly display the icons instead of scanning the files each time, thus, the process is sped up. However, in some cases, the icon cache can get corrupted or damaged which can result in the icons of the different files being incorrect and weird. In such a scenario, you will have to delete the icon cache so that it is rebuilt automatically by Windows. Therefore, in this article, we are going to show you how to rebuild your icon cache if you are in such a scenario.
As it turns out, similar to the icon cache, there is a cache for thumbnails as well. As such, the same thing can happen with thumbnails too which may result in them becoming blurry or not showing up at all. This means that the thumbnail cache has been corrupted as well. In that case, what you need to do is to rebuild the thumbnail cache in order to get the thumbnails back.
The icon cache or iconcache.db is a special database file which is kept by Windows. It uses it to draw icons on the screen for apps such as explorer instead of getting the image from the original application. The sole reason why it’s done is to make Windows draw the icons faster. Well, rebuilding the icon cache is easy in Windows 11, though the method has changed from Windows 7 and 8.1. Although, if you are looking for a way to rebuild the icon cache of your Windows computer, then we have you covered as well as we are going to be showing you how to rebuild the Windows icon cache in Windows 11. So, with that said, let us get started with any further ado.
Rebuild Icon Cache
As it turns out, you can easily rebuild your icon cache whenever it gets corrupted or you are facing issues with the icons being displayed incorrectly. There are actually three ways you can rebuild your icon cache. First, you can use the Windows Explorer to manually delete your icon cache. This may be a bit tedious, however, this enables you not to download any files online which is the second option.
Second, you can use a bat file that will automatically delete your icon cache so that it is built again automatically. Thirdly, you can use the command prompt and delete the icon cache via a few commands. We will be listing all of them in this article. With that said, let us get started and show you how to rebuild the icon cache in Windows 11.
Use File Explorer
Using the File Explorer, in order to rebuild the icon cache in Windows 11, you would have to do the following:
- First of all, open up the Windows Explorer.

Opening up File Explorer - Then, navigate to the following path by simply copy pasting it in the address bar:
C:\Users\%username%\AppData\Local\Microsoft\Windows\Explorer
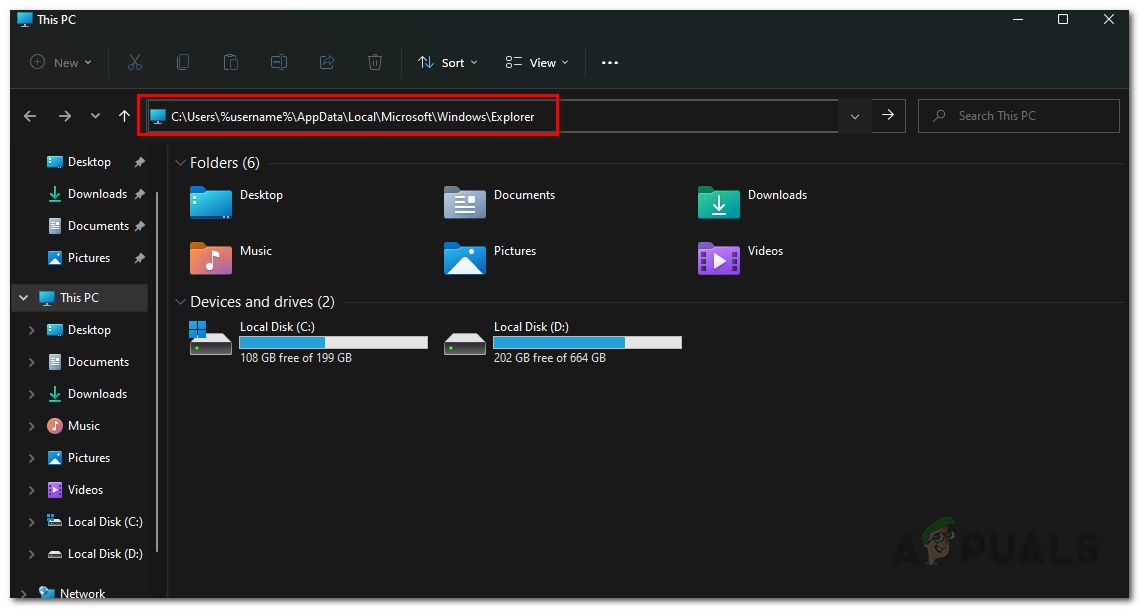
Navigating to the Icon Cache Folder - Here you will see many files. Delete any file starting with iconcache as there will be lots of such files.
- After deleting them, a new folder will be created there named “IconCacheToDelete” automatically.
- Don’t worry about it, once you reboot your computer, this folder will go away.
Use Command Prompt
Another way of deleting the icon cache would be to use the command prompt. This is a bit easier as compared to the first method as you just have to enter a set of commands to get the job done. If you do not wish to use the command prompt either, you can jump to the next method down below where you can use a script to get the job done. To do this, follow the instructions down below:
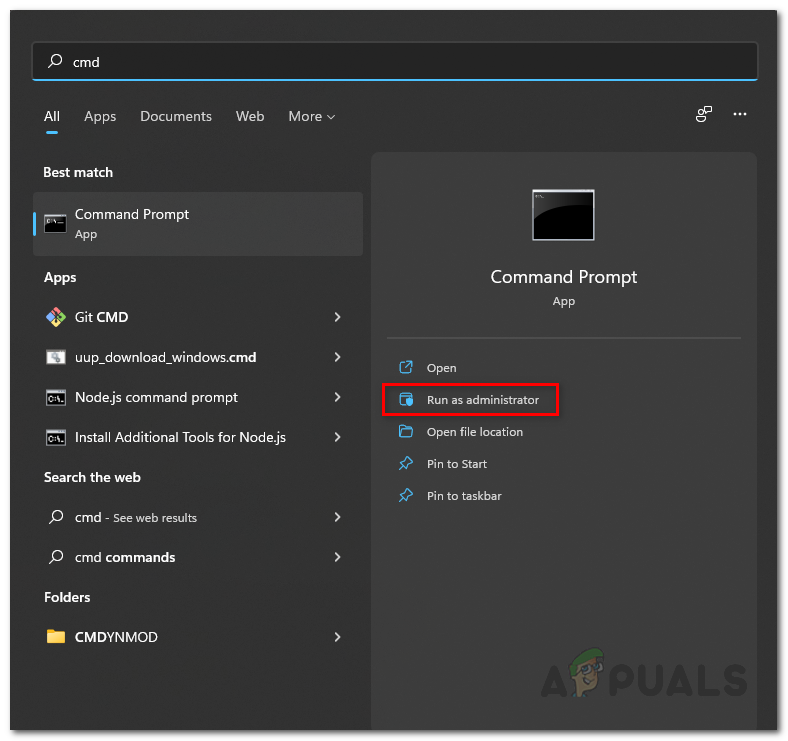
- First of all, open up the Start Menu and search for cmd. Right-click on the result shown and choose Run as administrator. Alternatively, you can click the Run as administrator option on the right hand side.
Opening Command Prompt as an Admin - Once the command prompt window is open, type in the following commands one by one to delete the cache:
cd /d %userprofile%\AppData\Local\Microsoft\Windows\Explorer
attrib –h iconcache_*.db
del iconcache_*.db start explorer
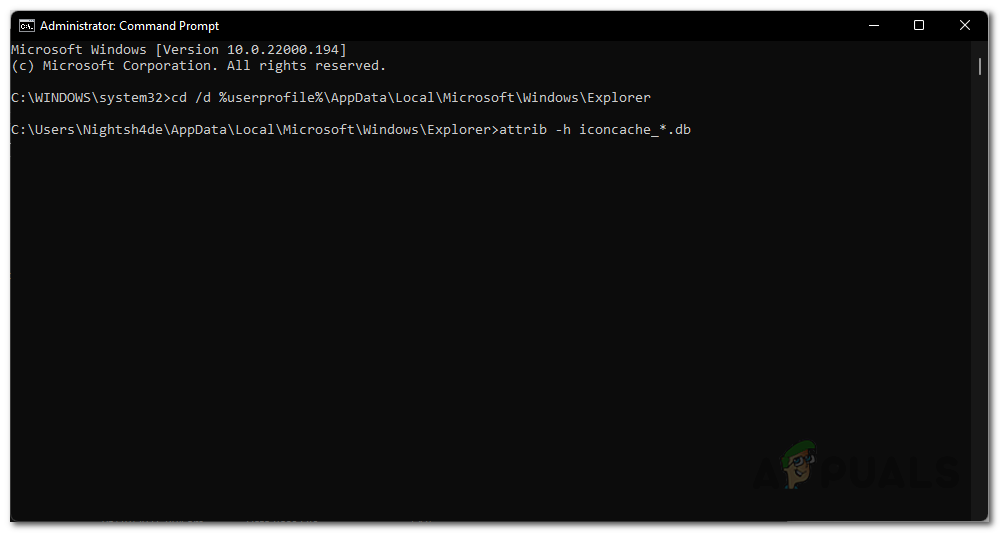
Making Icon Cache Files Visible - For the sake of explanation, the first command changes the current working directory to the specified folder.
- Furthermore, the second command removes all the files starting from iconcache_ from being hidden and the third command deletes these files.
- Once you have done that, go ahead and restart your computer.
- That’s it, you are done. Now you have successfully deleted the icon cache in Windows 11.
Use Batch Script
Finally, the easiest way of deleting the icon cache would be to simply run a batch script that we will be providing. The script will be automatically deleting the icon cache on your computer and then prompting you to restart your computer.
To download the script, just click here. After that, go ahead and run the script and follow the on screen prompts in the command prompt window that appears.
Rebuild Thumbnails Cache
Just like icon cache, Windows uses thumbnails cache for generating the thumbnails in Windows Explorer. These cache files contain small thumbnails for different files on your computer and Windows Explorer loads the thumbnails from these files as opposed to generating thumbnails for each image again and again when you open a folder in it. As generating thumbnails on the go is very resource demanding and would use a lot of cpu and slow down your computer if you are multitasking.
Windows generates thumbnails for the images on your computer once and stores them in the files starting from thumbs in the folder where the thumbnails cache is to be stored. These files end with .db in the end.
If for some reason, the thumbnails cache gets corrupted then you will have problems with thumbnails while using Windows Explorer to browse files. Some thumbnails may not appear at all and there would be visible problems for you to get the idea that something is not right with your computer.
Thus, for that what you need to do is to delete the thumbnails cache in your Windows which are many files stored in the same directory where the icon cache is stored. To delete the thumbnails cache, you are going to be using a command prompt. Follow the instructions down below to do this:
- First of all, open up the command prompt window by searching for it in the Start Menu. Click on the Run as administrator option on the left hand side.
Opening Command Prompt as an Admin - After that, type the following commands in the command prompt one by one:
cd /d %userprofile%\AppData\Local\Microsoft\Windows\Explorer
attrib –h thumbcache_*.db
del thumbcache_*.db

Making Thumbnail Cache Files Visible - That’s it, restart your computer now. The thumbnails cache will now be rebuilt as you have deleted the existing cache thumbnails databases.
If you were facing a problem at your end that was caused by corrupted thumbnails or icon cache files, then deleting the thumbnails or icon cache files would have caused Windows to regenerate the thumbnails or icon cache and your problem will be fixed. If the issue was caused by something else, then you will have to troubleshoot the problem.


