How to Disable or Enable ‘Require Sign-in on Wakeup’ on Windows 11
In order to help protect your PC, Windows 11 will require users to sign in once they wake up their device from a hibernation, modern hibernation (if your device supports it), or sleep stage. However, there are ways to get around this security mechanism if you’re tired of signing in every time your PC stays idle more for longer periods.

Keep in mind that sign-in on wakeup makes a lot of sense if you use your computer in public places or in a shared office. This security system ensures that someone else is prevented from accessing sensitive information on your computer while it’s ‘sleeping’.
But if you are the only person to use this particular Windows 11 PC and it never leaves your home, it makes sense to disable this behavior and get rid of any sign-in requirements for sleep.
And fortunately, there are various ways that will allow you to do this, whether you like to do this from a terminal or from the GUI on Windows 11.
We’ve made a list of methods that you can use to disable or enable ‘Require Sign-in on Wakeup’ on Windows 11. We will go over how to change this behavior for Sleep, Hibernation, or Modern Standby and we’re going to show you how to do it from the Settings menu, by using Registry Editor, or by using the Local Group Policy Editor.
Here are all the different ways that you can use to disable or enable Require Sign-in on Wakeup on Windows 11:
- Disable or Enable Require Sign-in on Wakeup from Modern Standby via Settings on Windows 11
- Disable or Enable Require Sign-in on Wakeup from Modern Standby via Registry Editor on Windows 11
- Disable or Enable Require Sign-in on Wakeup from Sleep or Hibernate via Settings on Windows 11
- Disable or Enable Require Sign-in on Wakeup from Sleep or Hibernate via Command Prompt on Windows 11
- Disable or Enable Require Sign-in on Wakeup from Sleep or Hibernate via Local Group Policy Editor on Windows 11
Follow the guide applicable to your preferred approach when tweaking your Windows system.
Turn ON or OFF Require sign-in on Wakeup from Modern Standby on Windows 11 (via Settings)
If your PC supports Modern Standby, this is hands down the easiest and most efficient way of disabling the required sign-in on wakeup behavior on Windows 11.
Note: Modern Standby is an explanation of the Connected Standby mode introduced in previous Windows versions. Among other things, it allows your computer to stay up to date and receive updates when it has a network connection available.
You can simply access the Sign-in Options menu from the Settings app and adjust the Required Sign-in during the Wake-up slider.
Here’s what you need to do:
Important: You won’t be able to follow the instruction below if your PC doesn’t support Modern Standby. In this case, move down to Method 3 (Turn ON or OFF Require sign-in on Wakeup from Sleep or Hibernation on Windows 11)
- Start by pressing Windows key + I to open up the Settings menu.
- Once you’re inside the Settings app of Windows 11, access the Accounts pane from the side menu on the left.
- Next, move over to the right-hand side menu and click on Sign-in Options from the list of available options.
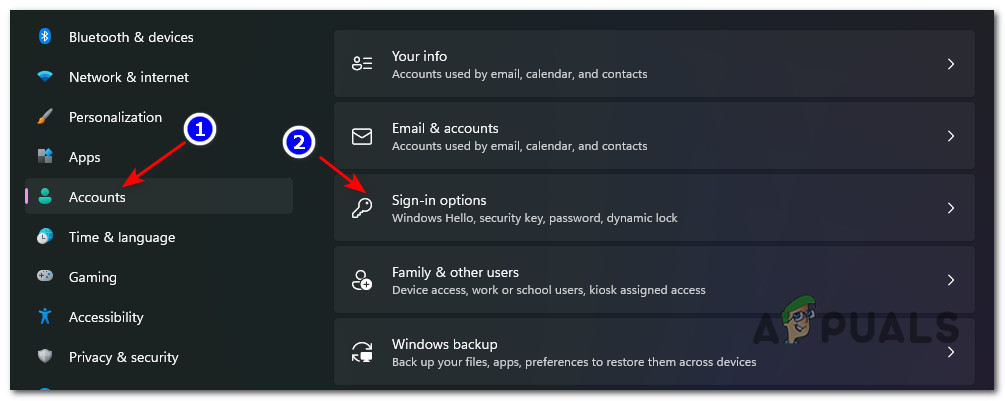
Accessing the Sign in the Options screen - Next, from the Sign-in Options menu, modify the If you’ve been away, when should Windows require you to sign in again? drop-down menu to your preferred behavior.
Note: If you want to disable the Required Sign-in during Wake-up, set the drop-down menu to Never. - As soon as you apply the changes, they will be enforced (without the need to restart your PC). At this point, you can safely close the Settings window.
Turn ON or OFF Require sign-in on Wakeup from Modern Standby on Windows 11 (via Registry Editor)
If you like enforcing changes from the Registry Editor, this method will scratch that itch.
In order to disable or enable the ‘require sign-in on wakeup’ feature, you’ll need to use the Registry Editor to navigate to HKEY_CURRENT_USER\Control Panel\Desktop and create a new DWORD called DelayLockInterval and assign the appropriate value depending on what you’re looking to achieve.
Here’s how to disable or enable require-sign in on wakeup for modern standby using the Registry Editor:
- Press Windows key + R to open up a Run dialog box. Next, type ‘regedit’ inside the text box, then press Ctrl + Shift + Enter to open up the Registry Editor with administrative privileges.

Open up the Registry Editor - At the User Account Control prompt, click Yes to grant administrative privileges.
- Once you’re inside the Registry Editor, navigate to the following location using the pane on the left-hand side:
HKEY_CURRENT_USER\Control Panel\Desktop
Note: You can also get here instantly by pasting the full registry path inside the navigation bar at the top and pressing Enter.
- Next, right-click on the Desktop registry key and choose New > Dword (32-bit Value) from the context menu that just appeared.
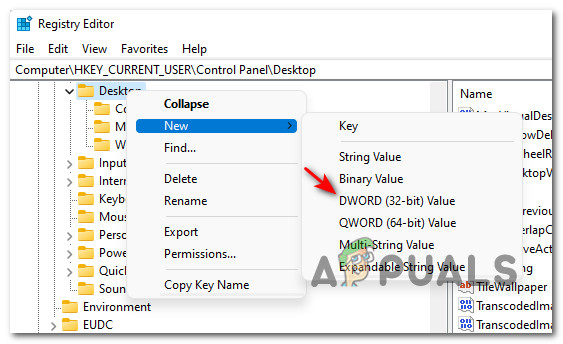
Creating a new Dword inside Registry Editor - Next, move over to the right-hand pane and name the newly created DWORD value to DelayLockInterval.
- Double-click on the newly created DWORD value (DelayLockInterval) and set the Base to Hexadecimal and the Value data to one of the following, depending on what you’re trying to accomplish:
f - Set the Value data to f to enable the sign-in behaviour when you wake from Modern Standby
0 - Set the Value data to 0 to disable the sign-in behaviour when you wake from Modern Standby
- Once the modifications have been enforced, you can safely close the elevated Registry Editor window.
- Reboot your PC in order to allow the changes to take effect. You will see the new behavior kicking in once your Windows 11 computer boots back up.
Turn ON or OFF Require sign-in on Wakeup from Sleep or Hibernation on Windows 11 (via Settings)
If your current PC configuration does NOT support Modern Standby, there’s also an easy way of adjusting the required sign-in on wakeup behavior for the classic Sleep or Hibernation modes.
Note: This option will ONLY be available if the computer where you installed Windows 11 does NOT support Modern Standby. Additionally, the changes you make below will only affect the active power plan (for all users).
Follow the instructions below to enable or disable require sign-in on wakeup for Sleep and Hibernation using the Settings menu of Windows 11:
- Press Windows key + I to open up the Settings screen.
- Once you’re inside the Settings screen, access the Accounts menu from the left-hand side.
- Next, move over to the right-hand side and click on Sign-in options.

Accessing the Sign-in Options screen - Once you’re inside the dedicated Sign-in options menu, modify the If you’ve been away, when should Windows require you to sign in again? drop-down menu to Never or When PC wakes up from sleep (default) depending on your preferred behavior.
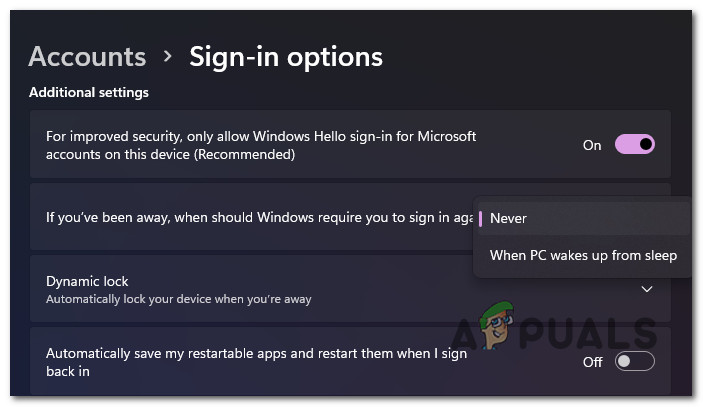
Set the Wake-up Behaviour - Once the changes have been enforced, you can close the Settings screen.
Turn ON or OFF Require sign-in on Wakeup from Sleep or Hibernation on Windows 11 (via Windows Terminal)
If you’re a terminal kind of guy, we’ve got you covered. You can also modify the required sign-in on wakeup behavior by opening up an elevated Windows Terminal window and running a series of commands (depending on if you want to disable or enabler this feature).
Note: Keep in mind that you will have to slightly adjust the command depending on your current power plan.
Here’s how to turn off or on require sign-in on wakeup from sleep or hibernation using the Windows Terminal:
- Press Windows key + R to open up a Run dialog box. Next, type ‘wt’ inside the text box and press Ctrl + Shift + Enter to open up an elevated Windows Terminal.

Open up a Windows Terminal app - Once you see the User Account Control prompt, click Yes to grant admin access.
- Once you’re inside the elevated Windows Terminal, paste one of the following commands and press Enter depending on the behavior that you wish to achieve in regards to the wake-up security mechanism:
Configure Require Sign-in to ON On Battery: powercfg /SETDCVALUEINDEX SCHEME_CURRENT SUB_NONE CONSOLELOCK 1 Plugged in: powercfg /SETACVALUEINDEX SCHEME_CURRENT SUB_NONE CONSOLELOCK 1 Configure Require Sign-in to OFF On Battery: powercfg /SETDCVALUEINDEX SCHEME_CURRENT SUB_NONE CONSOLELOCK 0 Plugged in: powercfg /SETACVALUEINDEX SCHEME_CURRENT SUB_NONE CONSOLELOCK 0
- Once the command has been successfully processed, you can safely close the elevated Command Prompt as the command should have already produced its effects.
Turn ON or OFF Require sign-in on Wakeup from Sleep or Hibernation on Windows 11 (via Local Group Policy Editor)
If you have access to the Local Group Policy Editor and you manage multiple computers on this network, following this method will probably save you the most amount of time.
If you’re on Windows 11 Home, you will not have this utility installed. The Local Group Policy Editor is only available on Windows 11 PRO, Windows 11 Enterprise, and Windows 11 Education. If you want, you can also install the Local Group Policy utility on the Home version of Windows 11.
Note: If you enforce this method after following Method 3 or Method 4, the following steps will override the behavior you previously established. However, this method has no effect on Method 1 and Method 2.
Here’s how to use the Local Group Policy Editor to turn on or off the require sign-in on wakeup on Windows 11:
- Press Windows key + R to open up a Run dialog box. Next, type ‘gepdit.msc’ inside the text box and press Ctrl + Shift + Enter to open up the Local Group Policy Editor.

Opening up the Local Group Policy Editor - When you’re prompted by the User Account Control, click Yes to grant administrative privileges.
- Once you’re finally inside the Local Group Policy Editor, use the menu on the left to navigate to the following location:
Computer Configuration\Administrative Templates\System\Power Management\Sleep Settings
- Once you arrive in the correct location, ensure that Sleep Settings are selected, then move over to the right-hand pane.
- From the right-hand pane, double-click on Require a password when a computer wakes (plugged in).
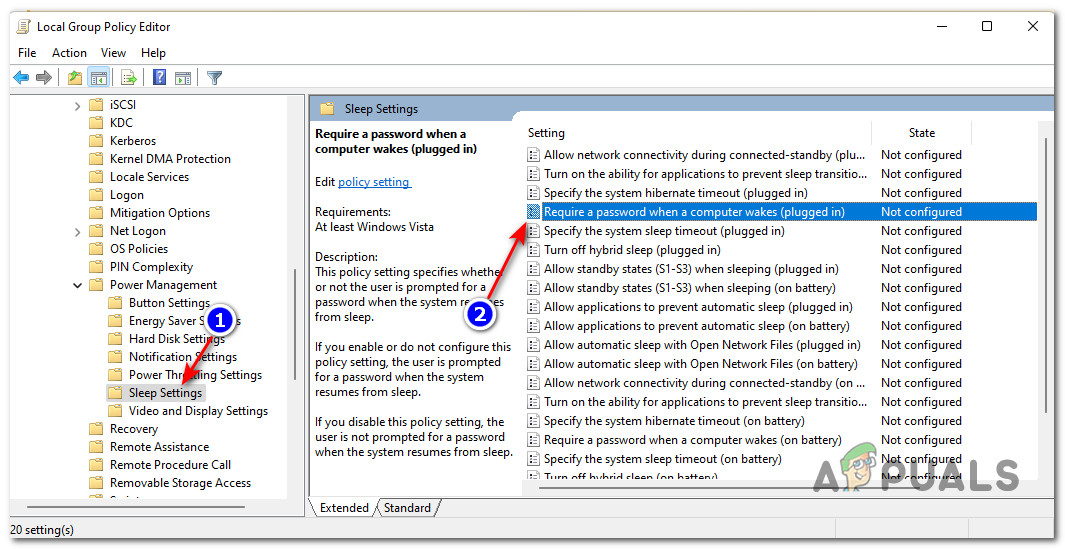
Require a password when the computer wakes - Next, set the Require a password when a computer wakes (plugged in) to Enabled or Disabled depending on what you want to achieve.
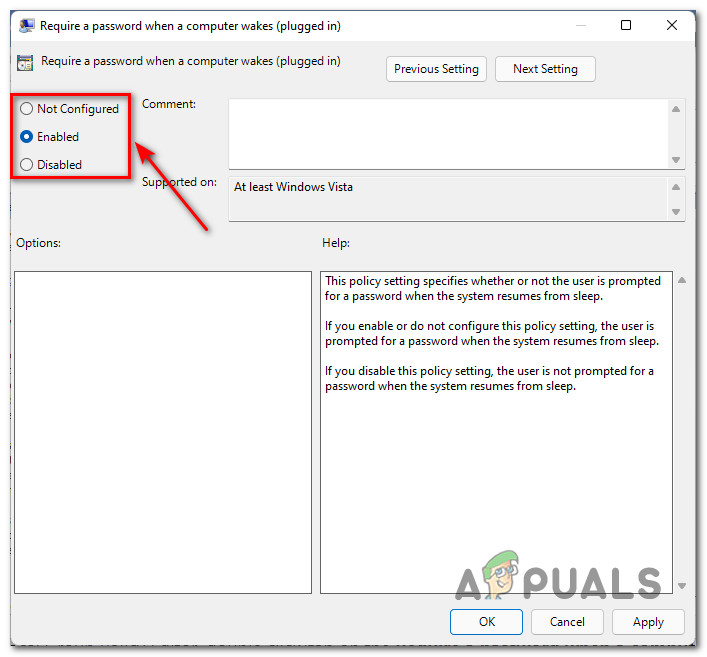
Modifying the wake-up behavior on Windows 11 via the Local Group Policy Editor Note: If you are using a laptop or ultrabook, you also need to modify the Require a password when a computer wakes (on battery) policy.
Disable Require Sign-in on Wakeup Using Winaero Tweaker
If none of these methods worked, try disabling Require Sign-in using Winaero Tweaker, an application that allows users to modify advanced settings in just one click. It is mostly used for disabling irrelevant background processes, which consumes high memory usage and makes the computer slower. Below are the steps to disable require sign-in on wakeup: –
- Download Winaero Tweaker and wait for the downloading to finish
- Once the downloading is finished, right-click on the zip folder and hover your mouse on WinRaR to select Extract to Winaero Tweaker
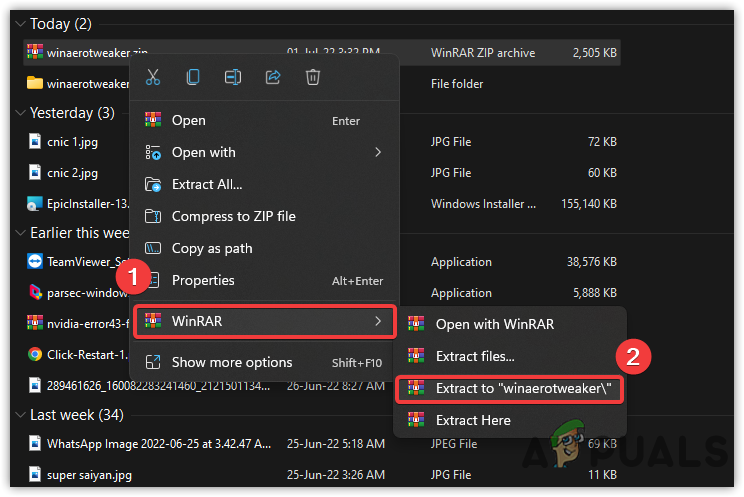
Extracting Folder - Now navigate to the extracted folder, and double-click on the Winaero Tweaker setup
- Then, follow the on-screen instructions to install the application
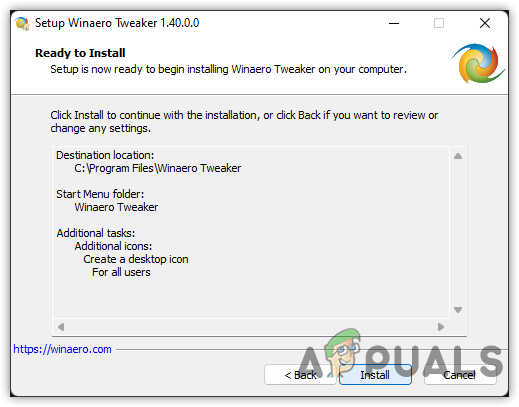
Installing Winaero Tweaker - Open the application and on the left pane scroll down to Behaviour
- Find and select Require a Password on Wakeup
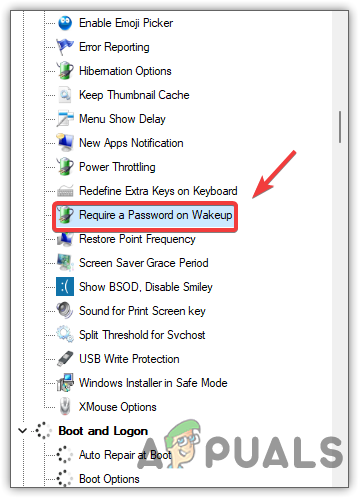
Selecting Require a Password on Wakeup - On the right pane, check the option Add Require a Password on Wakeup to Power Options
- Then, click Open Advanced Settings Of a Power Plan
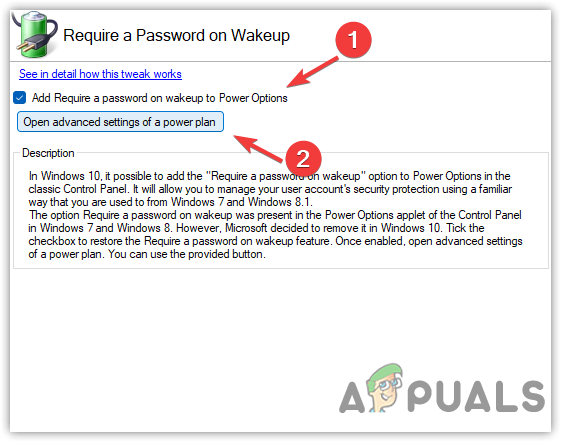
Launching Advanced Settings For a Power Plan - Under Balanced Activity, change the Value from No to Yes
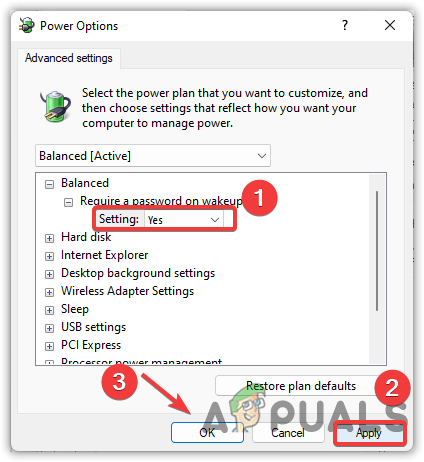
Disabling Require Sign-in on Wakeup - Once done, click Apply and press OK.


