How To Disable Automatic Updates On Windows 11
By default, Windows 11 is configured to install cumulative updates automatically. On top of this, you will be prompted to install every optional update that Microsoft pushes. But for various reasons, you might not want to see these updates installed.
It’s not uncommon for a new Windows update to create a new kind of issue that’s not present on older builds, so there’s an entire category of users that will find a good stable insider preview build and stick with it until a stable update is released.
If you’re one of them, we’ll show you how to prevent automatic updates from installing on Windows 11 so you can keep your preferred Windows build indefinitely.
As of now, we’ve discovered 5 different ways that will allow you to prevent new Windows 11 updates from installing:
- Temporarily pause Windows 11 updates via the Windows Update screen
- Disable the main Windows 11 Update service permanently
- Set up a metered Connection and limit the download of new Windows updates
- Disable the installation of new WIndows updates from the Registry
- Disable the installation of new Windows updates via Local Group Policy Editor
- Use a 3rd party tool to effectively disable Windows Automatic Updates
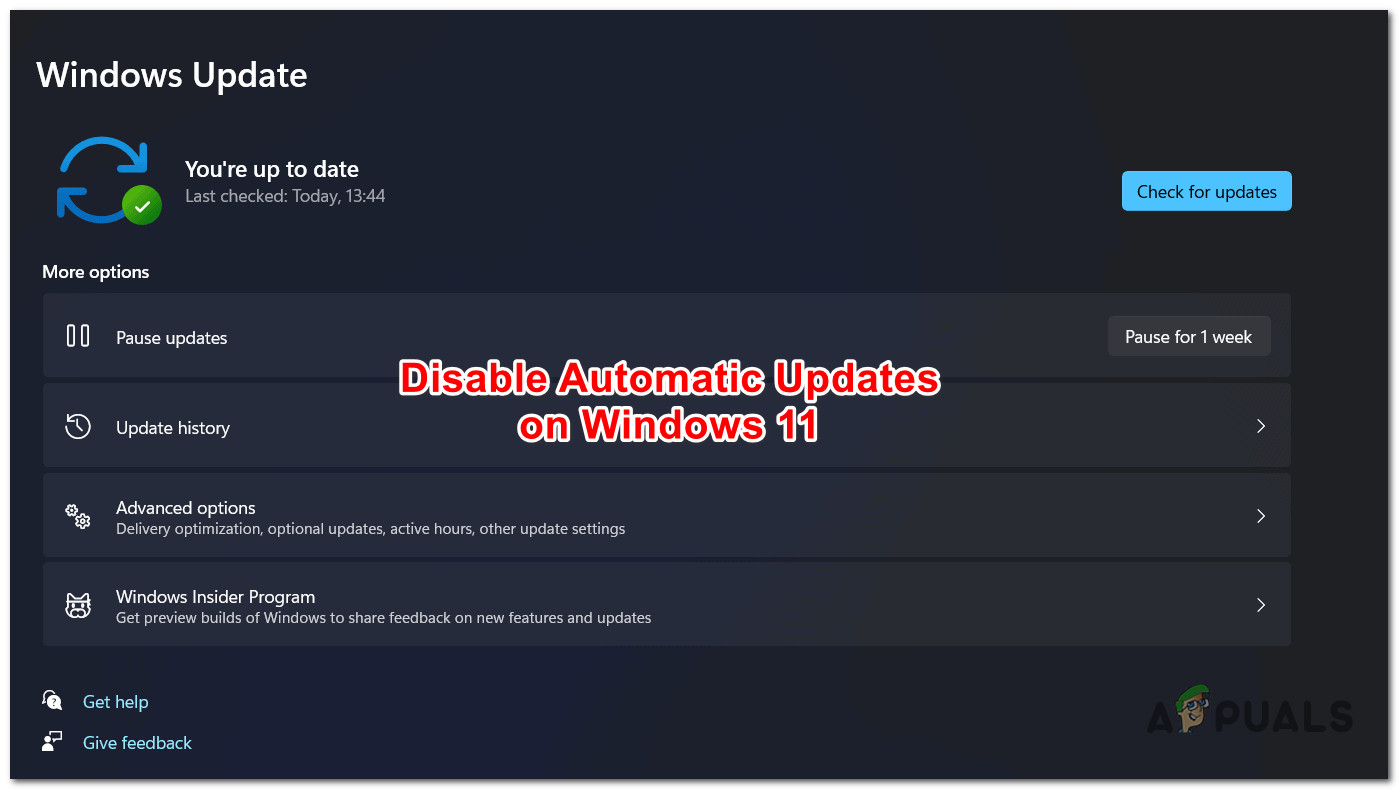
How to Pause Windows 11 Update Temporarily
If you’re only looking for a temporary solution of preventing new Windows Updates from getting installed for Windows 11, the ideal way to do it is by pausing them from the Windows Update page.
As of now, you can use the Windows Update page to pause the update for up to 7 days – But keep in mind that after this time period is over, Windows will automatically download and install all the pending updates.
Again, this is not a permanent solution and should not be regarded as such, but it’s perfect for situations where you’re traveling or working on a restricted Internet connection and you can’t afford the extra bandwidth usage.
Follow the instructions below to learn how to temporarily pause the updates on Windows 11:
- Press Windows key + I to open up the Settings screen of Windows 11.
- Once you’re inside the Settings screen, use the vertical menu on the left-hand side to click on Windows Update.

Opening up the Windows Updates settings - Once you’re inside the Windows Update settings, move over to the right-hand side menu and click on the Pause for 1-week button. It should be located directly under the list of cumulative updates that are pending.

Pausing the updates Note: If you ever want to resume the installation of the pending updates before 7 days pass, click on Resume updates at the top of the screen.
If you’re looking for a more permanent solution, move down to the next potential fix below.
How to Disable Windows 11 Updates by disabling the main WU service
If you’re looking for a permanent solution that will prevent your OS from installing pending updates on your PC indefinitely, one way to do it is to disable the main Windows Update service via the Services screen.
This is an elegant solution since you can always go back and re-enable the WU service thus resuming the installation of pending updates.
However, keep in mind that disabling this service will also affect other components that rely on it. For example, you can’t expect to perform a DISM scan successfully while the Windows Update service is disabled since your OS will have no way of downloading healthy system file equivalents to replace file corruption.
If you plan on disabling the main Windows Update service and you understand the consequences, follow the instructions below:
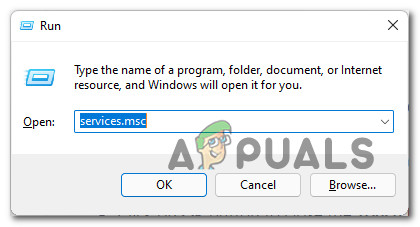
- Press Windows key + R to open up a Run dialog box. Inside the text box, type ‘service.msc’ and press Enter to open up the Services screen on WIndows 11. When you’re prompted by the User Account Control, click Yes to grant admin access.
Opening the Services screen - Once you’re inside the Services utility, move over to the menu on the right, then scroll down through the list of services and locate the main Windows Update service.
- After you locate the correct service, right-click on it and choose Properties from the context menu

Open up the Windows Update screen - Next, from the Windows Update Properties screen, select the General tab from the ribbon at the top, then change the drop-down menu of Startup type to Disabled.
- Finally, click the Stop button directly below to effectively stop the main Windows Update service.
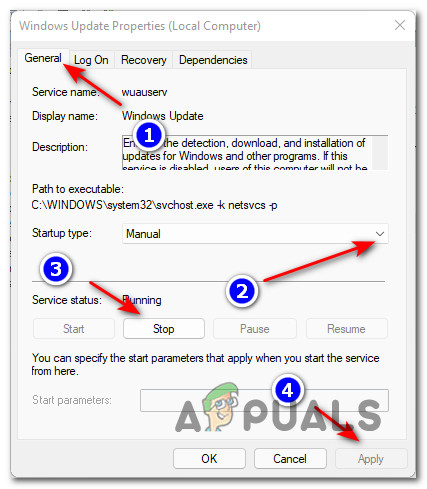
Disabling Windows Update via the Services screen - Click on Apply to make the changes permanent.
Set up a Metered Connection in order to Stop Windows Updates
A metered connection is great for saving bandwidth, but it’s also great for limiting the download of new Windows Updates. If you enforce a restriction on the amount of data your OS is allowed to download using Wi-Fi, you will be effectively preventing your current Windows 11 build from getting updated.
Note: A metered connection will restrict automatic updates on your system, but only if you are connected to the Internet via Wi-Fi.
If you’re using Wi-Fi to connect to the internet and you want to disable Windows Updates, this is probably the most elegant solution out of the bunch since you won’t need to disable the main Windows Update service or impose other kinds of restrictions.
In case this method serves your purpose, follow the steps below to set up a metered connection on Windows 11 that stops new WU updates from installing:
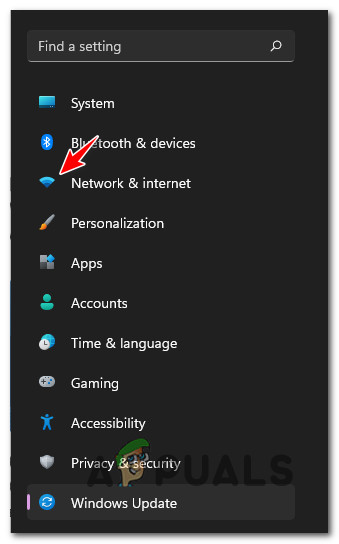
- Press Windows + I to open up the main Settings screen of Windows 11.
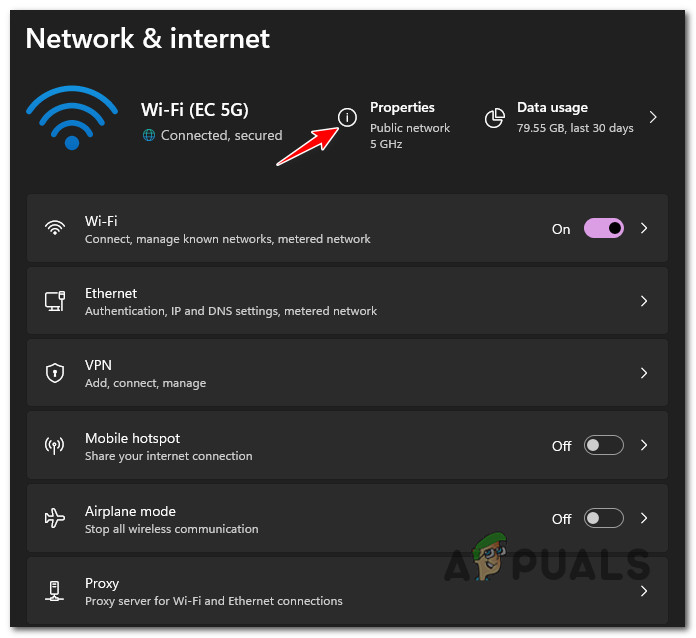
- Next, use the vertical menu on the left to click on Network & Internet.
Open up the Network and Internet screen - With the Network & internet tab selected, move over to the right-hand side section and click on Properties from the top of the screen.
Accessing the Properties screen of your Wi-Fi Connection - Once you’re inside the Properties screen, enable the toggle associated with Metered Connection.
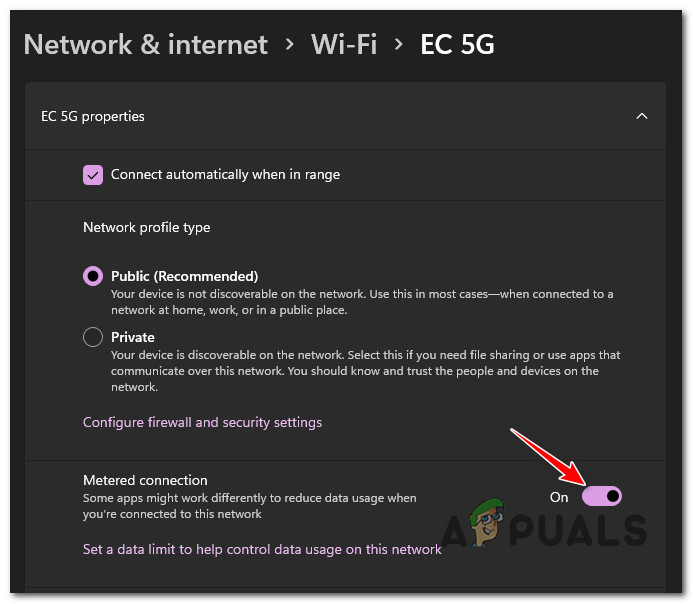
Setting up a Metered Connection on Windows 11
How to Disable Automatic Windows Update via Registry Editor
If you’re a technical kind of guy, you can also turn the automatic updates on Windows 11 by doing some registry tweaks via Registry Editor.
This method involves creating a new registry key containing a NoAutoUpdate value that will effectively prevent the Windows Update component from installing any new pending updates.
Important: However, before you get started with this method, understand that following the steps below incorrectly might break certain components of your Windows 11 installation. Our recommendation is to create a registry backup before following the instructions below. This way, in case anything goes wrong, you can easily restore it.
If you’re ready to enforce this registry tweak and you understand the consequences, follow the instructions below:
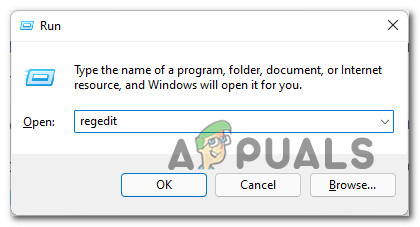
- Press Windows key + R to open up a Run dialog box. Next, type ‘regedit’ inside the text box and press Ctrl + Shift + Enter to open up the Registry Editor with administrative access.
Opening up the Registry Editor - When you’re prompted by the User Account Control, click Yes to grant administrative privileges.
- Once you’re inside the Registry Editor, use the menu on the left to navigate to the following path:
HKEY_LOCAL_MACHINE\SOFTWARE\Policies\Microsoft\Windows
Note: You can either navigate to this location manually or you can paste the full path in the navigation bar and hit Enter to arrive there instantly.
- Next, right-click on the Windows folder, then choose New > Key from the context menu that just appeared.
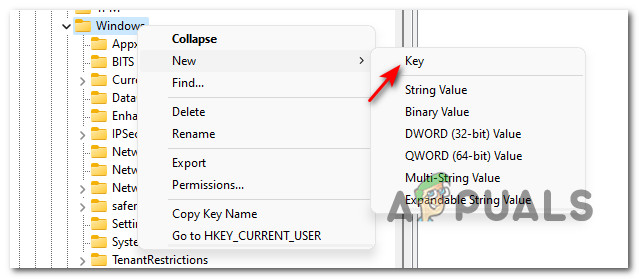
Creating a new key - Next, name the newly created key as WindowsUpdate, then press Enter to save the changes.
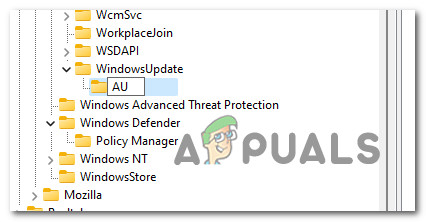
- Once the WindowsUpdate key is created, right-click on it and choose Key > New from the context menu.
- Next, name the newly created key as AU and press Enter to save the changes.
Creating the new AU key - After the AU key has been created, right-click on it and choose New > DWORD (32-bit) Value from the context menu that just appeared.
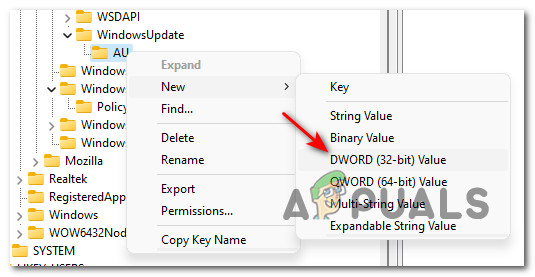
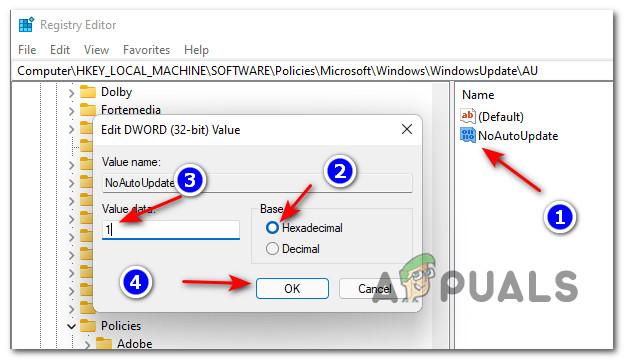
Creating a new DWORD inside the AU key - Next, name the newly created registry value to NoAutoUpdate.
- Double-click on NoAutoUpdate from the right-hand pane and set the Base to Hexadecimal and the Value data to 1 before clicking Ok to save the changes.
Stopping Windows Update via Registry Editor - Once these modifications have been made, close Registry Editor and reboot your computer to allow the changes to take effect.
- At the next system startup, automatic updates will be disabled on your system. If you ever want to enable them again, simply delete all the keys that you previously created above along with their associated values.
If you’re looking for a different way of stopping pending Windows 11 updates from installing, move down to the next method below.
How to Disable Windows 11 Updates via the Local Group Policy Editor
If the Local Group Policy Editor is available on your Windows 11 version, you can also use a Group Policy to explicitly prevent new Windows updates from getting installed on your PC.
Important: Windows 11 Home won’t have the Local Group Policy Editor installed by default. In this case, you can install the Gpedit.msc utility manually on Windows 11 Home or you can upgrade to Windows 11 PRO, Windows 11 Enterprise, or Windows 11 Education.
If you meet the requirements to run this utility and you have no issues with enforcing a local policy to prevent new Windows updates from installing, follow the instructions below to access and use the Local Group Policy editor to disable Automatic Windows Updates on Windows 11:
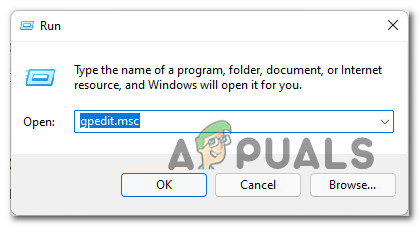
- Press Windows key + R to open up a Run dialog box. Once you’re inside the Run text box, type ‘gpedit.msc’ inside and press Enter to open up the Local Group Policy Editor.
Open up the Gpedit Utility - Once you’re prompted by the User Account Control, click Yes to grant administrative privileges.
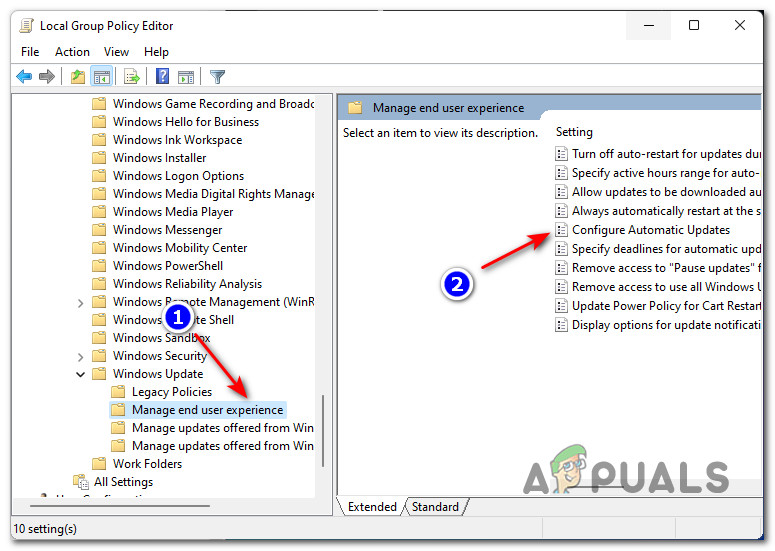
- After you make your way to the root Group Policy Editor location, use the menu on the left to navigate to the following location:
Computer Configuration > Administrative Templates > Windows Components > Windows Update > Manage end user experience
- After you arrive at the correct location, move over to the right-hand side and double-click on Configure Windows Updates.
Configure Windows Updates policy - Next, once you’re inside the Configure Automatic Updates screen, change the current status of the policy from Not Configured to Disabled and click on Apply to save the changes.
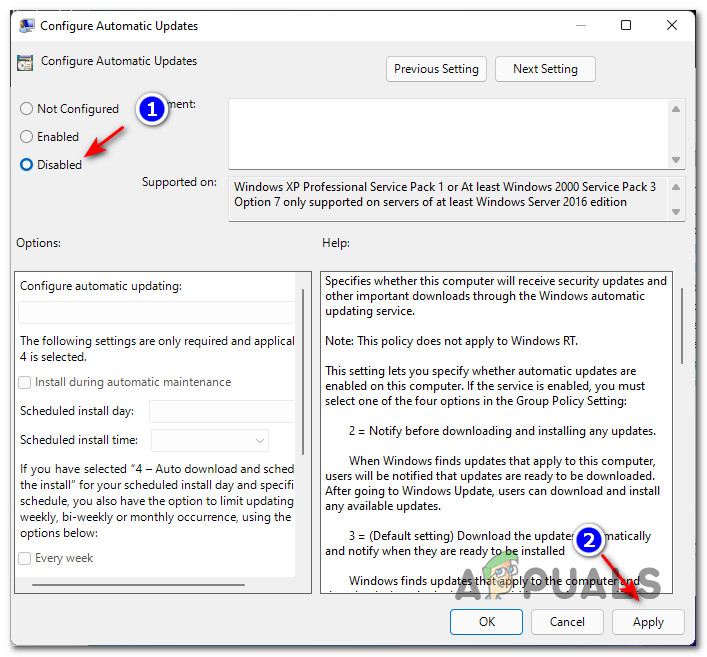
Disabling Automatic Updates for Windows 11 via Gpedit - Reboot your Windows 11 PC to enforce the policy that prevents pending updates from installing on Windows 11.
How to Use a 3rd party utility to block Windows 11 Updates
If you don’t mind allowing a 3rd party tools to stop the installation of pending Windows 11 updates for you, there’s also a myriad of free options that you can use to stop automatic system updates.
A simple google search will provide you with plenty of options, but if you want an option that we tested ourselves, we recommend using the Windows Update & Defender Blocker tool – This freeware will allow you to block all the Automatic Windows Update services with a single click on Windows 11.
Note: And if you ever want to revert back to standard update installation behavior, the reverting operation is just as easy.
Follow the instructions below to use a 3rd party utility (Windows Update & Defender blocker) to block Windows 11 updates:
Important: This tool was originally created for Windows 10, but works just as well for Windows 11.
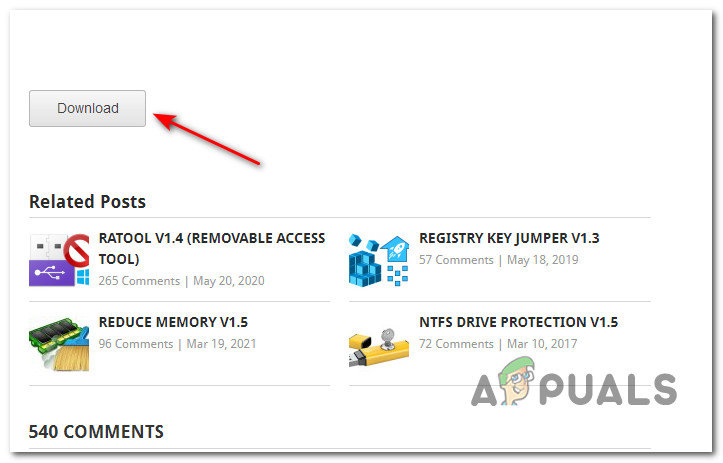
- Open your favorite browser and download the latest version Windows Update blocker from the official page.
- Once you’re on the download page, scroll all the way down to the bottom of the post and click on the Download button to download the utility’s installer.
Download the Windows Update Blocker utility - Once the archive is downloaded, extract the contents of it in a convenient location, then double-click on the Wub_x64 executable.

Opening the Windows Update Blocker executable - At the User Account Control prompt, click Yes to grant admin access.
- Once you’re inside the Windows Update Blocker screen, select the Disable Updates toggle and click on Apply Now to enforce the changes.
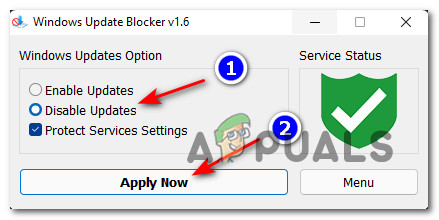
Disable Windows Update Services Note: Leave the box associated with Protect Services Settings enabled.
- Restart your changes and see how your Windows 11 OS is prevented from installing any pending Windows 11 updates on your PC.


