How to Disable Accelerated GPU Scheduling on Windows 11
Generally, it’s a good idea to keep the Accelerated GPU Scheduling enabled if you have a PC that supports it since it will improve the performance when running applications and games. However, there are also situations where this feature does more bad than good, crashing certain applications that aren’t designed to take advantage of hardware acceleration.
What is a hardware-accelerated GPU?
The Hardware-Accelerated GPU Scheduling feature allows your graphics card to manage its own video memory, instead of the operation system. It reduces the latency and improves the PC’s performance.
The feature was first added to Windows 10, now is also available on Windows 11. However, only the computers with GPUs that support Hardware Acceleration Scheduling can use this feature.
Note: If your current PC configuration is not equipped to support this feature, you won’t be able to enable or disable this feature.
How to disable hardware-accelerated GPU scheduling on Windows 11
The Hardware-Accelerated GPU Scheduling feature can be simply disabled from Settings, but you can also turn it off by making some modifications to the Registry Editor.
Depending on your preferred approach of doing under Windows, follow one of the following guides in order to disable hardware-accelerated GPU on your Windows 11 computer.
Note: Regardless of the method that you go for, you will need to be signed in with an admin account in order to be able to turn off hardware-accelerated GPU scheduling on Windows 11.
1. Disable Hardware Accelerated GPU Scheduling in Settings
If you want the easiest method out of the bunch, this is the best way of disabling the hardware-accelerated GPU feature on Windows 11. You can do this by accessing the Settings screen and disabling the graphics feature directly from the Graphics menu (under Display).
Follow the instructions below for the complete steps of disabling hardware-accelerated GPU from the settings menu:
- Right-click on the Start button located in the taskbar, then click on Settings.
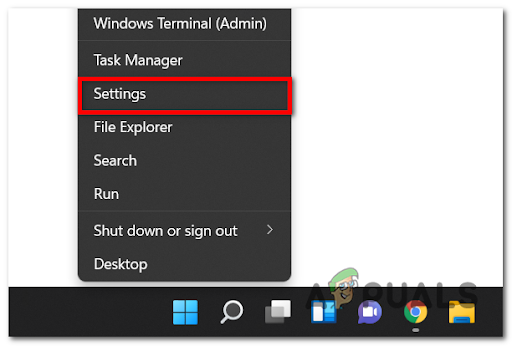
Open up the Settings screen Note: Additionally, you can press Windows key + I to open up the Settings screen automatically.
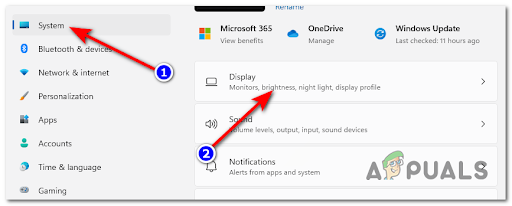
- Inside the Settings menu, click on System from the left-side list, then access Display.
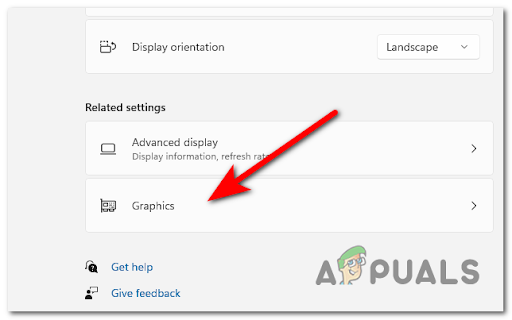
Accessing the Display menu - After that, scroll down through the Display menu until you find Graphics (under Related settings), then click on it.
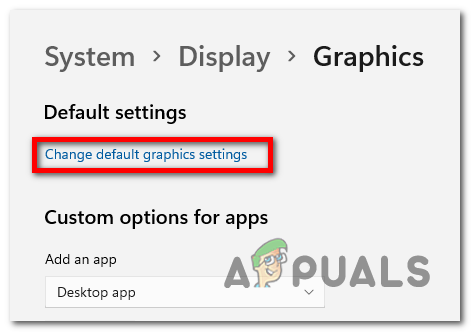
Accessing the Graphics settings on Windows 11 - Once you’re finally inside the Graphics menu, click on Change default graphics settings (under Default settings).
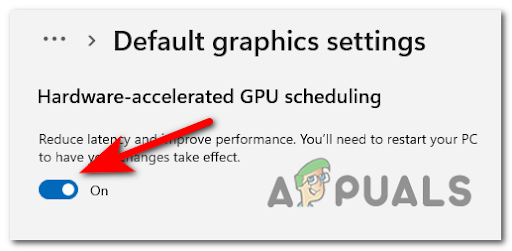
Changing the default graphics settings - Finally, disable the toggle associated with Hardware-accelerated GPU scheduling in order to disable this feature.

Disable hardware-accelerated GPU Note: If you don’t see this option on your computer, it’s because your PC doesn’t support Hardware-accelerated GPU scheduling.
- Now that hardware acceleration has been successfully disabled, reboot your computer before repeating the action that was causing an issue with hardware acceleration.
2. Disable Hardware Accelerated GPU Scheduling using Registry Editor
If you consider yourself a technical Windows user, you might want to do this modification by modifying the Registry so that Hardware Accelerated GPU Scheduling stays disabled regardless of the modifications that you end up doing from the Settings menu.
This modification ca be operated by accessing the GraphicsDriver key (under Control) and modifying a value named HwSchMode depending if you want Hardware Accelerated GPU Scheduling disabled or enabled.
Follow the instructions below to disable hardware-accelerated GPU scheduling via Registry Editor:
- Press Windows key + R to open up a Run dialog box. Next, type ‘regedit’ inside the text box and press Ctrl + Shift + Enter to open up the Registry Editor with administrative access.
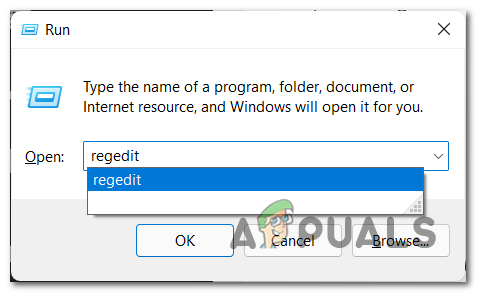
Accessing the Registry Editor Note: When you’re prompted by the User Account Control, click Yes to grant admin access.
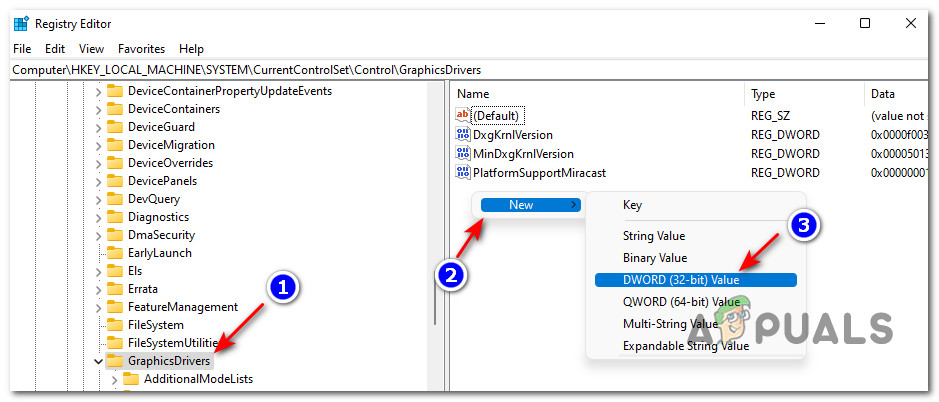
- Once you’re inside an elevated Registry Editor window, use the menu on the left to navigate to the following location:
HKEY_LOCAL_MACHINE\SYSTEM\CurrentControlSet\Control\GraphicsDrivers
Note: You can either navigate to this location manually or you can paste the location directly into the navigation bar and press Enter to get there instantly.
- Once you get to the correct location, ensure that GraphicsDrivers is selected from the left, then move over to the right pane, right-click on an empty space and select New > Dword (32-bit) Value.
Creating a new DWORD value - Next, name the newly created value HwSchMode by right-clicking on it and choosing Rename from the context menu.
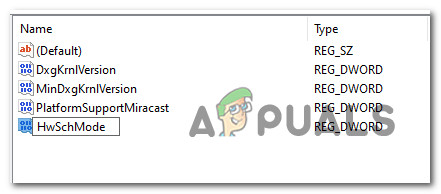
Creating the HwSchMode value - Next, double-click on HwSchMode value, set the Base to Hexadecimal, and the Value data to 0 in order to disable Hardware-Accelerated GPU Scheduling.
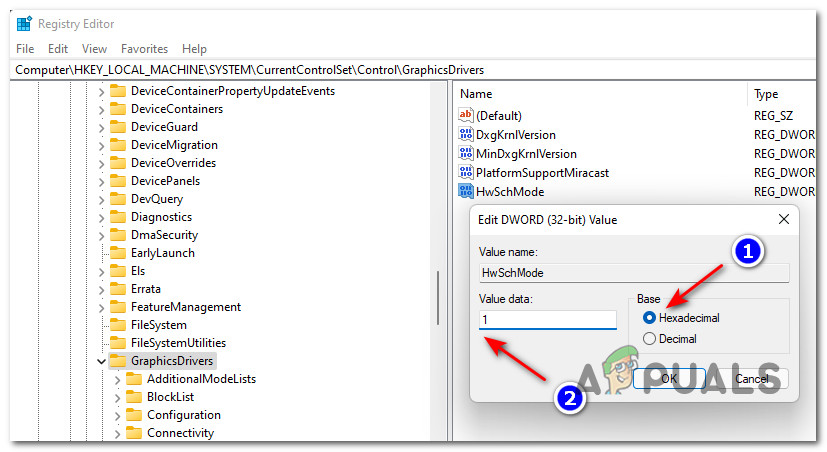
Disabling hardware acceleration via Registry Editor Note: If hardware acceleration is currently disabled and you want to enable it, set the value data to 1 before clicking Ok to save the changes.
- Once you have successfully saved the changes, reboot your computer in order to enforce the changes and make them permanent.


