How to Customize OEM Support Information in Windows 10?
The OEM (Original Equipment Manufacturer) information in the Windows includes the details about the vendor from which you purchased the PC. It includes the manufacturer, model, logo, support phone, support hours, and support URL for the computer. A PC purchased from a vendor will already have all the information related to that vendor. However, you can add or edit the OEM Information on your computer. In this article, we will show you the method through which you can add or edit the information about your system.
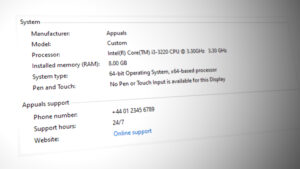
If the PC is custom built, then you can add your own support information. Most organizations would simply add their own information on the computer. There are also users who would just want to add their own names on their personal computers for fun.
Customizing the OEM Information through Registry Editor
The OEM information can be customized by using the Registry Editor. The Windows Registry includes all the information related to the operating system, hardware, and applications. It requires some technical steps to create the missing key or value for the setting. If the information is already available on your system, then you can simply edit it. If it isn’t available, then you can add the information by following the below steps.
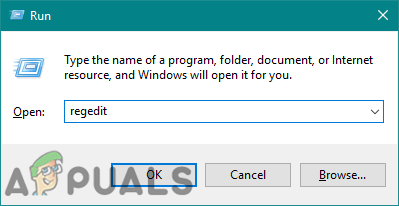
- Hold the Windows key and then press R to open the Run command box. Now type “regedit” and press the Enter key to open the Registry Editor. You will get prompted by UAC (User Account Control), choose the Yes button for it.
Opening the Registry Editor - You can create a backup before making any new changes in the Registry. Click on the File menu in the menu bar and choose the Export option. Name the file and choose the location. Now click on the Save button to create the backup.
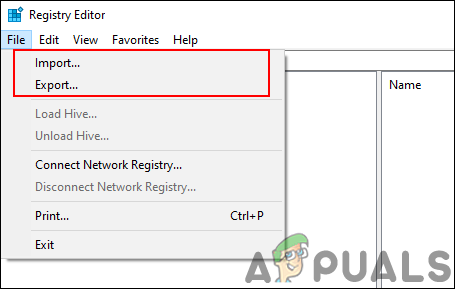
Creating a Registry backup Note: You can always recover a backup by clicking on the File > Import option. Then, select the backup file that you previously created.
- Navigate to the following path in the Registry Editor window:
HKEY_LOCAL_MACHINE\SOFTWARE\Microsoft\Windows\CurrentVersion\OEMInformation
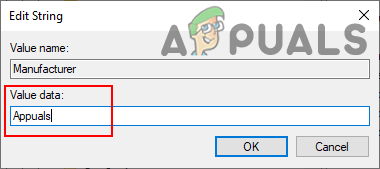
- To add a manufacturer name, right-click on the right pane and choose the New > String Value option. Name the value as “Manufacturer“.
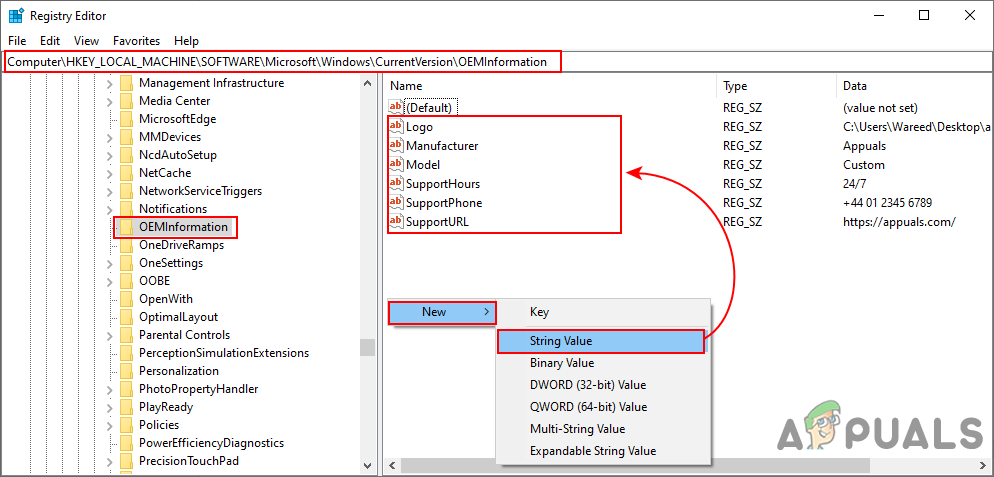
Creating new values in Registry - Double-click on the value to open it. Now type the Manufacturer name in the Value data.
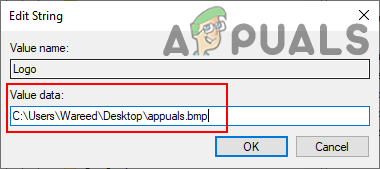
Adding the manufacturer name - If you want to add the logo, right-click on the right pane and choose the New > String Value option. Name this value as “Logo“.
- Double-click on the Logo value to open it. Now add the image path in the Value data as shown.
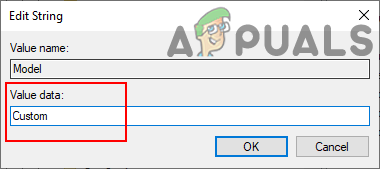
Adding the logo - To add the model’s name, right-click on the right pane and choose the New > String Value option. Name the value as “Model“.
- Now double-click on the Model value to open it. Change the Value data to the model’s name.
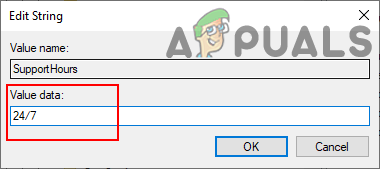
Adding the model name - If you want to list the support hours, right-click on the right pane and choose the New > String Value option. Name this value as the “SupportHours“.
- Double-click on the SupportHours value and change the Value data accordingly.
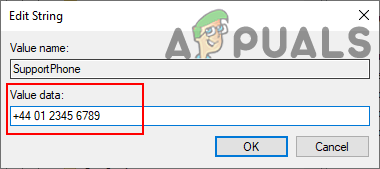
Adding the support hourse - You can also include your phone number by right-clicking on the right pane and choosing the New > String Value option. Name the value as “SupportPhone“.
- Double-click on the SupportPhone value and add the phone number in the Value data box.
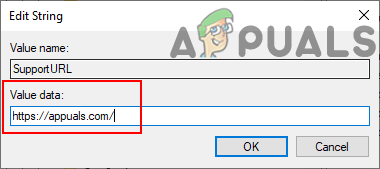
Adding the phone number - Finally, you can include the URL by right-clicking on the right pane and choosing the New > String Value option. Name the value as the “SupportURL“.
- Double-click on the SupportURL value to open it. Now add the URL of the site in the Value data area.
Adding the website URL - Now you can close the Registry Editor window. The changes will be applied instantly and you can view them. However, if it doesn’t apply, then you need to restart the system.
- You can revert back to default information only by removing all the created values from the Registry.


