How to Configure and Restore Server Backups to Cloud?
Accidents are bound to happen and there is nothing you can do about it. One day the hard drives are all fine and operational and the next day, you come to notice one of the storages malfunctioning and out of order. In some cases, the data stored inside the storages can be restored, however, there are still scenarios where the data inside is lost and inaccessible. This is where backups come in to help and get you through the obnoxious times. Creating a backup is in fact the only counter-strategy to such accidents or data loss. The importance of backup increases exponentially in networks both small and large. In case of a data loss, the network might cease to stop functioning properly because the lost data might have had config or other important files that are required by the devices or servers present in the network.
A server stores all of the significant files that are important to the smooth operation of the network. Every decision made in case of a network depends on the data, be it expanding the business or improving the quality of service provided. A simple hardware failure or a power outage can cause all the data to be lost. However, if you regularly backup your data, you have nothing to worry about because all you lost was a piece of hardware which can be easily replaced. The data stored inside, however, cannot be recovered unless you have a proper backup system in place to keep your data safe. Even after all these risks, server backups are often treated as secondary or low priority tasks.
1. What is Solarwinds Backup?
There are tons of backup software present that lets you backup your data, however, Solarwinds Backup tops the list. Backup by Solarwinds (download here) is a cloud based backup solution that offers extended functionalities as compared to other third-party backup solutions. With Backup, you can backup your data safely to a private Solarwinds cloud via your user account that you will create while signing up for a plan. The data centers are provided by hosting companies that ensure a 24/7 security system so that your data privacy can never be breached or compromised. Other than that, their data centers in various countries such as Australia, USA, UK, Germany and more are ISO and SOC certified which adds up to the security level provided and ensured by Solarwinds.
Solarwinds Backup enables you to configure backups to be initiated automatically per a specific schedule or frequency. The service comes in with built-in compression and deduplication capabilities so that you can even store large sums of data without having to compromise the integrity of the files. With the help of deduplication, you will be saved from the trouble of backing up the same files again mistakenly. To access the software, head over to the link provided above and then register yourself an account. You can avail the free trial provided by Solarwinds if you wish to evaluate the product for yourself. Once you have registered yourself, you can follow our backup your server guide that takes you through the initial steps.
2. Preparing Devices for Backup using the Backup Management Portal
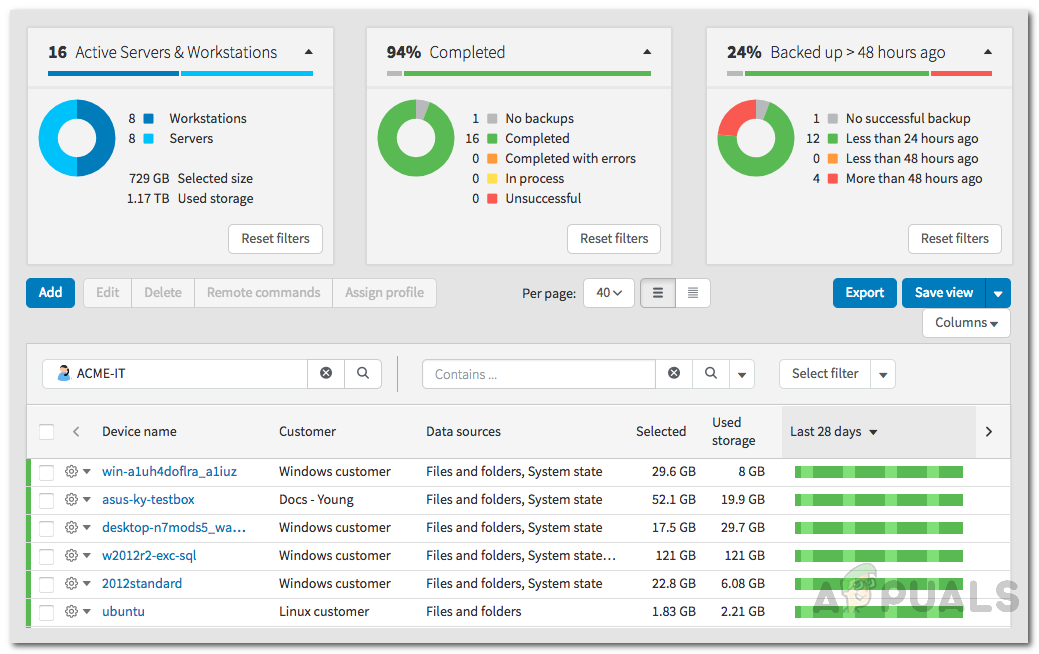
Once you have registered an account, you will be taken to the Backup Management Portal. Here, you can add devices to the portal so that you can backup your data to the cloud on those devices. To do this, follow the below guidelines:
- On the Backup Dashboard, click on the Add a device button. This will take you to the Add Wizard.
- Click Servers and Workstations from the options provided.
- After that, choose a customer from the drop-down menu and then select the device’s operating system.
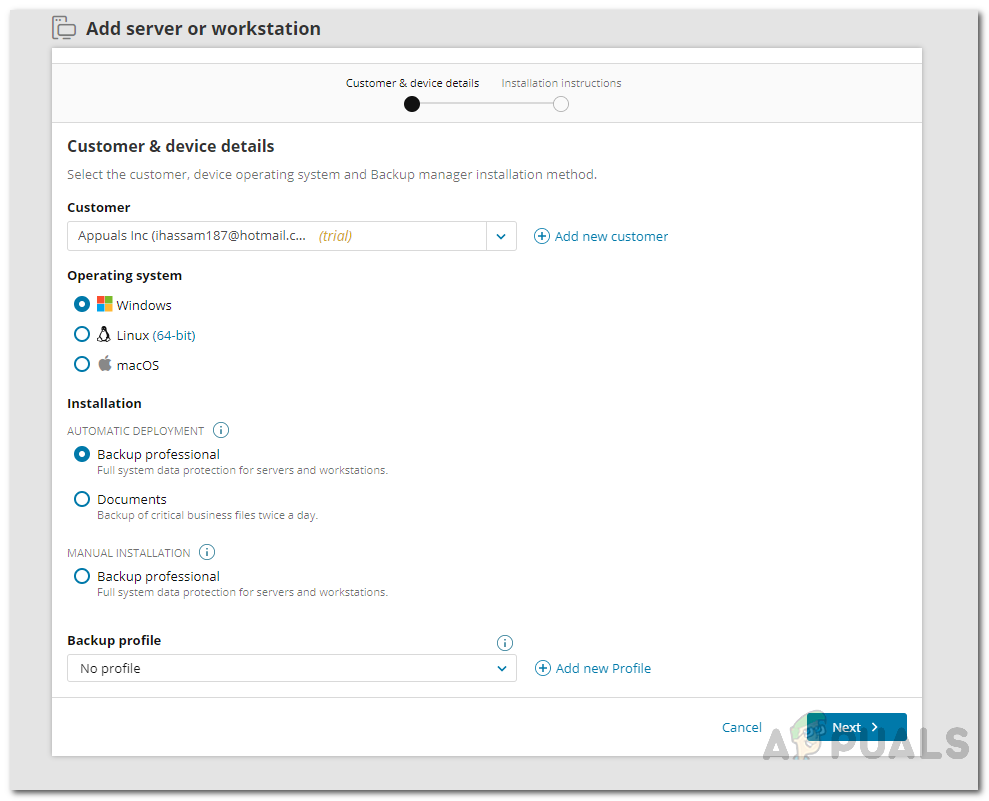
Add Wizard - Finally, choose the installation type per your needs and then click the Next button.
- Download the installer provided to the specific device.
3. Installing and Accessing Backup Manager
After you have downloaded the installer, you will have to install it on the device whose data you want to backup. This is pretty easy to do and we’ll be guiding you through it. So, let us begin.
3.1 For Windows/MacOS
To access the backup manager on your Windows or MacOS device, do the following:
- Run the downloaded installer. This will take you to a browse which you will have to go through a few steps.
- First of all, choose the language of the backup manager. Then, click Next.
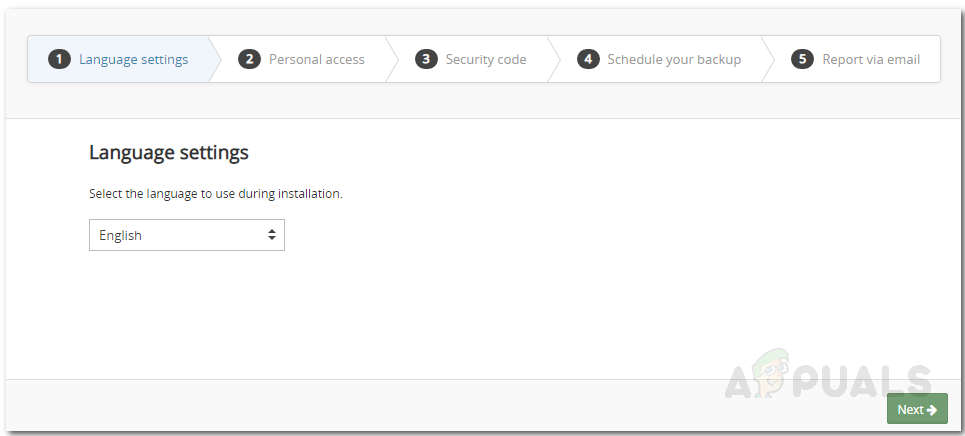
Selecting Language - After that, on Personal Access, provide your device name and the password.
- Then, provide a security code that will act as the encryption key. Make sure to save this code somewhere safe because if you lose this code you will not be able to access your data.
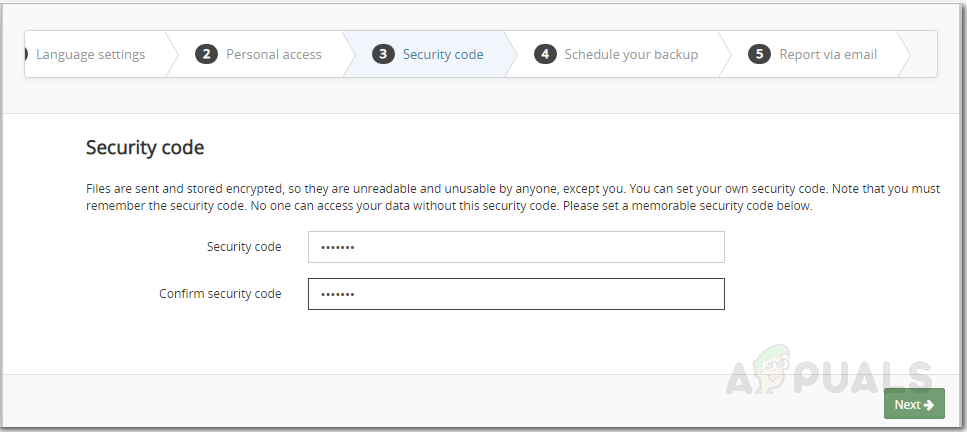
Security Code - Afterward, specify a time of your liking for the backup. Then, click Next.
- If you wish to be notified, you can provide an email address where the email alerts will be sent.
- Finally, click Next and wait for the service to be initialized.
3.2 For Linux
If you have a Linux device, the installation process will be different for you than the above process. The most convenient way of installing backup manager on a Linux device would be to use the RUN installer. It comes in two versions i.e. i386 which is for 32-bit systems and amd64 which is for 64-bit systems. Make sure to replace i686 in the link given below with x86_64 if you have a 64-bit system. You will require root permissions so make sure you have the password. To install backup manager, do the following:
- First of all, switch to the root user by entering the following command:
su
- After that, download the RUN installer per your system. Do not forget to change the i686 if you have a 64-bit system.
wget https://cdn.cloudbackup.management/maxdownloads/mxb-linux-i686.run
- Now, you will have to grant the installer execute permissions by entering the following command:
chmod +x mxb-linux-i686.run
- Finally, you will have to run the installer along with the installation parameters. Make sure to enclose the values that contain punctuation or spaces in quotation marks. Replace the user, password and encryption–key parameters with your own values.
./mxb-linux-i686.run -- --user="yourusername" --password="yourpassword" --encryption-key="yourKEY" --use-proxy=false
4. Configuring Schedule and Frequency-based Backups using the Backup Manager
In this article, we will be going over two ways of enabling backups or automating backups of your server. The first one is a schedule based backup in which the selected data is backed up per a provided schedule every time. The second option is known as frequency based backups in which the data is backed up on a specific frequency i.e. at a specified interval. Before we get into the automating part, let us first go through the part of selecting the data that you wish to backup in the first place.
Configuring Data Selection
Before you have the data automatically backed up, you will have to select the file that you wish to backup. This could be configuration files or any other important files that need to be backed up frequently. Here’s how to do it:
- Open up Backup Manager on the device where the data is stored.
- Go to the Backup tab.
- After that, click the Add button in front of the data source that you wish to back up.
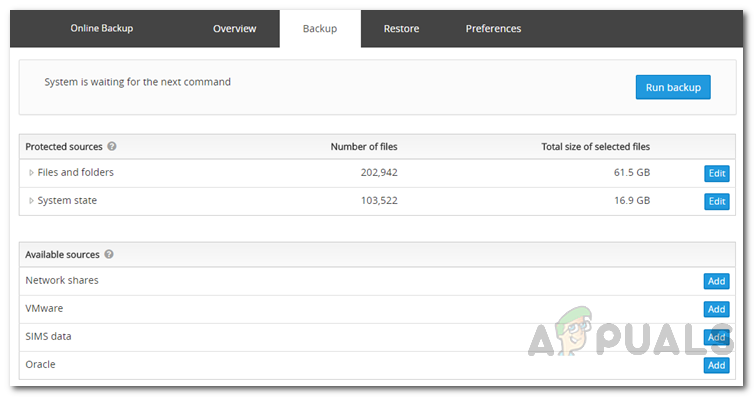
Choosing Data Source - Select the folders, files or components that you wish to back up depending on your selected data source.
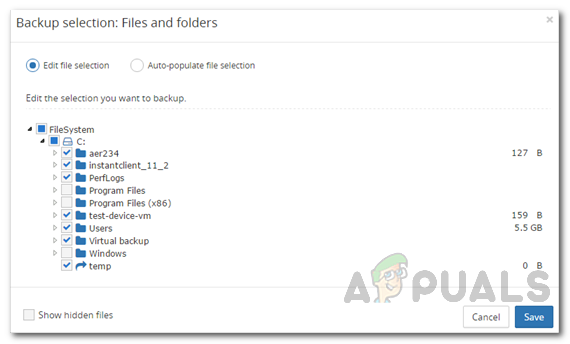
Choosing Data to Backup - After that, click the Save button and you are done with selecting the data for the back up.
4.1 Configuring Schedule-Based Backup
One of the most fitting ways to back up your data is to set a schedule at which the selected data is backed up automatically without requiring your intervention. You can create various schedules for a specific device for different data sources that run at contrasting times. Here is how to create a backup schedule:
- Launch the Backup Manager on the device you wish to backup data.
- Go to the Preferences tab and then on the left-hand side click on Schedule.
- Click the Add schedule button to create a new backup schedule.
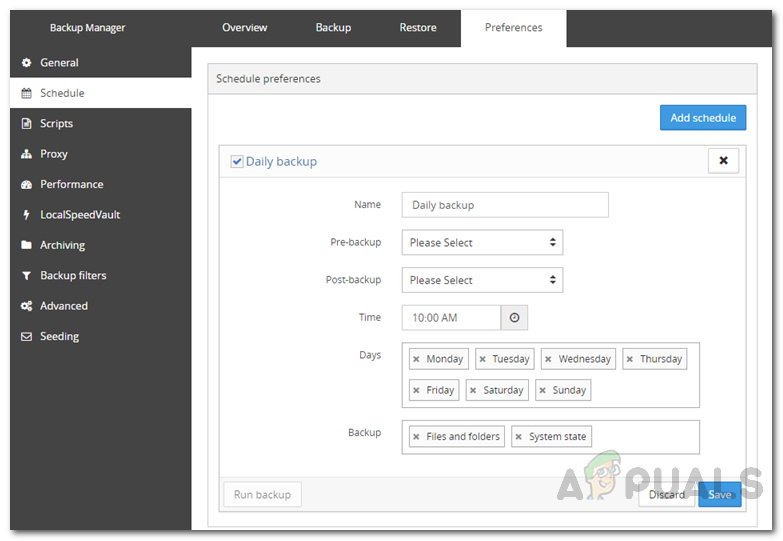
Creating Backup Schedule - Give the schedule a relevant name and then you can run scripts before the backup (Pre-backup) and after the backup (Post-backup) by choosing them from the given drop-down menus.
- After that, select the time of the backup and follow it up by choosing the days of the week on which the backup is to run.
- Finally, select the data sources to backup and then click the Save button.
4.2 Configuring Frequency-Based Backups
Configuring frequency based backup is different from schedule based. To be able to configure frequency based backups, you will have to create a backup profile and then assign the profile to the devices on which the data is stored. Here’s how to create a backup profile and then assign it to a backup device:
- First of all, login to your Backup Management console as a superuser.
- From the vertical menu present on the left, select Backup Profiles.
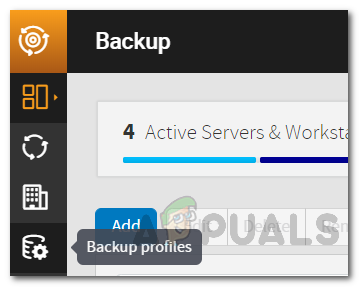
Backup Dashboard - Click the Add Profile button to create a new backup profile.
- Give the new profile a name and specify a customer to which it will be available. Click Add.
- After that, select Backup as the backup policy and configure the frequency of the backup. You can also change the additional settings per your needs.
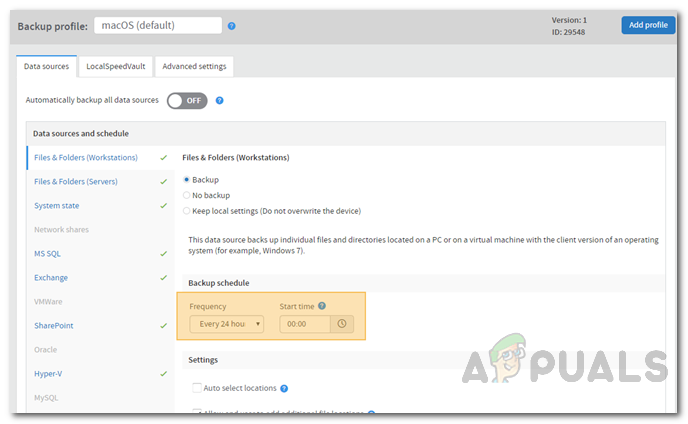
Backup Profile Configuration - Finally, click the Add Profile button to save the profile settings and add it to backup profiles.
- Head to the Device Management module to assign the profile to different devices.
- To assign the profile, click on the Assign button and then select Backup Profile.
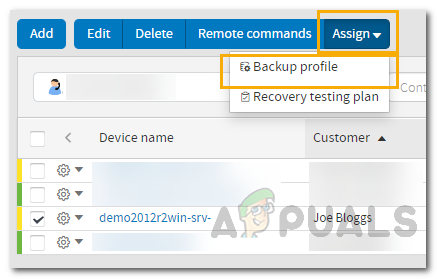
Assigning Backup Profile - After that, select the profile that you just created from the list provided and click Save.
5. How to Restore Server Backups?
Now that you have successfully created backups and automated them, you can restore any backup that you desire because what use are the backups if you are not going to restore them in future. A great feature here is mobility meaning you can backup data from a device and then have it restored to a different device. To do this, follow the below instructions:
- Open up the Backup Manager on the device you wish to recover the data to.
- Go to the Restore tab and then choose a data source from the left-hand menu.
- After that, select the backup that you wish to restore. An (A) next to the name of the backup session means that the data is archived. A (L) means the data is stored locally in the LocalSpeedVault and hasn’t been synchronized with the cloud yet.
- Specify a location to which you wish to restore the backup. If you wish to specify a new location, choose the Restore to new location option.
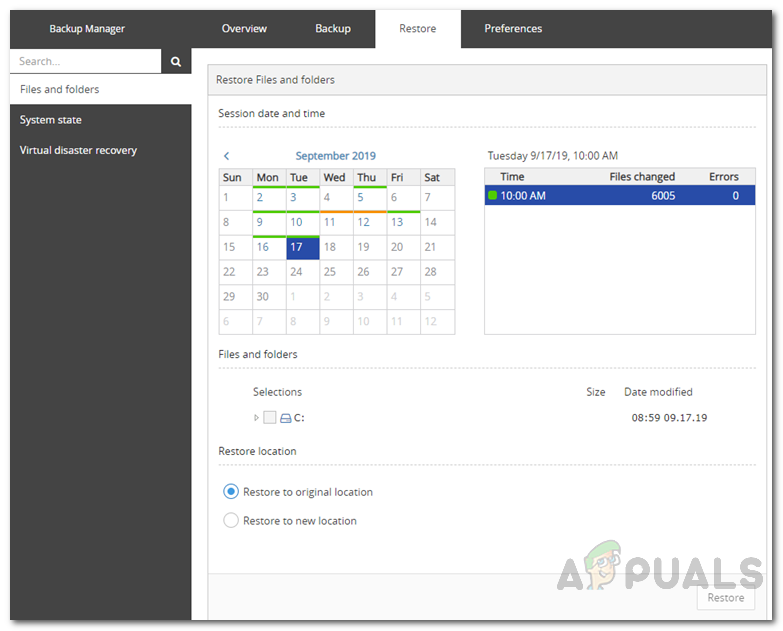
Restoring Backup - Finally, click the Restore button and then wait for the restore process to be completed. You can close the Backup Manager on your browser as the process will run in the background.


